Use Physical Server Folders for the WordPress Media Storage

The media library is one of the most important parts of a WordPress site as it has all the media that give life to your site, and, let’s be honest, a site is basically all media.
We should have our media library as organized as possible, that’s why we offer WP Media Folder, which also, now offers a good feature that will allow you to create physical folders, a really useful tool as it can be used, for example, for marketing purposes.
Let’s say we have a product and we want to make ads and another kind of stuff with the images that come from this product, now you can just go to your server installation via FTP and look for the media folder for that specific product(that’s why we should have our media library as organized as possible).
In this tutorial, we are going to show you how to use this new feature and make your site more professional, allowing you to have all your media files organized in your WordPress installation and, also, on your server.
Table Of Content
Manage WordPress real physical folders for media
Creating Folders for your WordPress Media Library
Now there are two cases, the first one if you have media folders already created, and the second one if you want to start creating folders and you don’t have created media folders yet, on both cases, you can activate the option and WP Media Folder will start creating physical folders.
We are going to show you first an installation where we have created already media folders using WP Media Folder.
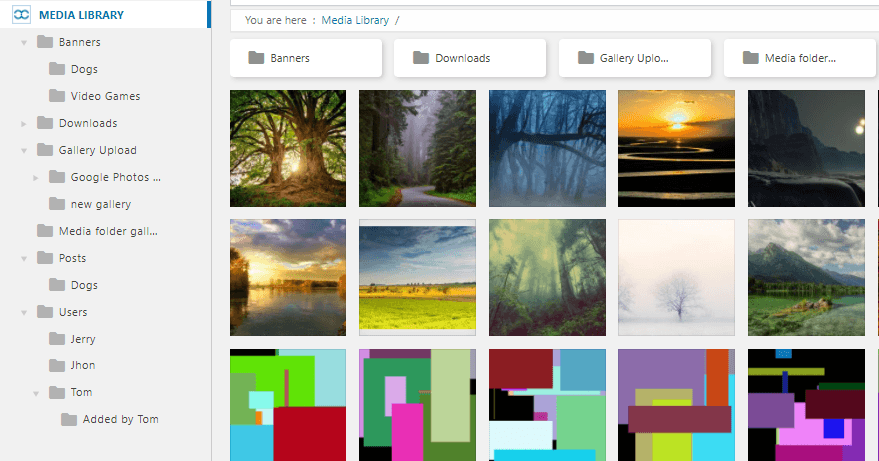
And the server looks like this.
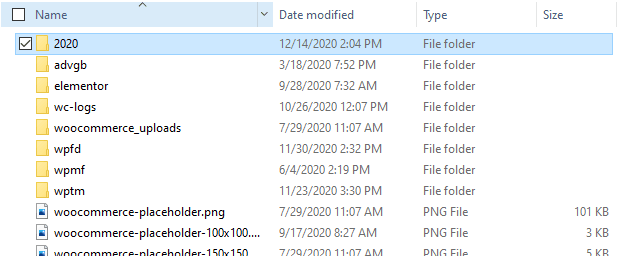
As you can see, it is the normal uploads/2020 path that WordPress has per default, now let’s change the settings to see the magic happen.
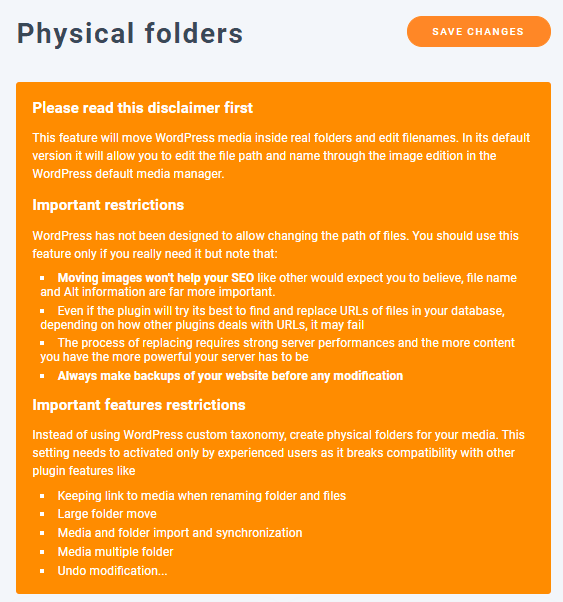
NOTE: Before start setting the physical folders, keep in mind the warning showed that WP Media Folder shows you:
First of all, we should keep in mind that this process could overload your server so, in order to avoid that, WP Media Folder has an option to control the background process.
For this, go to Settings > WP Media Folder > General > Advanced.
You’ll see an option called Background task speed, we should leave it at 50% or 25% if we want to make other changes to our site during the converting to physical folders task.
As an extra, we can turn on the Show Status Menu Bar option to see the process of the physical folder creation.
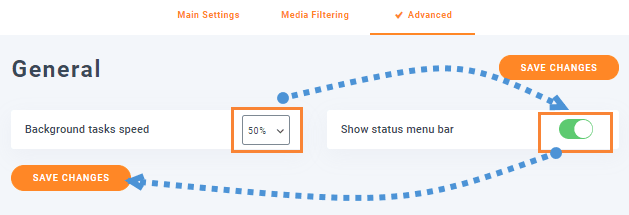
So, in this case, we are going to leave it at 50%, set the Show Status Menu Bar option, and continue with the creation of the physical folders.
To start, we are going to go to: Settings > WP Media Folder > Physical Folders.
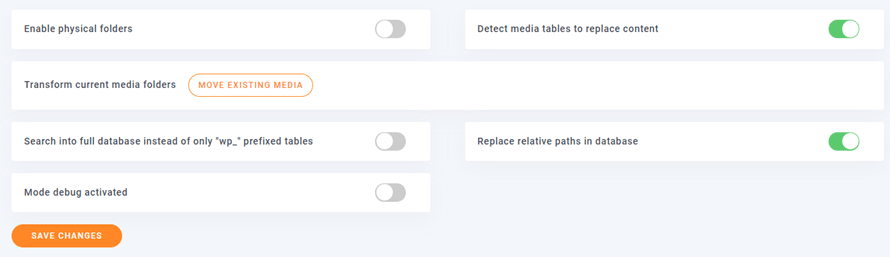
We are going to explain what is the function of each folder so you can select it carefully:
Enable physical folders: WARNING: Instead of using WordPress custom taxonomy, create physical folders for your media. Some features of the plugin will be disabled as they're not compatible with the setting! (Read more above).
Detect media tables to replace content: The plugin will auto-select the tables and columns where the replacement of attachments (media) URLs should proceed. This is the better option if you want to make sure to not lose replacements. Disable this option if you know what you’re doing and want to select custom data set to optimize the process.
Transform current media folders: Additionally to the folder creation as a physical folder, all the current folder structure, and media will be transformed as WordPress physical folders.
Search into full database instead of only "wp_" prefixed tables: If checked, the plugin will not only replace content in your wordpress tables but in all the tables it will find in the database. It could be useful if you use your attachment links in another cms or custom script. If you don't specifically need it, leave this option unchecked.
Replace relative paths in database: By default, WordPress uses absolutes urls, but some plugins may use relative paths. If checked, the plugin will try to replace also a relative path in the database, instead of only absolute urls. Replacements in the database may fail in particular cases (files with the same name) if this option is used while you're not using the default year/month upload folders option in WordPress settings.
Mode debug activated: When enabled, all actions made by the plugin will be stored in a log file in the plugin folder.
So basically as we are using a test site that doesn’t have a plugin that uses relative paths, and we are not using attachment links now custom scripts but we want to move our current media folders to physical folders, we are going to leave the setup like this:
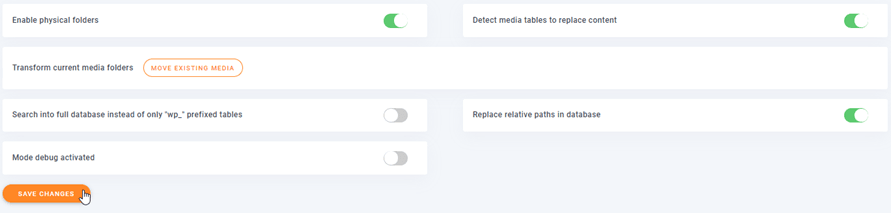
Now, finally, click on Save Changes and wait for the magic.
As we have set the status menu bar on the Advanced settings, we should be able to see the progress on the top bar for the conversion.
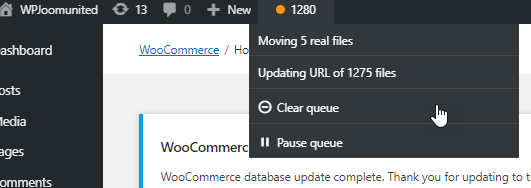
As you can see, we also have the option to cancel and pause the queue when we want.
The process is magic basically as you won’t have to move anything, it will be made in the background automatically so you can leave it running during the night for example.
Let’s make Physical this WordPress Media Folder Organizer
As you can see, this is a really useful tool so you are going to have your server and your media library organized at the same time, and you will be able to just copy/paste the folders from your server to your PC and it is going to be also organized :)
This is only one of all the features that WP Media Folder offers you to make your site as organized and professional as possible, for example, create awesome galleries with only 2 clicks so what are you waiting for? Go here and start your membership today.
When you subscribe to the blog, we will send you an e-mail when there are new updates on the site so you wouldn't miss them.


Comments