WordPress products
 Joomla products
 Support
 News
News Login
LoginHow to Configure WP Media Folder for Bunny Storage Offload and Faster Media Delivery

A growing WordPress media library can take up valuable hosting space and make your website harder to manage. WP Media Folder provides a simple way to move images, videos, PDFs, and other files to Bunny Storage while keeping them available in the familiar WordPress media library. Continue reading to learn how this integration can reduce server load and deliver your media faster to visitors around the world.
Bunny Storage keeps your website files outside your regular hosting account, while Bunny CDN helps deliver them through a global network. WP Media Folder connects both services to WordPress, automatically sends media to Bunny Storage, and updates file addresses so visitors receive them from Bunny CDN.
This guide explains how to configure WP Media Folder for Bunny Storage, move existing media, and create a faster and more scalable media setup without writing code.
Say goodbye to messy media library.
WP Media Folder lets you categorize files, sync folders with
cloud storage, create amazing galleries and even
replace images without breaking links.
Optimize your media workflow today
Table of content
- Why Use Bunny Storage and Bunny CDN for WordPress
- How WP Media Folder Connects WordPress to Bunny Storage
- What You Need Before Starting
- How Automatic URL Replacement Works
- How Bunny Storage Can Improve WordPress Performance
- Using WP Media Folder and Bunny Storage for Image-Heavy Sites
- Using WP Media Folder and Bunny Storage with WooCommerce
- Deliver WordPress Media Faster with WP Media Folder and Bunny Storage
Why Use Bunny Storage and Bunny CDN for WordPress
WordPress usually stores every uploaded file on the same server that runs your website. This includes blog images, product photos, videos, PDFs, and downloadable documents.
This setup is convenient at first, but a large media library can use significant hosting space. Your server must also deliver every file whenever someone visits a page, views a product, or downloads a document.
Bunny divides this work between two services:
- Bunny Storage keeps your media files in the cloud.
- Bunny CDN delivers those files to website visitors.

Bunny CDN uses a global network of locations to deliver content. Instead of every visitor requesting an image from your main hosting server, Bunny can provide the file through its delivery network.
This is especially useful for websites with visitors in different countries. Media can be delivered more efficiently without requiring you to move your entire WordPress website to another host.
How WP Media Folder Connects WordPress to Bunny Storage
WP Media Folder brings Bunny Storage offloading into the WordPress dashboard. The integration is available through the WP Media Folder Cloud Addon.
After the connection is complete, WP Media Folder can:
- Send new media uploads to Bunny Storage
- Move existing media to Bunny Storage
- Replace local file addresses automatically
- Remove media files from your hosting server
- Keep media organized inside WordPress
- Return files to local storage when necessary

You can continue uploading and selecting images through the regular WordPress media library. Editors, store managers, and content creators do not need to manage files directly from the Bunny dashboard.
WP Media Folder handles the connection behind the scenes while preserving a familiar WordPress workflow.
What You Need Before Starting
- A WordPress website
- WP Media Folder installed
- The WP Media Folder Cloud Addon installed
- An active Bunny account
- Permission to create Bunny Storage and Pull Zones
A Storage Zone is the cloud space where Bunny keeps your files.
A Pull Zone connects those stored files to Bunny CDN so they can be displayed on your website.
You will also use an Access Key. This is the private password that allows WP Media Folder to communicate securely with Bunny Storage.
It is recommended to create a website backup before moving a large existing media library.
Step 1: Create a Bunny Storage Zone
Sign in to your Bunny dashboard and open:
Delivery > Storage
Select Add Storage Zone and enter a descriptive name. A simple name connected to your website will make the zone easier to recognize later.
Choose the main storage region that best fits your website. According to the WP Media Folder documentation, you should select a region rather than leaving the default main storage region option unchanged.
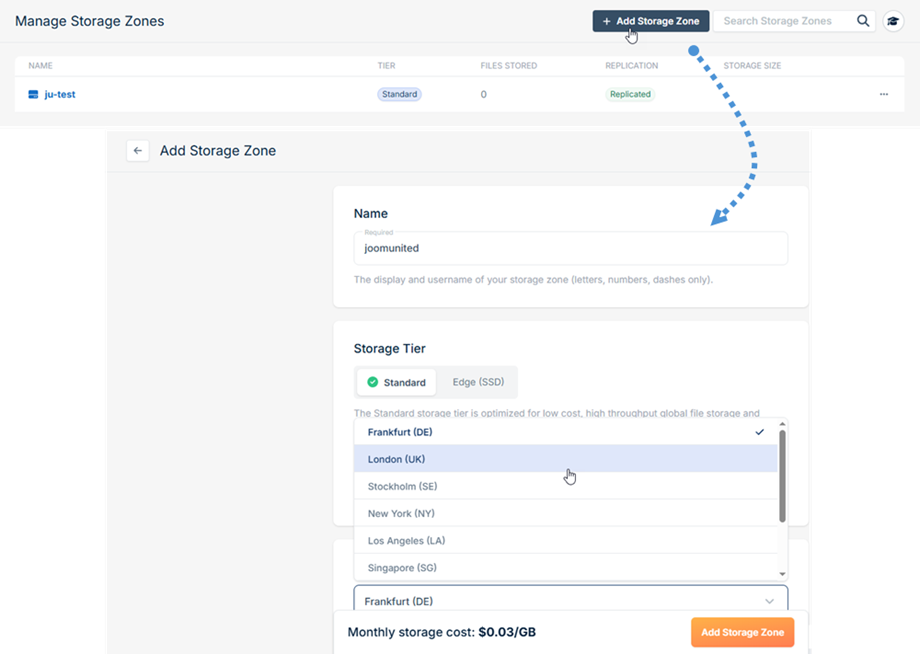
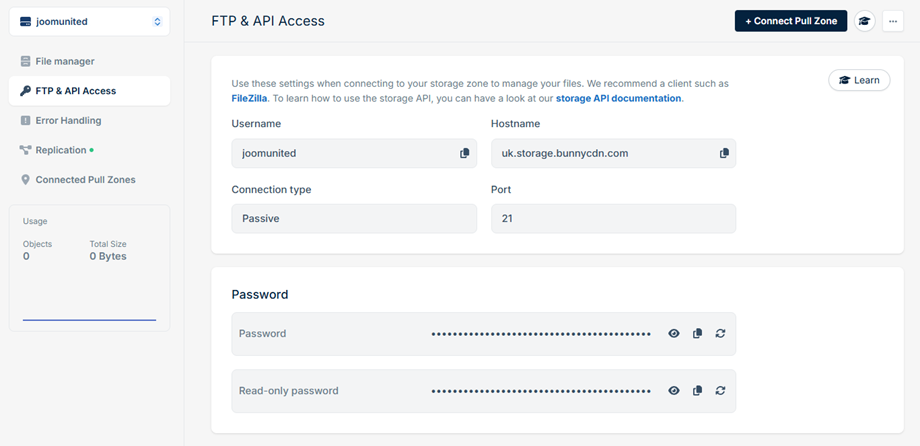
Create the Storage Zone and open its FTP & API Access section.
You will find three important details there:
- Storage Zone Name
- Hostname
- Password
The password shown by Bunny will be used as the Access Key inside the WP Media Folder.
Keep this information private. It provides access to the storage connection and should not be added to public pages or shared in screenshots.
Step 2: Connect a Bunny Pull Zone
The Storage Zone keeps your files, but you also need a Pull Zone to deliver those files through Bunny CDN.
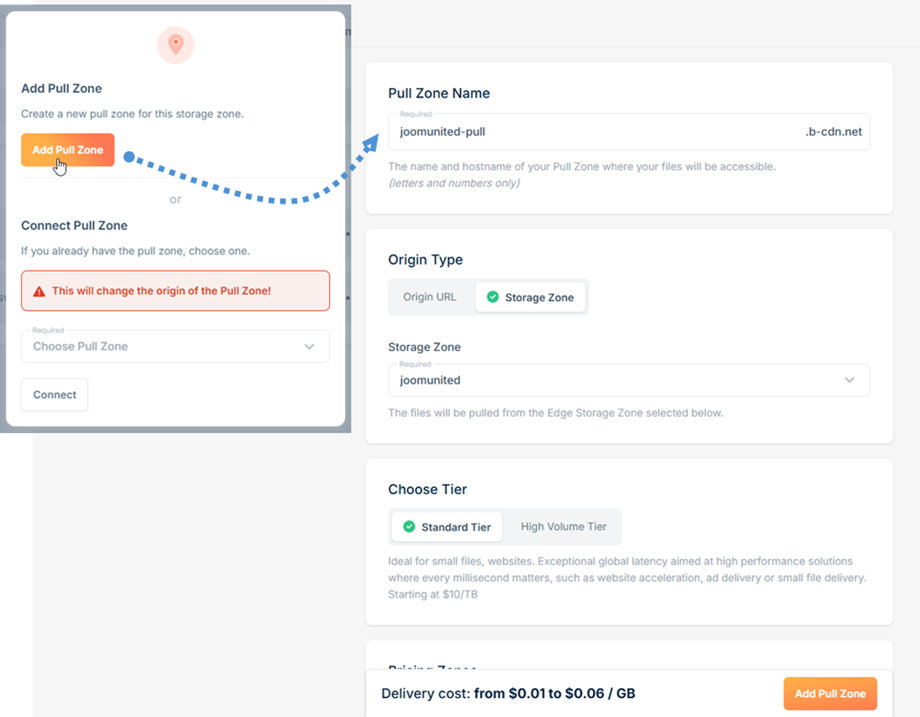
From your Storage Zone, select Connect Pull Zone.
You can connect an existing Pull Zone or create a new one. For a new setup, enter a name related to your website and complete the creation process.
The Pull Zone gives WP Media Folder the information needed to replace local WordPress media addresses with Bunny CDN addresses.
You do not need to understand the technical details of CDN routing. The important point is that the Storage Zone holds the files, while the Pull Zone delivers them to your visitors.
Step 3: Connect Bunny Storage to WP Media Folder
Return to the WordPress dashboard and open:
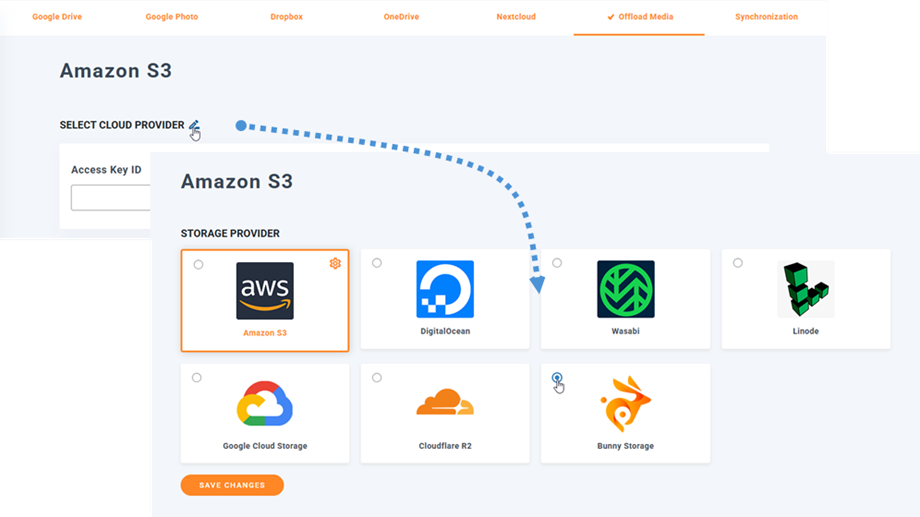
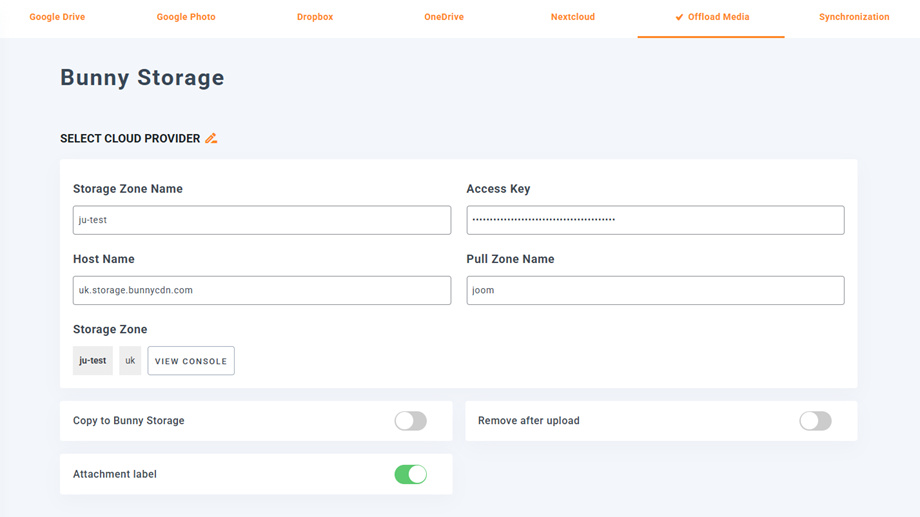
Settings > WP Media Folder > Cloud & Media Offload > Media Offload
Choose Bunny Storage from the available services.
Enter the information collected from the Bunny dashboard:
- Storage Zone Name
- Access Key
- Hostname
- Pull Zone Name
Make sure each value is entered exactly as it appears in Bunny. Even a small typing error or extra space can prevent the connection from working.
Save the settings. WP Media Folder should confirm that the connection was completed successfully.
If it does not connect, review the four values and confirm that the selected Pull Zone is connected to the correct Storage Zone.
Step 4: Send New Media to Bunny Storage
Once the connection works, enable Copy to Bunny Storage.
WP Media Folder will now send new files uploaded to the WordPress media library to your Bunny Storage Zone.
Start with a test image before moving the complete media library. Upload the image through WordPress, add it to a test page, and confirm that it displays correctly.
You should also verify that the file appears in your Bunny Storage Zone.
During this first test, keep the original file on your hosting server. This gives you a local copy while you confirm that the Bunny connection and media delivery are working as expected.
Step 5: Move Existing WordPress Media
The Copy to Bunny Storage setting applies to new uploads. Files that were already in your WordPress media library must be moved separately.
Use the Synchronize Media option in WP Media Folder to send existing images and other files to Bunny Storage.
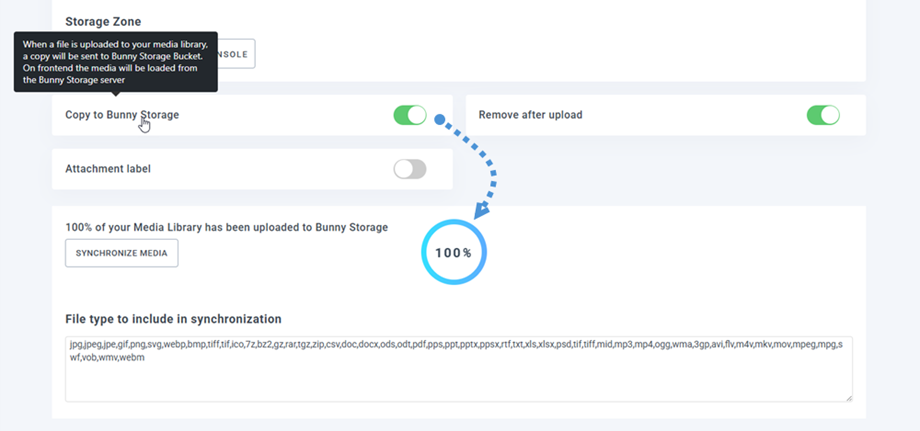
WP Media Folder also updates their file addresses. This means your existing posts, pages, galleries, and product listings can continue displaying the same media without requiring you to replace each file manually.
For a large website, run the synchronization during a quieter period. Moving many images and WordPress thumbnails can require additional processing while the transfer is running.
Step 6: Remove Media from Your Hosting Server
Copying files to Bunny Storage does not automatically free hosting space if the original versions remain on your server.
After testing the integration, you can enable Remove after upload.
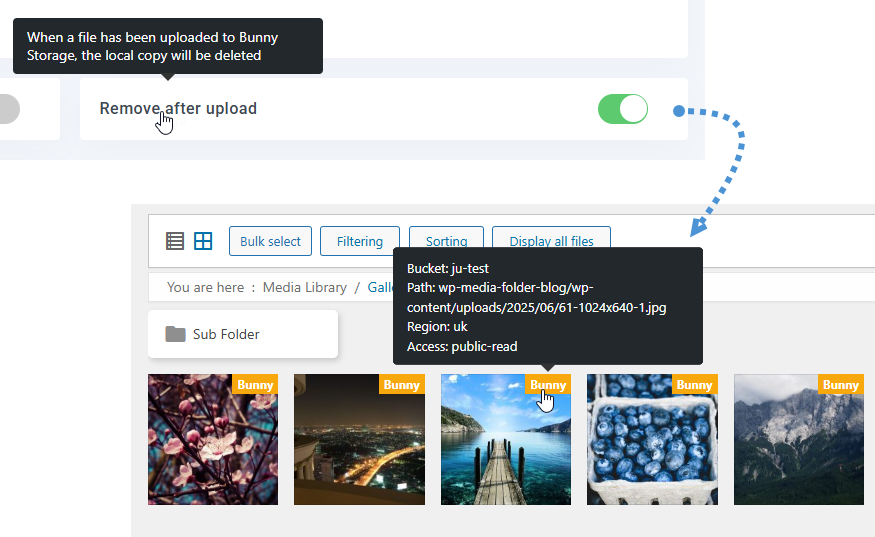
With this option active, WP Media Folder stores the media on Bunny Storage instead of keeping another copy on your WordPress hosting server.
This can help reduce:
- Hosting storage usage
- Website backup size
- Server bandwidth usage
- Pressure during busy traffic periods
The files will not disappear from the WordPress media library. WP Media Folder keeps the WordPress media entries available, even though the actual files are stored with Bunny.
How Automatic URL Replacement Works
WordPress media normally loads from your website's hosting address. After a file is offloaded, it needs to load from Bunny CDN instead.
WP Media Folder handles this change automatically.
Visitors will continue seeing the same images, galleries, product photos, and downloads. The difference is that the files are now delivered through Bunny rather than directly from your WordPress server.
You do not need to search through old pages and replace image links manually. WP Media Folder manages the new media addresses based on the Bunny Storage settings.
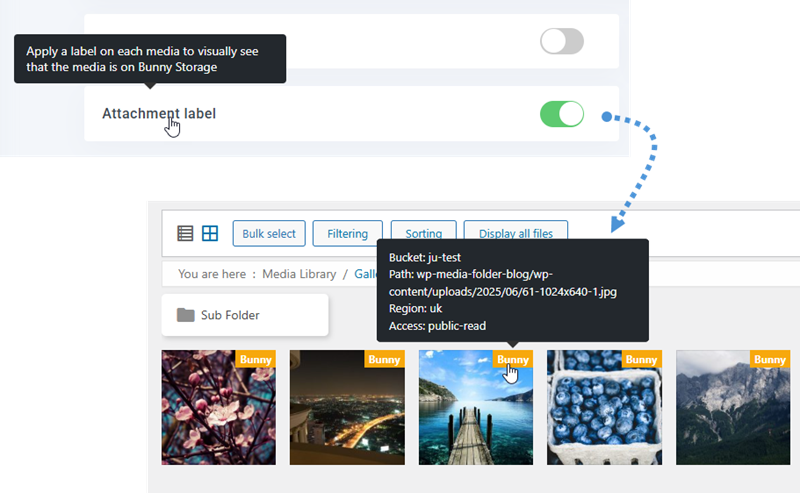
The plugin also includes an Attachment Label option. When enabled, administrators can identify media connected to Bunny Storage from the WordPress media library.
How Bunny Storage Can Improve WordPress Performance
Media files often represent a large part of a webpage. Product photos, featured images, galleries, and banners can all affect how quickly a page feels ready to use.
By moving media delivery to Bunny, your main server has fewer files to send. It can focus on loading WordPress pages, processing requests, and running the website's main features.
Bunny CDN can also deliver files through its global network, which may improve loading times for visitors located far from your hosting server.
The integration can provide:
- Faster global media delivery
- Less server storage pressure
- Better handling of traffic increases
- A more scalable media library
Media offloading should still be combined with good image practices. Upload appropriately sized images, compress large files, and use lazy loading when possible.
Bunny CDN improves how files are delivered, but an unnecessarily large image will still require more time to load than an optimized one.
Using WP Media Folder and Bunny Storage for Image-Heavy Sites
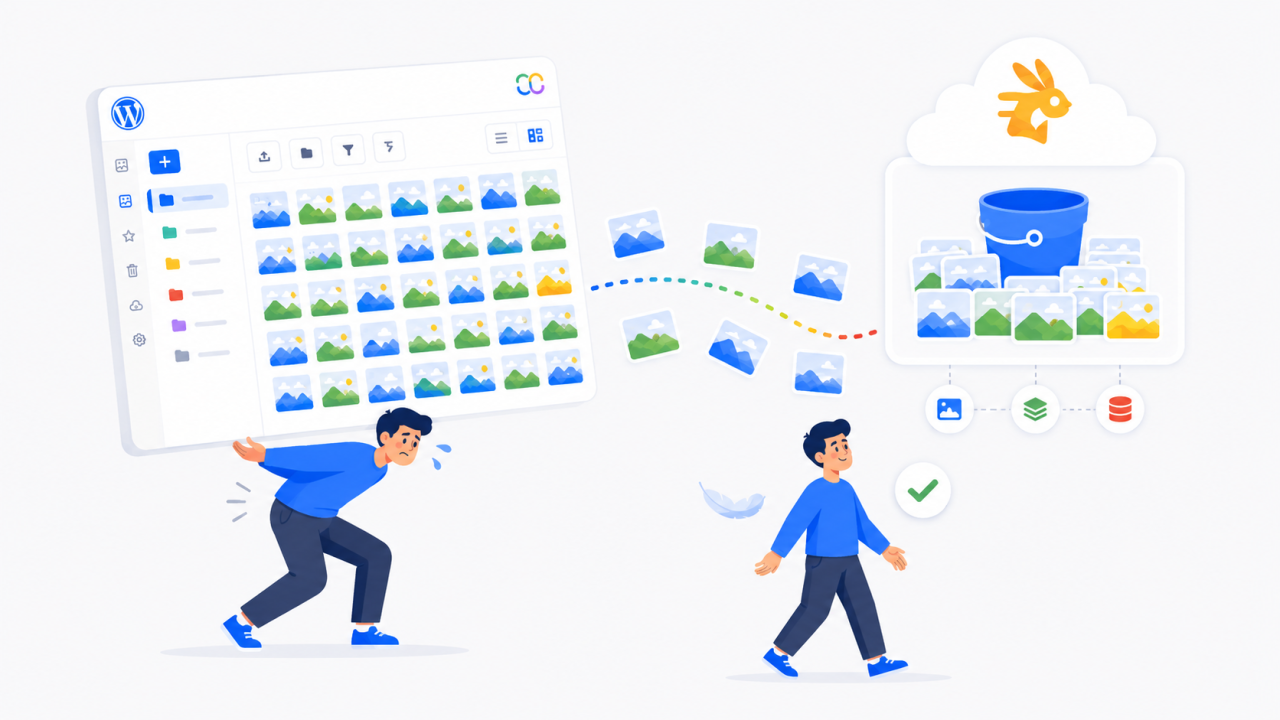
Websites that depend heavily on visual content are strong candidates for Bunny Storage offloading.
These may include:
- Photography portfolios
- Online magazines
- Travel blogs
- Real estate websites
- Design portfolios
- News websites
- Event galleries
WP Media Folder helps organize large media collections into folders while Bunny Storage holds the actual files.
Editors can continue managing images from WordPress without changing their normal workflow. The files are simply stored and delivered from a more scalable location.
Using WP Media Folder and Bunny Storage with WooCommerce
WooCommerce stores can quickly build large media libraries. A single product may include a main image, a gallery, thumbnails, variation images, and promotional graphics.
As the product catalog grows, these files consume more storage and create more work for the hosting server.
WP Media Folder works through the WordPress media library used by WooCommerce. Store managers can organize product images into folders, select them normally when editing products, and offload them to Bunny Storage.

This setup is particularly useful for stores with:
- Large product catalogs
- Several images per product
- High-resolution product photography
- Customers in different countries
- Seasonal traffic increases
Before enabling full media removal, test product pages, image galleries, variation images, category pages, and any additional WooCommerce image features.
Calling all webmasters!
Save time and boost productivity with WP Media Folder. Effortlessly organize client media
files, create custom
galleries, and provide a seamless user experience.
Upgrade your website projects now!
Deliver WordPress Media Faster with WP Media Folder and Bunny Storage
WP Media Folder and Bunny Storage provide a practical way to move media away from your hosting server and deliver it through Bunny CDN.
The setup requires a Bunny Storage Zone, a connected Pull Zone, and four connection details entered in WP Media Folder. Once connected, the plugin can send new uploads to Bunny, synchronize existing media, replace file addresses automatically, and remove local copies when you are ready.
For image-heavy websites and WooCommerce stores(also has an integration with WP Media Folder), this creates a more scalable media system without making everyday WordPress management more complicated. Editors can continue working from the familiar media library while WP Media Folder and Bunny handle storage and global file delivery.
When you subscribe to the blog, we will send you an e-mail when there are new updates on the site so you wouldn't miss them.