produk WordPress
 produk Joomla
 Mendukung
 Berita
 Login
LoginCara Mengatur File WordPress di Folder Pustaka Media

Bayangkan menemukan aset yang tepat di antara ratusan atau bahkan ribuan gambar, video, PDF, dan file desain yang semuanya menumpuk dalam satu daftar datar saat Anda membutuhkannya bisa terasa membingungkan dan memakan waktu. Secara default, WordPress otomatis membuat folder untuk tahun dan bulan yang berbeda lalu mengelompokkan file berdasarkan tanggal unggah. Namun, satu ukuran tidak selalu cocok untuk semua, yang dengan cepat menjadi berantakan seiring pertumbuhan situs Anda.
Menerapkan strategi pengorganisasian yang kuat untuk pustaka media WordPress Anda menghemat waktu dan meningkatkan fungsionalitas situs Anda secara keseluruhan. Dengan menggunakan plugin yang dirancang untuk manajemen media, Anda dapat membuat struktur folder yang logis, memindahkan dan menyalin file dengan cepat, serta menyederhanakan proses pembuatan konten Anda.
Dalam panduan ini, Anda akan mempelajari langkah demi langkah cara mengatur file WordPress Anda menggunakan folder media dan rekomendasi plugin untuk manajemen file yang lebih baik.
Daftar isi
- Mengapa Pengorganisasian Berbasis Folder Sangat Penting?
- Panduan Langkah demi Langkah untuk Mengatur File WordPress dengan Plugin Folder Media
- Cara Memindahkan dan Menyalin File di Pustaka Media WordPress
- Cara Mengganti Nama File dan Folder di Perpustakaan Media
- Mengapa WP Media Folder oleh JoomUnited Unggul
- Kesimpulan
Mengapa Pengorganisasian Berbasis Folder Sangat Penting?
Seiring bertambahnya koleksi aset digital Anda, memiliki organisasi media yang jelas dan terstruktur menjadi suatu kebutuhan. Dengan mengelompokkan file secara logis, Anda dapat langsung menuju bagian yang tepat tanpa perlu mencari-cari di antara semuanya. Ini membantu menyederhanakan alur kerja Anda, menghemat waktu, dan mengurangi stres.
Selain efisiensi, organisasi yang tepat juga mencegah konten duplikat yang tidak perlu yang dapat membingungkan mesin pencari dengan banyak gambar yang tampak serupa. Konsistensi ini membantu gambar dan halaman Anda mendapatkan peringkat yang lebih baik dan meningkatkan sinyal kualitas keseluruhan yang dilihat Google.
Lebih penting lagi, struktur berbasis folder membantu mencerminkan arsitektur konten Anda secara keseluruhan. Misalnya, mengatur file ke dalam direktori seperti "Blog/2026/SEO-Tips" atau "Produk/Kategori/April-2026" memastikan bahwa konvensi penamaan Anda tetap logis dan konsisten. Ini tidak hanya meningkatkan organisasi internal tetapi juga mendukung praktik SEO yang lebih baik, karena nama file dan teks alt Anda tetap relevan dan terstruktur.
Struktur media yang rapi tidak hanya menjaga kerapian, tetapi juga meningkatkan efisiensi, meningkatkan kinerja, dan memperkuat visibilitas pencarian situs Anda secara keseluruhan.
Panduan Langkah demi Langkah untuk Mengatur File WordPress dengan Plugin Folder Media
Mengatur file WordPress Anda dengan plugin folder media khusus dapat secara signifikan menyederhanakan proses manajemen media Anda. Banyak plugin manajemen file WordPress tersedia, termasuk plugin bawaan WordPress, yang gratis dan tersedia untuk semua orang.
Meskipun gratis, plugin bawaan tidak menawarkan fitur yang lengkap untuk mengelola file WordPress. Oleh karena itu, Anda mungkin ingin mencari solusi yang lebih lengkap seperti WP Media Folder oleh JoomUnited, yang akan kita bahas sekarang.
Plugin ini memiliki antarmuka yang ramah pengguna yang menawarkan sistem folder intuitif dengan fungsi seret dan lepas, manajemen file massal, filter media, dan dukungan watermark. Plugin ini juga memungkinkan pengguna untuk mengatur file secara hierarkis, berintegrasi dengan layanan penyimpanan pihak ketiga, dan menyematkan video jarak jauh.
Berikut adalah langkah-langkah untuk menggunakan plugin ini.
Ucapkan selamat tinggal pada pustaka media yang berantakan.
WP Media Folder memungkinkan Anda mengategorikan file, menyinkronkan folder dengan penyimpanan cloud, membuat galeri yang menakjubkan, dan bahkan mengganti gambar tanpa merusak tautan.
Optimalkan alur kerja media Anda hari ini
1. Instal dan Aktifkan Plugin WP Media Folder
Untuk menginstal WP Media Folder, pertama-tama beli plugin dari situs web JoomUnited dan unduh file ZIP dari dasbor akun JoomUnited Anda.
Selanjutnya, buka dasbor WordPress Anda dan navigasi ke Plugin > Tambah Baru > Unggah Plugin. Klik Pilih File, pilih file ZIP yang telah Anda unduh, lalu klik Instal Sekarang. Setelah instalasi selesai, klik Aktifkan Plugin.
Setelah aktivasi, item menu baru "WP Media Folder" akan muncul di sidebar kiri panel admin WordPress Anda. WP Media Folder juga dapat diakses dari menu Media dan tombol media di atas editor Anda. Untuk panduan instalasi langkah demi langkah yang lengkap, lihat resmi WP Media Folder dokumentasi instalasi.
Catatan: Setelah aktivasi, pastikan untuk masuk ke akun JoomUnited Anda di dalam plugin untuk mengaktifkan lisensi Anda.
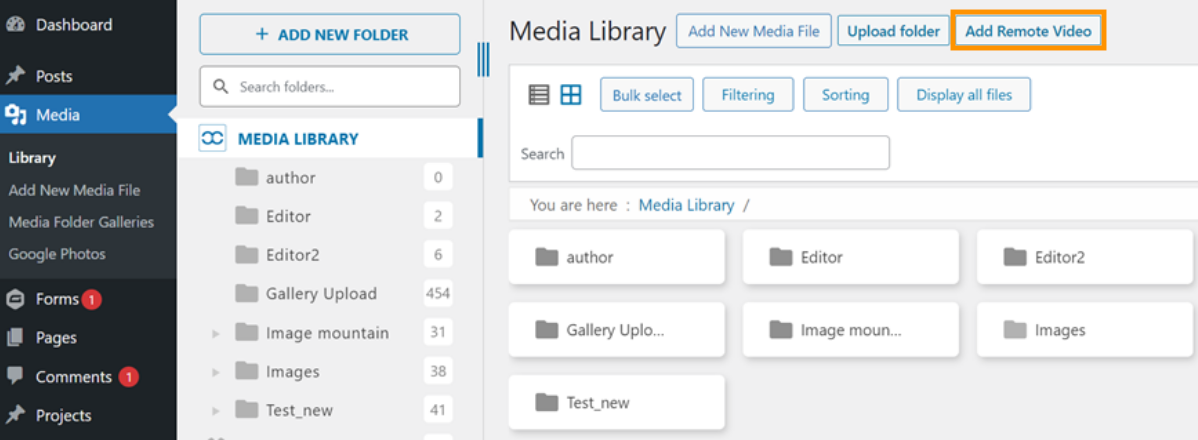
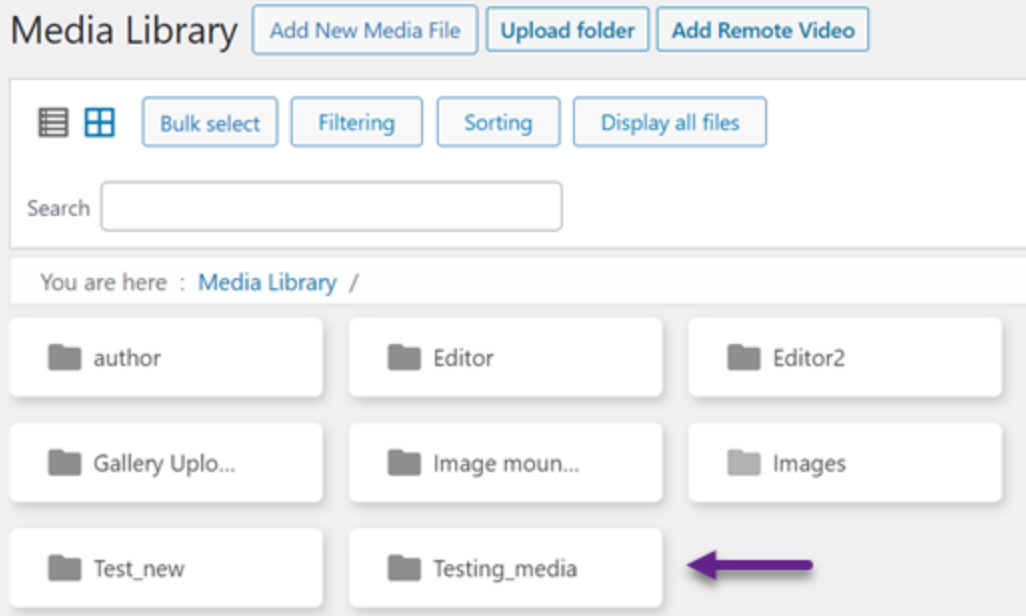
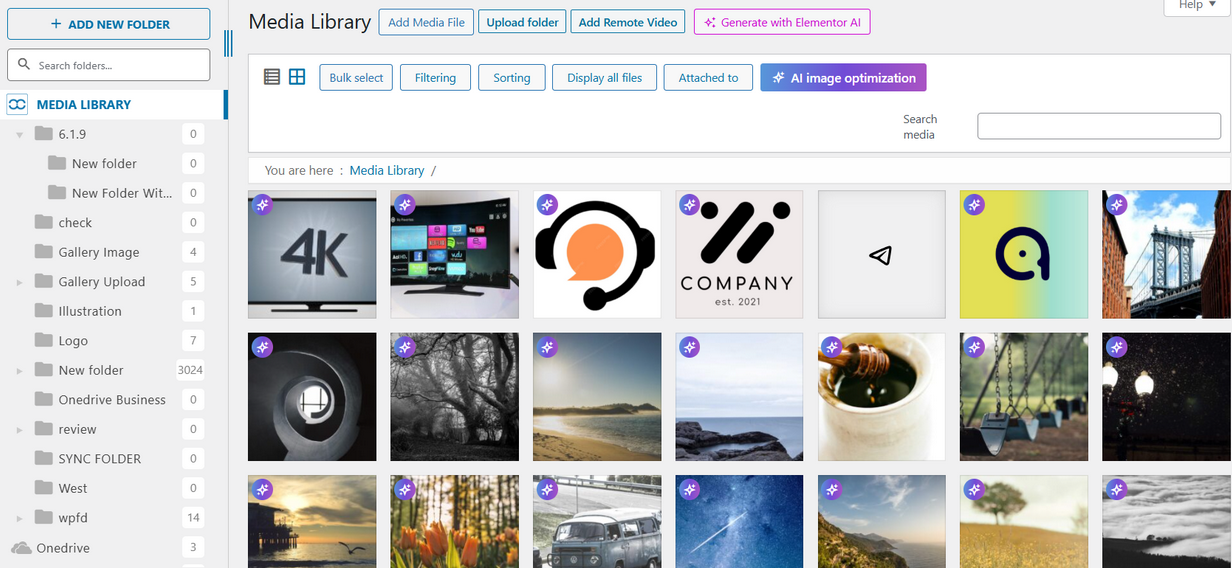
Selanjutnya, di menu Media, pilih Perpustakaan. Berikut tampilan Folder Media dengan plugin terpasang. Seperti yang ditunjukkan di bawah ini, ada juga opsi menu tambahan, Tambah Video Jarak Jauh.
2. Buat Folder Pertama Anda
Setelah plugin aktif, Anda siap untuk mulai membangun struktur folder Anda. Anda dapat menavigasi ke lokasi tempat Anda ingin membuat folder baru, misalnya di dalam folder yang sudah ada. Namun, dalam hal ini, kita akan membuatnya langsung di Perpustakaan Media. Klik + Tambah Folder Baru > Masukkan Nama Folder > Klik tombol "Buat".
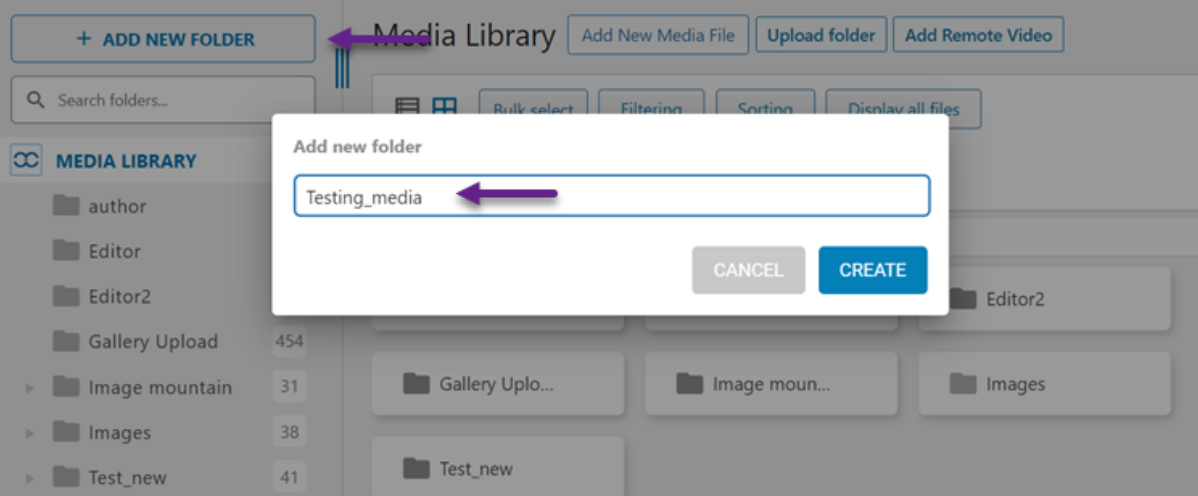
Folder baru akan muncul dengan nama yang Anda masukkan, misalnya, "Testing_media". Anda dapat membuat folder dan subfolder sebanyak yang dibutuhkan untuk mencerminkan struktur konten Anda.
3. Unggah File Anda ke Folder
Setelah folder dibuat, Anda dapat mengunggah file yang ingin Anda tambahkan ke WordPress. Pilih folder baru dan klik Tambah File Media Baru. Anda akan melihat opsi untuk memilih file atau menambahkan video jarak jauh. Tidak seperti Pustaka Media WordPress default, versi ini juga menyertakan Video Jarak Jauh dan Unggah Folder .
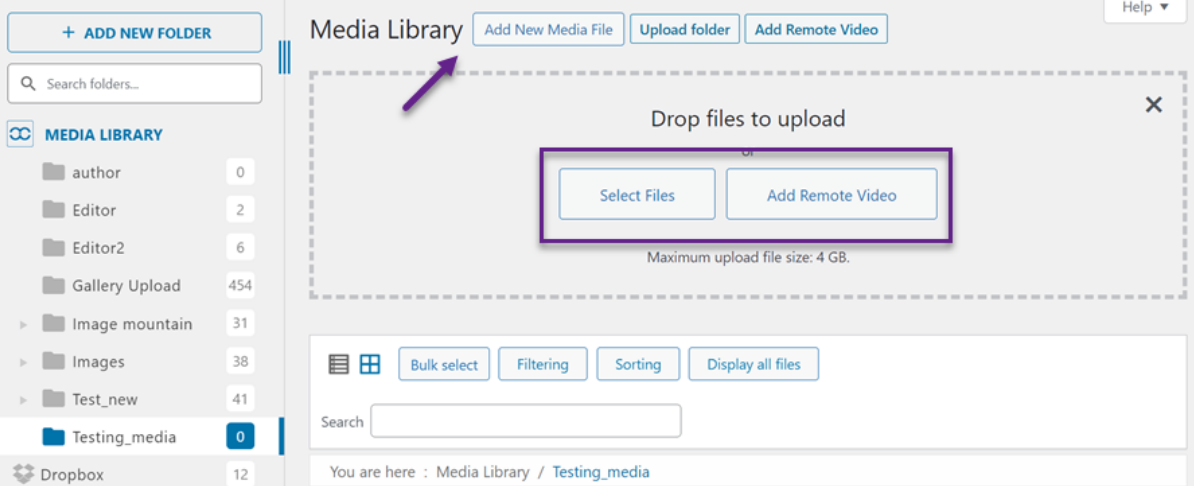
Sebagai contoh, jika unggahan berhasil, gambar akan muncul di dalam folder, seperti yang ditunjukkan pada tampilan di bawah ini.
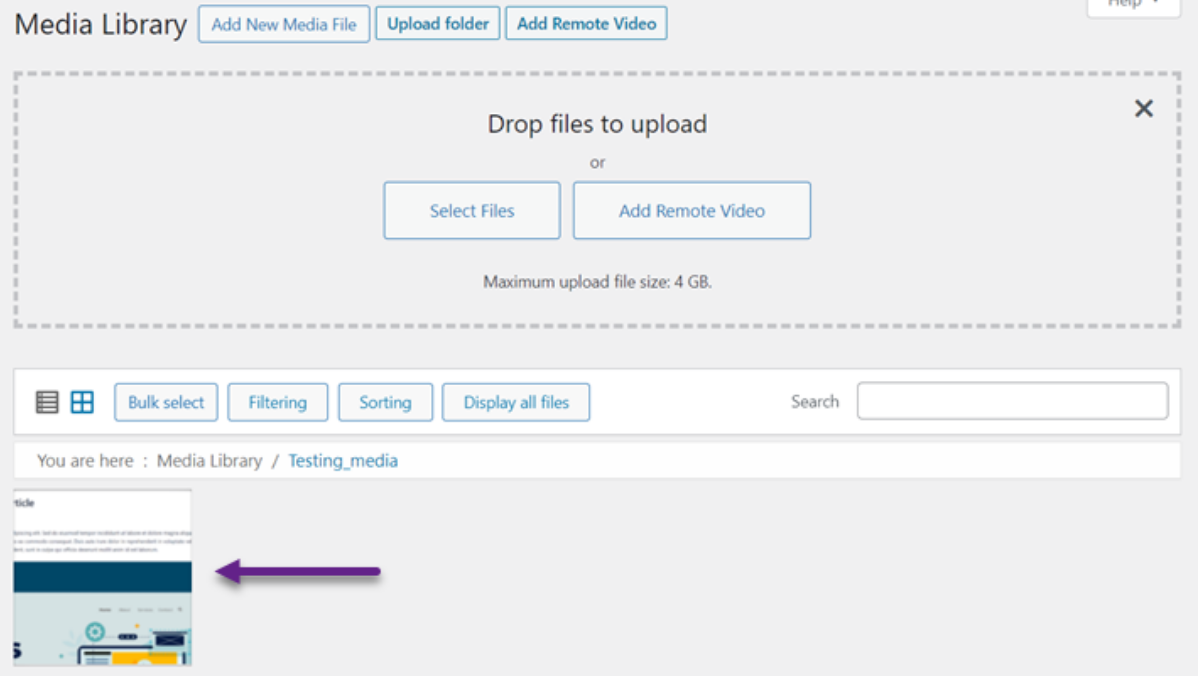
Selain itu, sebuah angka akan muncul di sebelah nama folder, yang menunjukkan jumlah total file di dalam folder tersebut.

Cara Memindahkan dan Menyalin File di Pustaka Media WordPress
Setelah berhasil membuat folder baru dan mengunggah file, mari kita jelajahi cara memindahkan dan menyalin file Anda dengan mudah dan cepat.
Terkadang, Anda mungkin perlu memindahkan file media yang sudah ada ke lokasi baru. Plugin ini memungkinkan Anda untuk memindahkan file asli atau membuat duplikat di folder baru di dalam pustaka media WordPress.
1. Memindahkan File ke Folder Lain di Perpustakaan Media
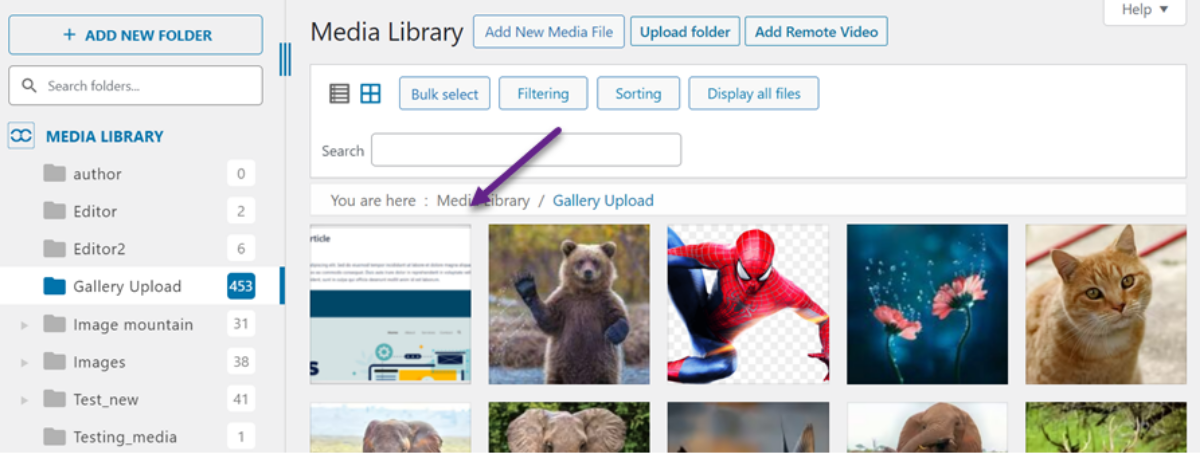
Untuk memindahkan file, ada dua pilihan. Pertama, seret dan lepas file langsung ke folder yang diinginkan. Misalnya, seperti yang ditunjukkan di bawah ini, kita akan memindahkannya ke folder Unggahan Galeri.
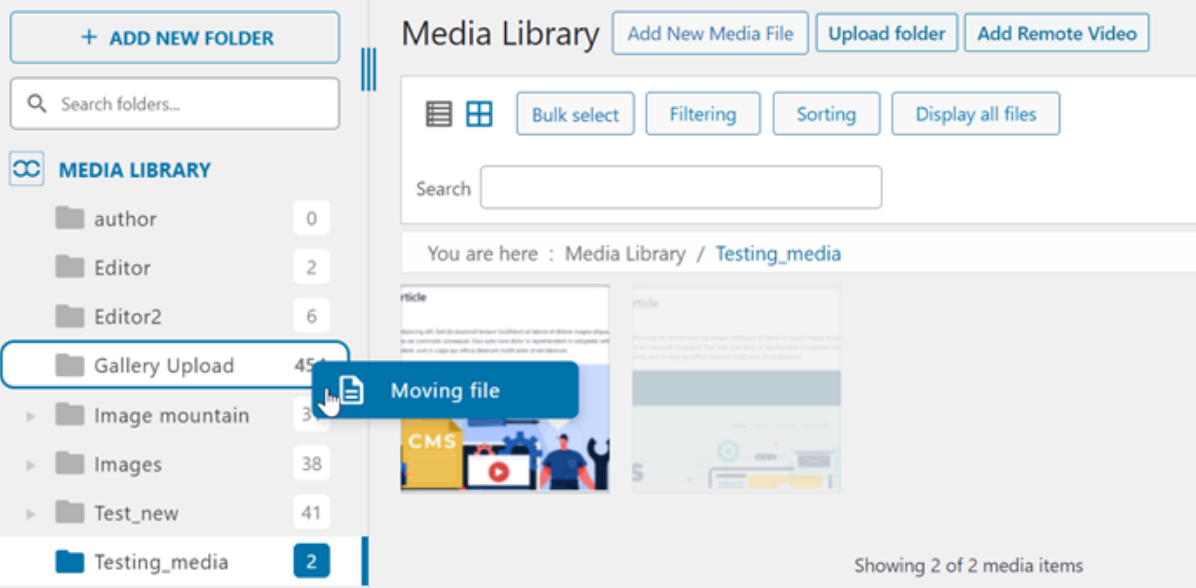
Jika berhasil, gambar akan dipindahkan ke folder yang dipilih, seperti yang ditunjukkan di bawah ini.
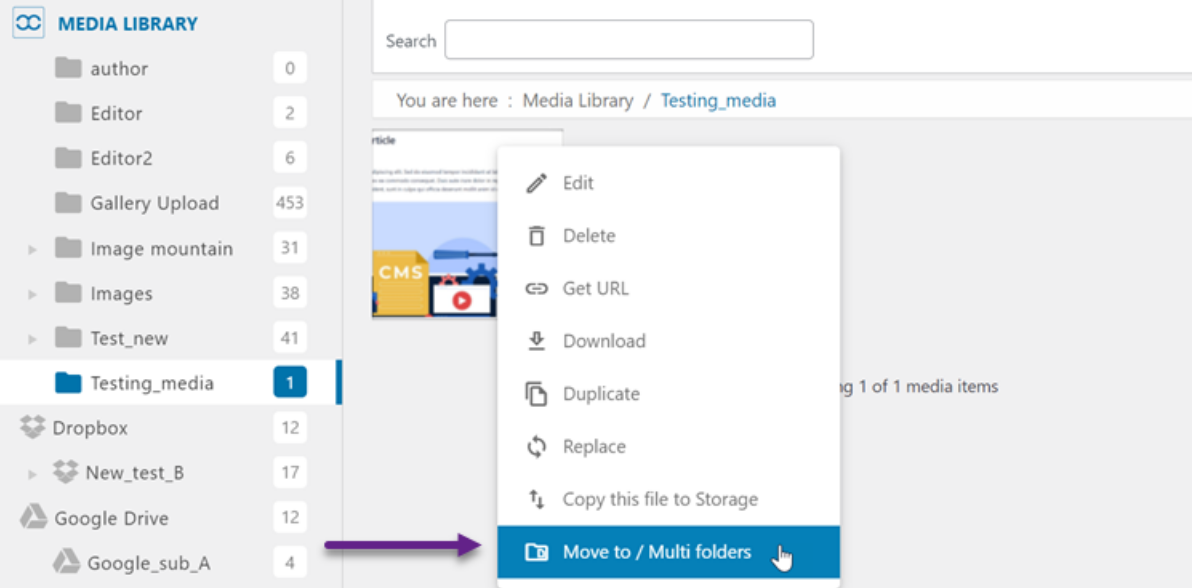
Opsi kedua adalah memindahkan file secara manual. Klik kanan gambar yang ingin Anda pindahkan, lalu pilih Pindahkan ke / Beberapa Folder.
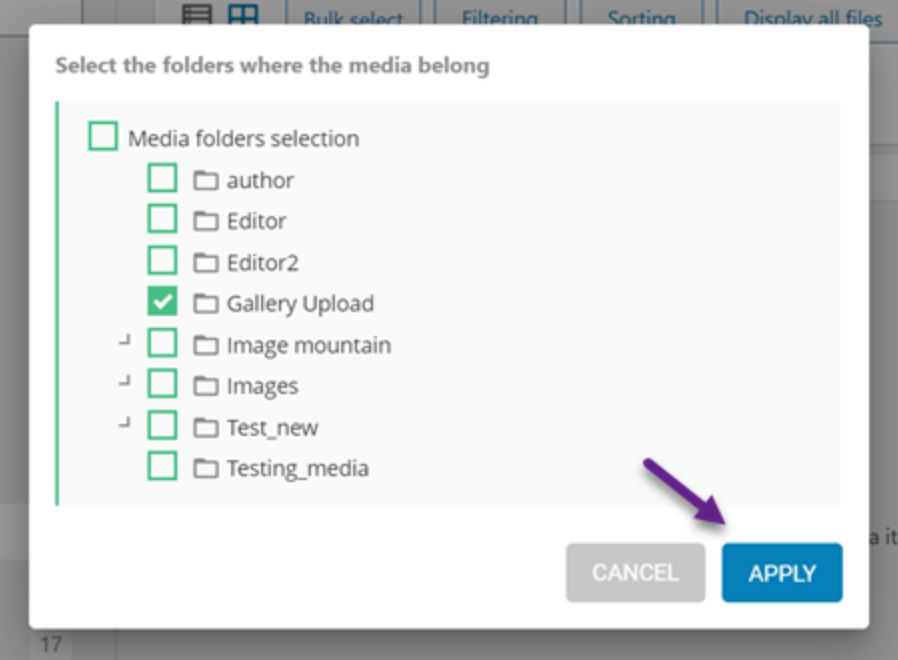
Setelah itu, Anda akan melihat daftar folder yang tersedia, seperti Unggahan Galeri. Pilih folder yang diinginkan, lalu klik Terapkan.
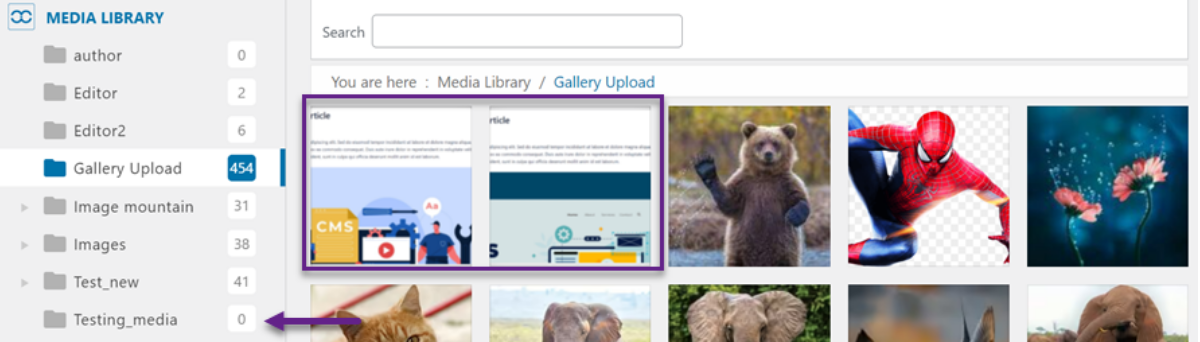
Jika proses berhasil, buka folder Unggahan Galeri dan Anda akan melihat file yang dipindahkan di sana. Sementara itu, jumlah file di folder Testing_media akan diperbarui menjadi 0 file.
2. Menyalin File ke Folder di Perpustakaan Media
Di sisi lain, jika Anda ingin membuat salinan file dan menyimpannya ke folder yang sama, Anda dapat mengklik kanan file tersebut, lalu pilih "Salin file ini ke penyimpanan". Kemudian, Anda akan menerima pemberitahuan yang mengkonfirmasi bahwa file telah berhasil disalin.
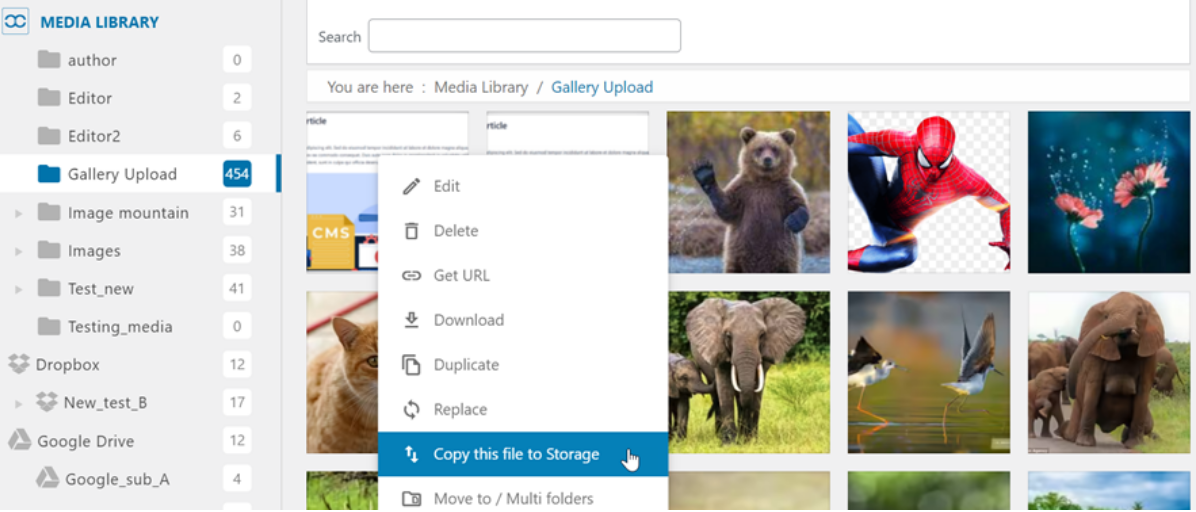
Harap dicatat bahwa file yang disalin akan muncul di penyimpanan cloud yang terhubung, seperti Google Drive, bukan di folder Perpustakaan Media lokal itu sendiri.
Cara Mengganti Nama File dan Folder di Perpustakaan Media
Menjaga konsistensi nama file dan folder sama pentingnya dengan mengorganisirnya ke dalam struktur yang tepat. WP Media Folder memberi Anda kendali penuh atas penamaan, baik secara manual maupun otomatis.
1. Mengganti Nama Folder di Folder Perpustakaan Media
Temukan folder yang ingin Anda ubah namanya, lalu klik kanan pada folder yang ingin Anda ganti namanya. Kemudian, pilih menu "Ganti Nama" dan masukkan nama folder baru yang Anda inginkan.
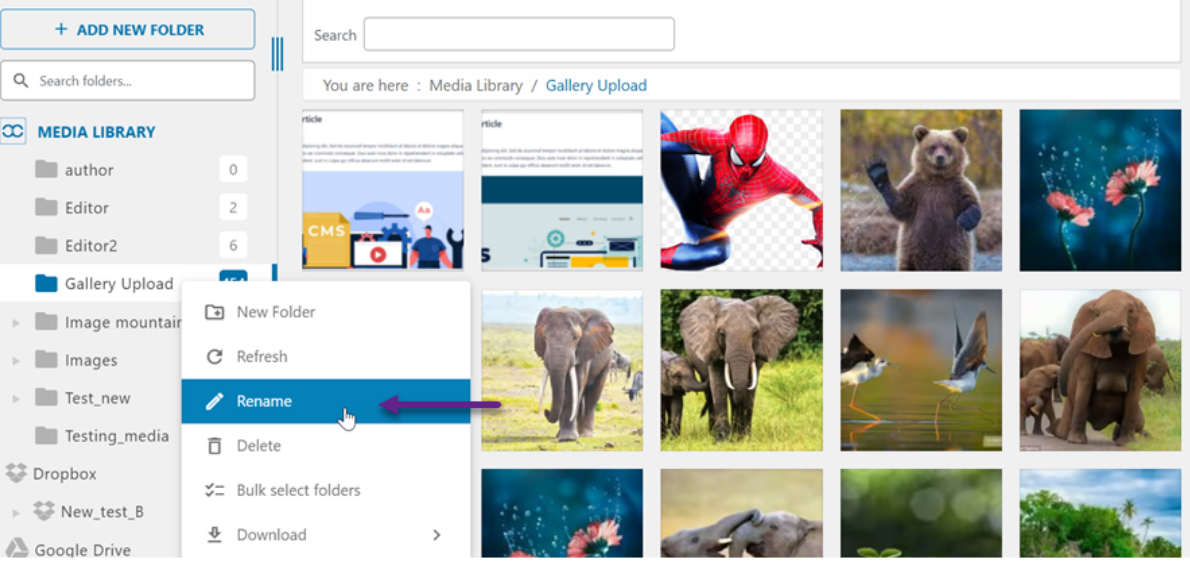
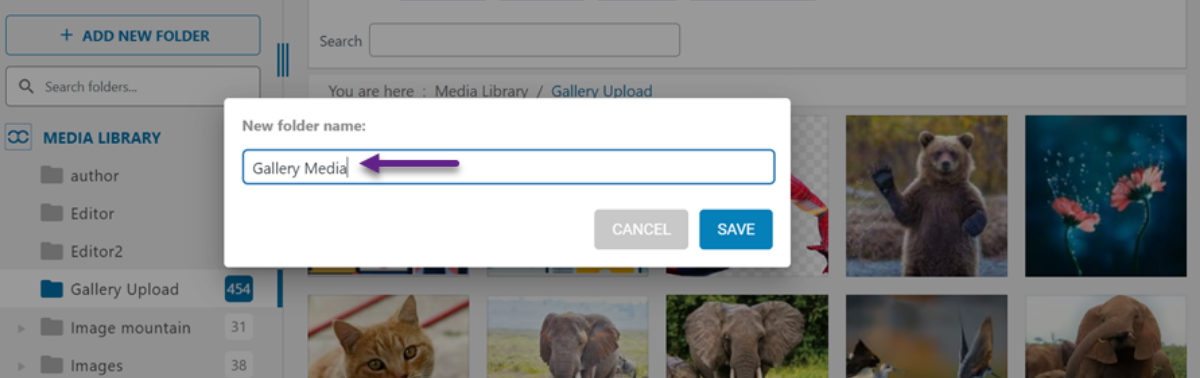
Sebagai contoh, masukkan nama folder baru seperti yang ditunjukkan di bawah ini, lalu klik Simpan.
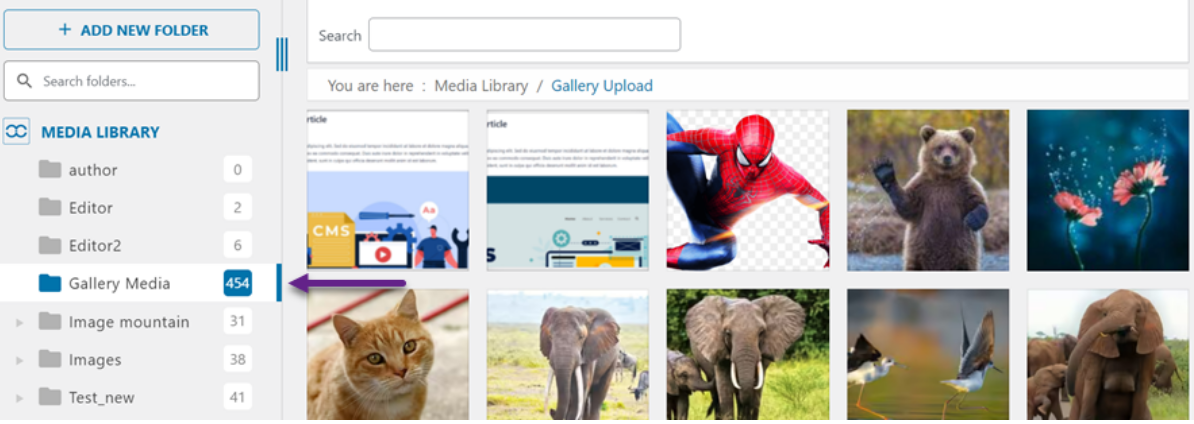
Setelah itu, Anda dapat melihat bahwa nama folder berhasil diubah.
2. Mengganti Nama File di Folder Perpustakaan Media
Plugin ini mendukung pemberian nama file otomatis yang dimulai saat file diunggah. Ini memerlukan konfigurasi khusus.
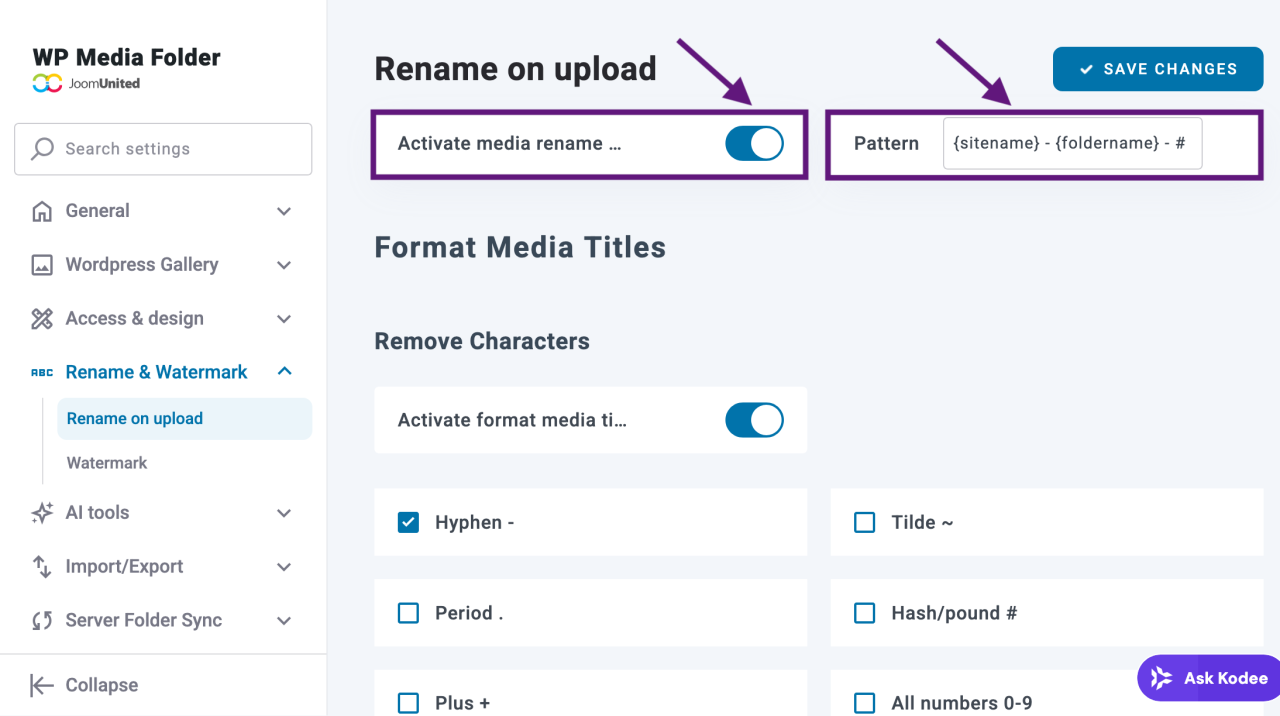
Pertama, buka Pengaturan > Ganti Nama & Tanda Air. Anda dapat mengklik Aktifkan penggantian nama media saat diunggah, lalu masukkan Pola, misalnya: {nama asli} - {nama folder}.
Setiap file yang Anda unggah akan secara otomatis diganti namanya mengikuti pola ini, membantu Anda menjaga agar nama file tetap terorganisir dan konsisten.
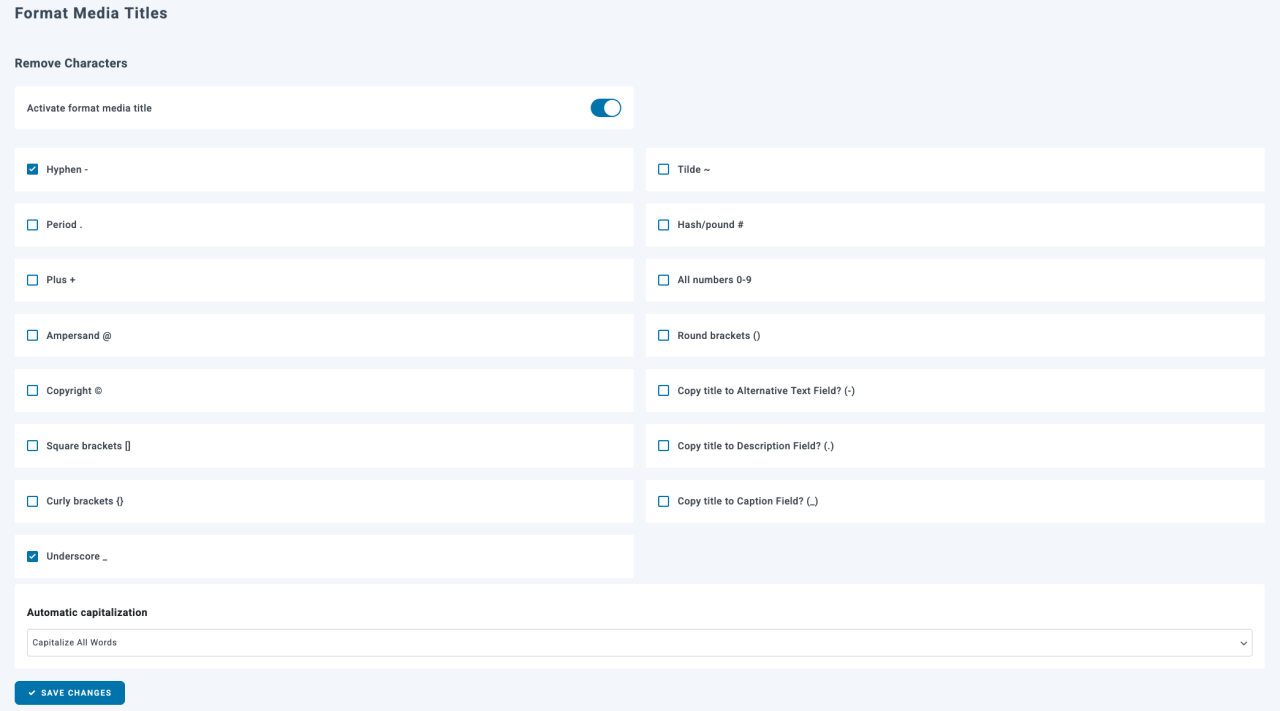
Anda dapat memilih karakter mana yang ingin Anda hapus dari nama file default. Setelah selesai, klik Simpan Perubahan.
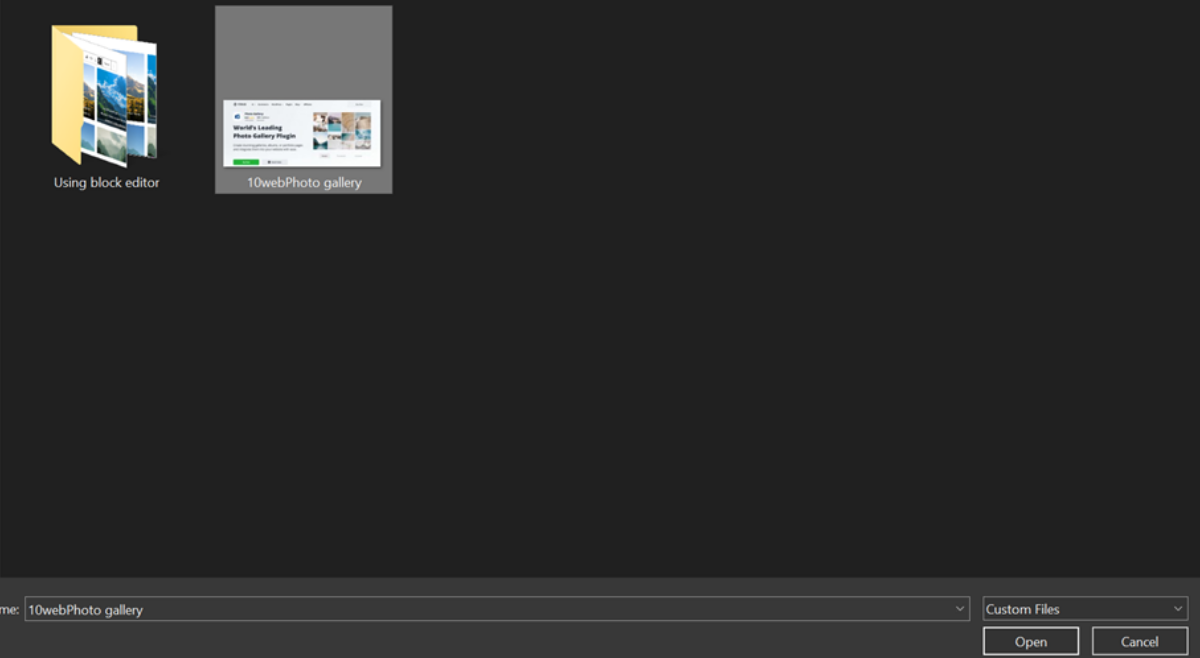
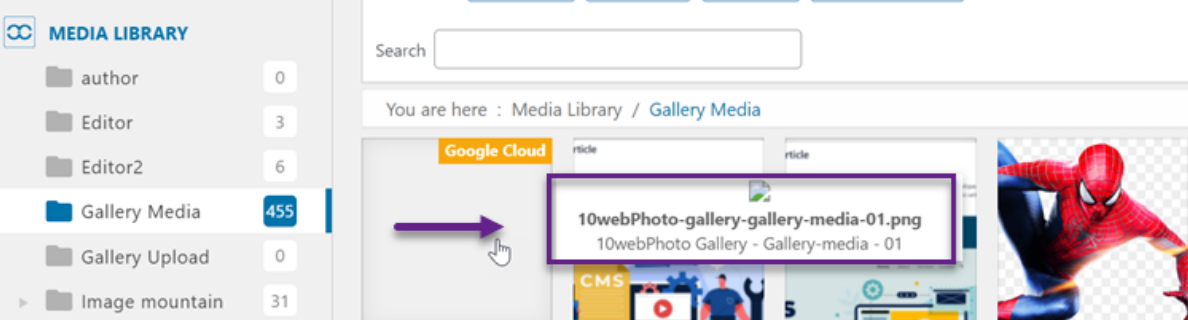
Sekarang mari kita coba mengunggah file dan melihat apakah penggantian nama otomatis berfungsi. Pertama, pilih file, misalnya "10webPhoto Gallery." Setelah berhasil diunggah ke WordPress, nama file akan berubah dengan tambahan nama folder berdasarkan pola yang telah dikonfigurasi.
Setelah berhasil diunggah, nama file akan berubah secara otomatis tanpa perlu Anda edit secara manual.
Selain itu, kami menyarankan Anda untuk mengetikkan nama yang ramah SEO, seperti kata kunci, yang dapat membantu mengoptimalkan gambar Anda.
Mengapa WP Media Folder oleh JoomUnited Unggul
Sepanjang panduan ini, kami telah menggunakan WP Media Folder dari JoomUnited sebagai plugin pilihan kami, dan itu bukan tanpa alasan. Plugin ini sangat cocok untuk agensi, situs e-commerce, dan blog dengan konten yang padat yang membutuhkan pengelola file berfitur lengkap dengan fitur seret dan lepas, sinkronisasi cloud, dan optimasi massal.
Fitur Utama:
- Pembuatan metadata AI sekali klik (judul, teks alt, deskripsi)
- Folder dan subfolder tanpa batas
- Manajemen seret dan lepas
- Integrasi cloud (Google Drive, OneDrive, Dropbox, Amazon Web Services, DigitalOcean, Google Cloud, Wasabi, dan lainnya)
- Integrasi Google Photos
- Pemrosesan dan optimasi gambar secara massal
- Pratinjau dan pencarian media
- Ganti media di mana saja tanpa merusak tautan
Keuntungan:
- Pengorganisasian berbasis folder yang mudah
- Pembuatan metadata AI sekali klik untuk SEO yang lebih cepat
- Alur kerja seret dan lepas
- Manajemen media yang ramah SEO
- Opsi integrasi cloud yang ekstensif
- Kontrol akses media tingkat lanjut berdasarkan pengguna atau peran
- Cocok untuk situs web berukuran besar
Kekurangan:
- Paket premium diperlukan untuk add-on cloud dan galeri
- Fitur-fitur canggih mungkin membutuhkan waktu untuk dipelajari oleh pengguna baru
Harga:
- WP Media Folder (Plugin + Dukungan & Pembaruan 1 Tahun) – $49/tahun
- Plugin + Semua Addon (Plugin + Dukungan & Pembaruan 1 Tahun + Addon Cloud & Galeri) – $69/tahun
Panggilan untuk semua webmaster!
Hemat waktu dan tingkatkan produktivitas dengan WP Media Folder. Atur file media klien dengan mudah, buat galeri kustom, dan berikan pengalaman pengguna yang mulus.
Tingkatkan proyek situs web Anda sekarang!
Kesimpulan
Mengatur pustaka media WordPress Anda menggunakan folder sangat penting untuk menjaga situs web yang efisien dan terstruktur dengan baik. Menerapkan plugin seperti WP Media Folder oleh JoomUnited dapat secara signifikan menyederhanakan proses manajemen media Anda, menghemat waktu, dan meningkatkan kinerja situs secara keseluruhan.
Artikel ini telah memandu Anda melalui langkah-langkah penting dalam menginstal plugin, membuat folder, mengunggah file, dan memindahkan, menyalin, serta mengganti nama media secara efisien di lingkungan WordPress Anda. Dengan opsi harga yang fleksibel dan tanpa kebijakan perpanjangan otomatis, Anda dapat memilih paket yang paling sesuai dengan kebutuhan Anda dan mulai menggunakannya hari ini juga.
Saat Anda berlangganan blog, kami akan mengirimkan email kepada Anda ketika ada pembaruan baru di situs agar Anda tidak melewatkannya.