Joomla 파일 업로드를 확장자와 함께 설정하는 방법

웹사이트에서 파일을 관리하는 것은 일반적으로 우리가 제공할 수 있는 가장 중요한 기능 중 하나(가장 중요하다고 말하지 않는)이며 Dropfiles을 사용하면 프론트 엔드에서 직접 사용자들이 파일을 업로드할 수 있습니다.
Dropfiles 는 파일을 관리하기 위한 많은 도구를 제공하며, 관리자의 대시보드에서 직접 파일을 관리하거나 콘텐츠에 추가할 수 있는 업로드 양식을 사용하여 직접 관리할 수 있습니다.
이 게시물에서는 Dropfiles을(를) 사용하여 파일 업로드 양식을 만드는 것이 얼마나 쉬운지 알아보겠습니다.
웹마스터는 Dropfiles을(를) 사용하여 클라이언트 웹 사이트에 대한 파일 협력을 단순화합니다.
클라이언트가 파일을 안전하게 공유하고 공동 작업할 수 있도록 하여 생산성을 높이고 프로젝트 워크플로를 간소화합니다.
지금 경쟁 우위를 확보하세요!
파일 업로드 카테고리 생성
사용자가 개인 또는 공용 저장소를 관리할 수 있는 저장소를 생성하는 것부터 문서와 같은 정보를 사용자와 공유할 수 있는 업로드 양식을 추가하는 것까지, Dropfiles 사용하면 몇 번의 클릭만으로 프로세스를 쉽게 만들 수 있습니다.
우선, 우리는 Dropfiles 카테고리는 파일 업로드 양식에 사용되며, 이를 위해 다음으로 이동합니다 컴포넌트 > Dropfiles > 파일 관리자.

이 페이지에서, 클릭하세요 +New 그리고 카테고리가 생성됩니다.
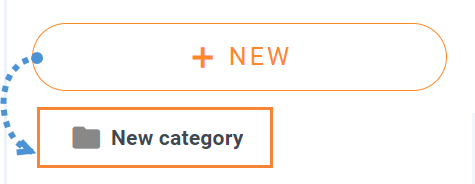
이제 연필 아이콘을 클릭하여 이름을 바꿀 수 있습니다.

이제 특정 역할에 대해서만 이 카테고리를 사용할 수 있어야 한다고 가정해 보겠습니다. 모든 사용자가 사이트에 파일을 업로드하도록 허용하지 않으므로 Dropfiles 을(를) 사용하면 완전히 가능합니다
카테고리 권한을 설정하려면, 카테고리 페이지 상단 섹션에 배치된 카테고리 설정 탭으로 이동해야 하며, 액세스 수준 드롭다운을 클릭하면 옵션이 나타나며, 공개로 설정하거나 특정 사용자 액세스 수준으로 설정할 수 있습니다.
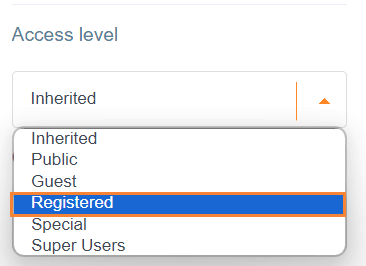
이 경우, 우리는 등록된 사용자를 선택했으므로 파일을 보고 업로드하려면 등록된 사용자여야 합니다.
우리는 같은 섹션에서 테마를 선택하여 고객이 프런트엔드에서 파일을 관리하도록 허용할 수 있습니다.
마지막으로, 우리는 클릭하기만 하면 됩니다 설정 저장 그리고 우리의 카테고리가 준비되었습니다!
Joomla 콘텐츠에 업로드 양식 추가
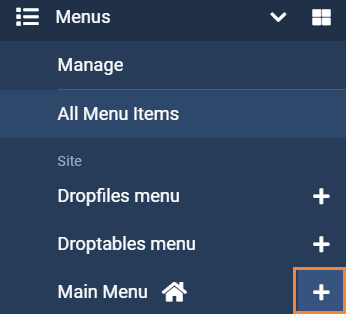
카테고리가 생성되었으니, 이제 콘텐츠로 이동하여 이 작업을 수행할 수 있습니다 메뉴 > 배치될 메뉴 선택 > +
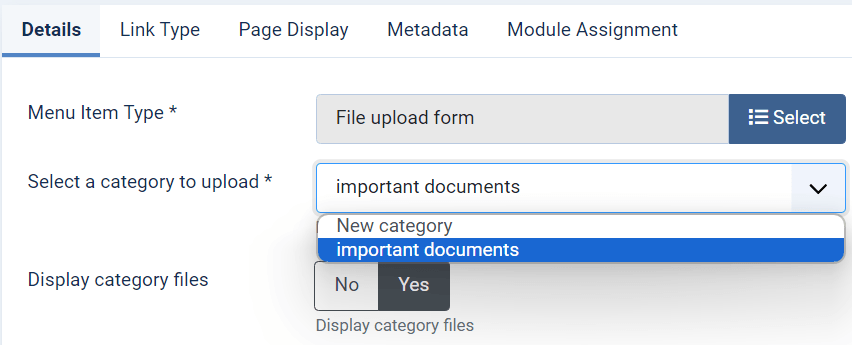
아래 메뉴 항목 유형 > Dropfiles, 사용하려는 업로드 파일 모듈을 선택하면, "파일 업로드 양식"을 사용할 수 있고, "파일 관리"도 가능합니다.
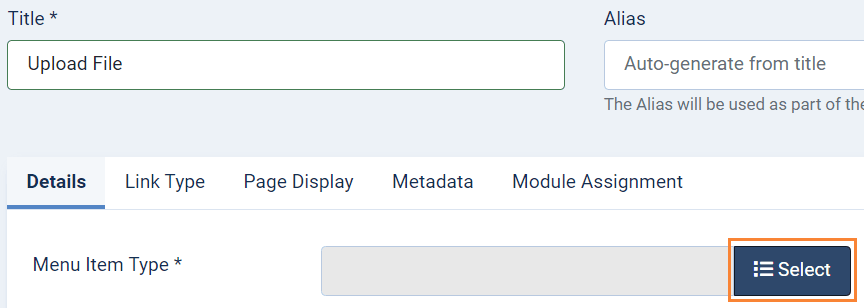
파일 유형을 선택한 후에는 모듈 설정 옵션이 표시되어야 합니다. 이 경우, "File Upload Form"을 선택하면 사용할 카테고리를 선택할 수 있으며, 카테고리 파일을 표시할지 여부도 선택할 수 있습니다.
이제 양식을 보려면 사이트 앞에서 로그인하고 생성된 메뉴 아이콘을 클릭하면 업로드 양식이 새 페이지에 나타납니다.

두 개의 버튼을 클릭하는 것만큼 쉽습니다! 이제 "파일 관리" 옵션을 선택하면 어떻게 될까요?
답은, 카테고리 설정을 사용하고 ACL 설정에 따라 예를 들어 다운로드 또는 업로드와 같은 옵션을 표시하도록 허용한다는 것입니다.
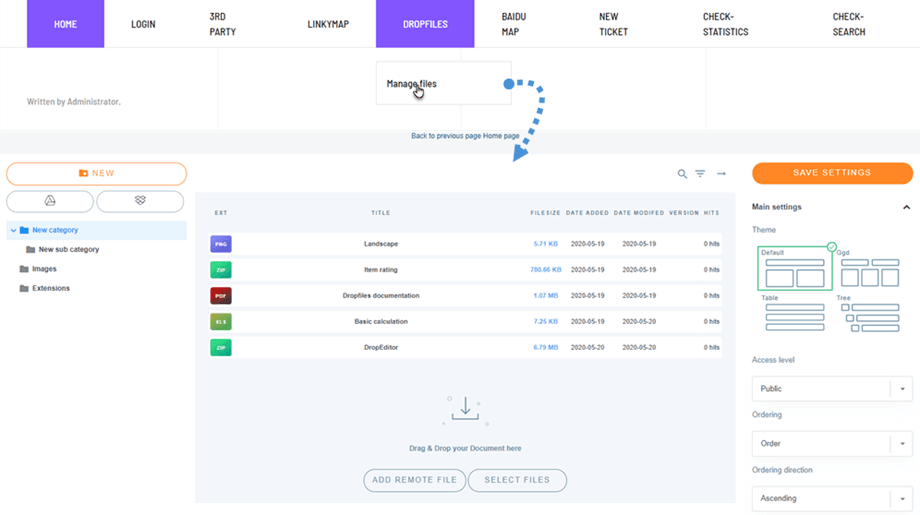
그리고 정말 멋져 보입니다! Doesn't it? 이제 모든 사용자가 우리와 그들의 필요에 따라 파일과 카테고리를 관리할 수 있습니다.
모든 웹마스터를 불러드립니다!
클라이언트 웹사이트를 Dropfiles으로 강화하세요. 파일을 쉽게 업로드, 분류 및 공유하여 클라이언트에게 사용자 친화적이고 효율적인 문서 관리 방법을 제공합니다.
오늘날 웹 디자인 서비스를 업그레이드하세요!
전체 Joomla 파일 관리자
에 포함된 다양한 기능 중 하나를 살펴보았습니다 Dropfiles! Dropfiles에는 몇 번의 클릭만으로 전문가처럼 사이트 파일을 관리할 수 있는 여러 도구가 있습니다. 뿐만 아니라 Google Drive, OneDrive, Dropbox와 같은 클라우드 서비스에 연결할 수 있는 기능도 다양하게 제공됩니다. 지금 바로 여기에서 Dropfiles를 다운로드하세요!
블로그에 가입하면 사이트에 새로운 업데이트가 있을 때 이메일을 보내드리므로 업데이트를 놓치지 않을 것입니다.


댓글