WordPress产品
 Joomla 产品
 Support
 News
News 登录
登录如何在媒体库文件夹中整理 WordPress 文件

想象一下,当你需要某个资源时,却要在数百甚至数千个图片、视频、PDF 和设计文件中翻找,而它们全都堆在一个扁平列表中,这会让人感到不堪重负且耗时。默认情况下,WordPress 会自动按不同的年份和月份创建文件夹,然后按上传日期对文件进行分组。然而,一刀切并不总是适用,随着网站的发展,这会很快变得混乱。.
Implementing a robust organization strategy for your WordPress media library saves time and enhances your site's overall functionality. Using plugins designed for media management, you can create a logical folder structure, quickly move and copy files, and streamline your content creation process.
In this guide, you will learn step by step how to organize your WordPress files using media folders and plugin recommendations for better file management.
Table of content
Why is Folder-Based Organization Essential?
As your collection of digital assets continues to grow, having a clear and structured media organization becomes a necessity. By grouping files logically, you can instantly jump to the right section instead of searching through everything. This helps streamline your workflow, saving time and reducing stress.
Beyond efficiency, proper organization also prevents unnecessary duplicate content that might confuse search engines with multiple similar-looking images. This consistency helps your images and pages rank better and improves the overall quality signals Google sees.
More importantly, a folder-based structure helps reflect your overall content architecture. For example, organizing files into directories like "Blog/2026/SEO-Tips" or "Products/Categories/April-2026" ensures that your naming conventions remain logical and consistent. This not only improves internal organization but also supports better SEO practices, as your filenames and alt text stay relevant and structured.
A clean media structure doesn't just keep things neat it enhances efficiency, improves performance, and strengthens your site's overall search visibility.
Step-by-Step to Organize WordPress Files with Media Folder Plugin
Organizing your WordPress files with a dedicated media folder plugin can significantly streamline your media management process. Many WordPress file management plugins are available, including the built-in WordPress plugin, which is free and available to everyone.
Although free, the built-in plugin does not offer extensive features for managing WordPress files. Therefore, you might want to look for a more complete solution like the WP Media Folder plugin by JoomUnited, which we will be walking through now.
This plugin has a user-friendly interface offering an intuitive folder system with drag-and-drop functionality, batch file management, media filters, and watermark support. It also allows users to organize files hierarchically, integrate with third-party storage services, and embed remote videos.
Here are the steps to use the plugin.
告别杂乱无章的媒体库。.
WP Media Folder 让您对文件进行分类,将文件夹与云存储同步,创建令人惊叹的画廊,甚至可以在不破坏链接的情况下替换图片。
立即优化您的媒体工作流程
1. Install and Activate WP Media Folder Plugin
To install WP Media Folder, first purchase the plugin from the JoomUnited website and download the ZIP file from your JoomUnited account dashboard.
Next, go to your WordPress dashboard and navigate to Plugins > Add New > Upload Plugin. Click Choose File, select the ZIP file you downloaded, then click Install Now. Once the installation is complete, click Activate Plugin.
Upon activation, a new "WP Media Folder" menu item will appear in the left sidebar of your WordPress admin panel. WP Media Folder is also accessible from the Media menu and the media button above your editor. For a complete step-by-step installation guide, refer to the official WP Media Folder installation documentation.
Note: After activation, make sure to log in to your JoomUnited account inside the plugin to activate your license.
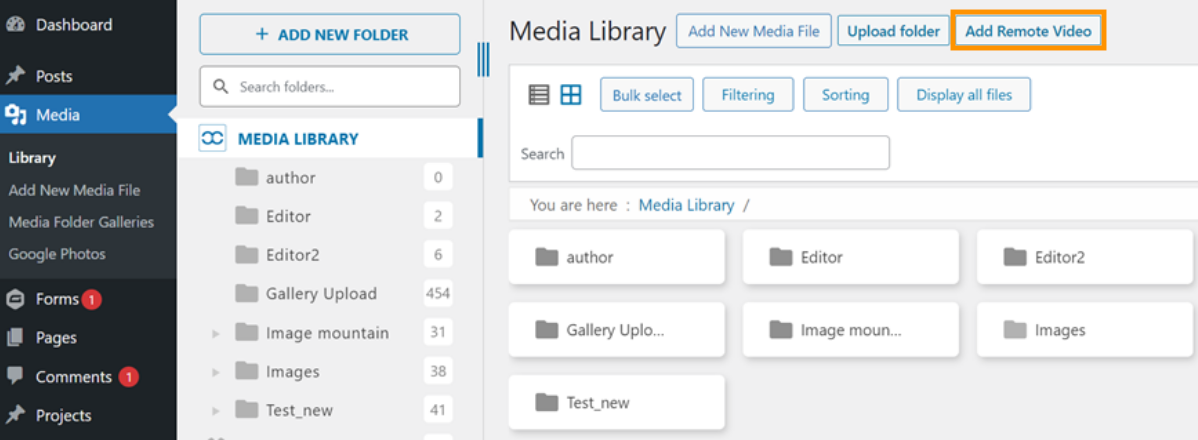
Next, in the Media menu, select Library. Here is the view of the Media Folder with the plugin installed. As shown below, there is also an additional menu option, Add Remote Video.
2. Create Your First Folder
Once the plugin is active, you are ready to start building your folder structure. You can navigate to the location where you want to create a new folder, such as inside an existing folder. However, in this case, we will create it directly in the Media Library. Click + Add New Folder > Enter the Folder Name > Click the "Create" button.
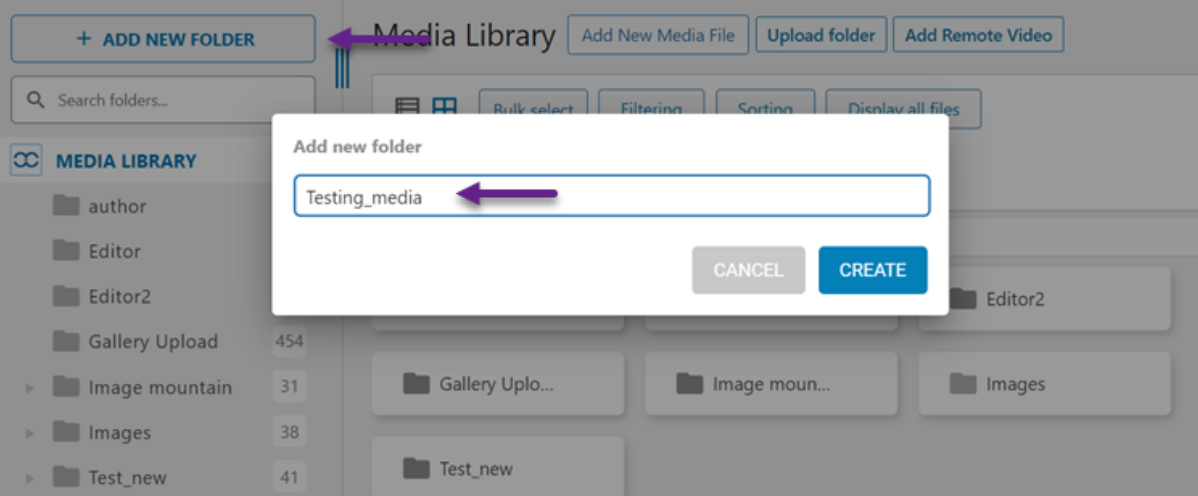
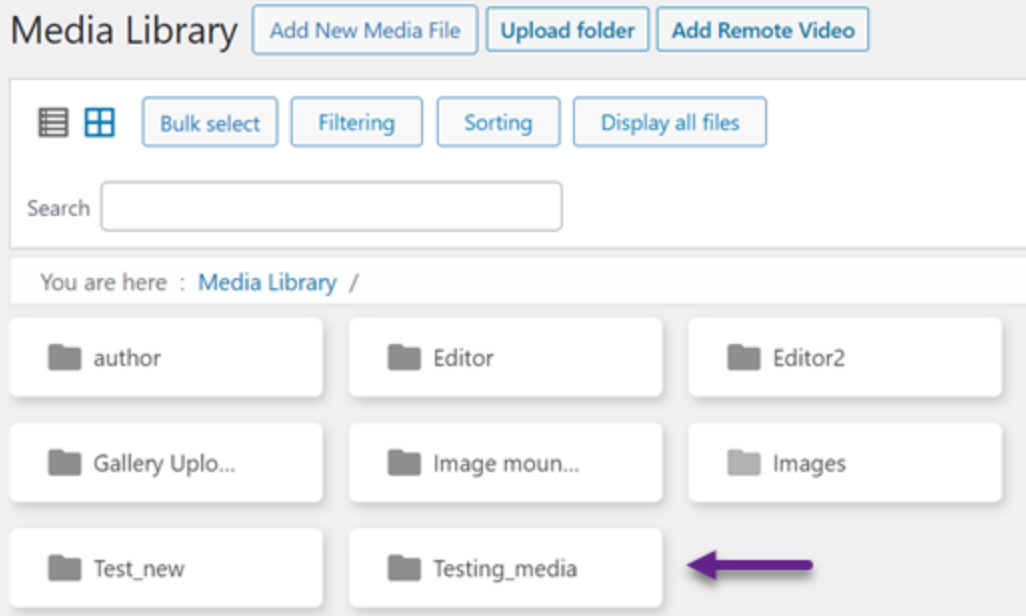
The new folder will appear with the name you entered, for example, "Testing_media". You can create as many folders and subfolders as needed to reflect your content structure.
3. Upload Your Files to the Folder
Once the folder is created, you can upload the files you want to add to WordPress. Select the new folder and click Add New Media File. You will see options to either select files or add a remote video. Unlike the default WordPress Media Library, this version also includes Remote Video and Upload Folder options.
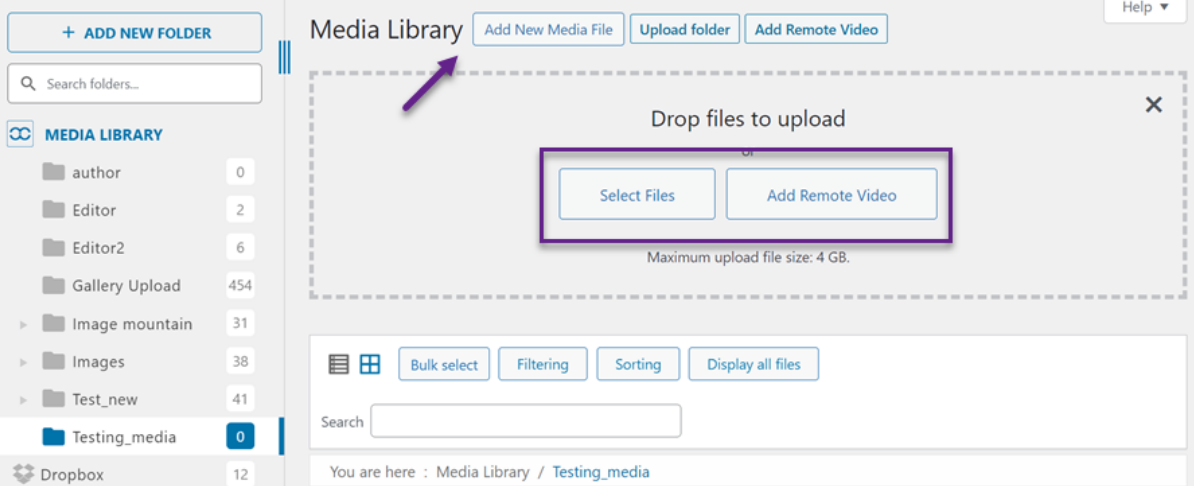
For instance, if the upload is successful, the image will appear inside the folder, as shown in the display below.
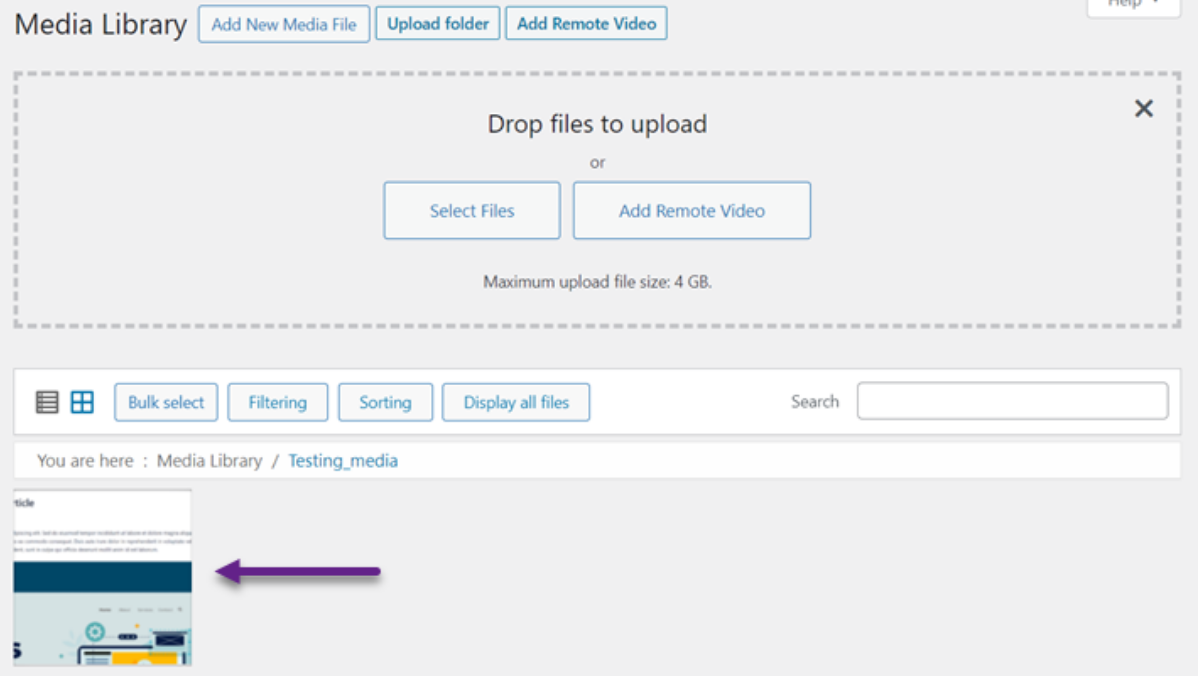
Additionally, a number will appear next to the folder name, indicating the total number of files inside that folder.

How to Move and Copy Files in the WordPress Media Library
After successfully creating a new folder and uploading files, let's explore how to move and copy your files easily and quickly.
Sometimes, you might need to relocate an existing media file to a new location. This plugin allows you to move the original file or create a duplicate in the new folder within the WordPress media library.
1. Moving a File to Another Folder in the Media Library
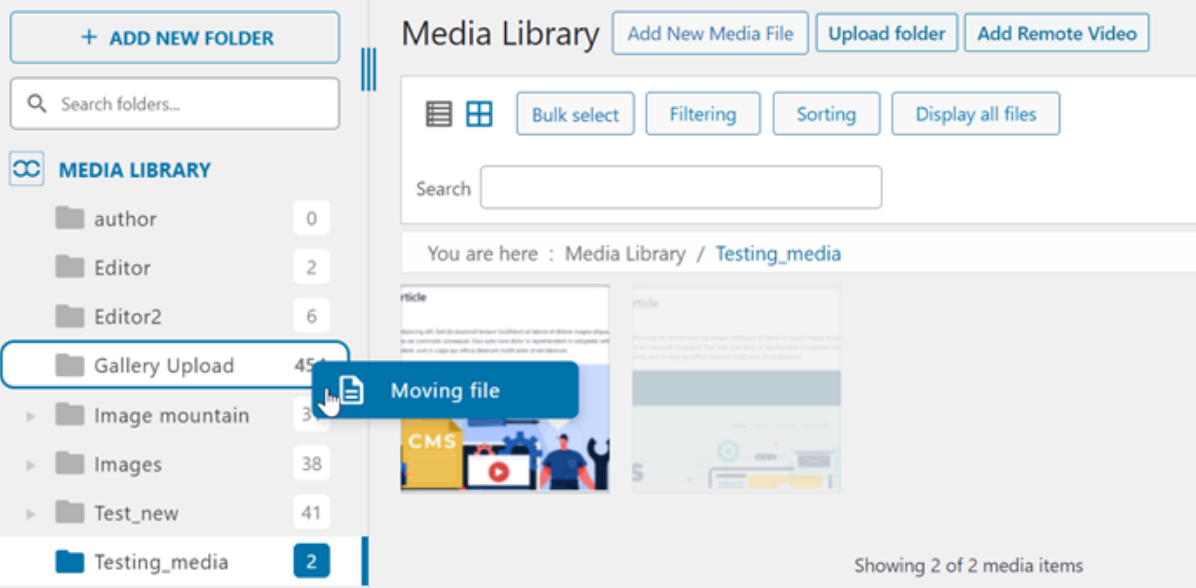
To move any file, there are two options. The first is to drag-and-drop the file directly into the desired folder. For example, as shown below, we will move it to the Gallery Upload folder.
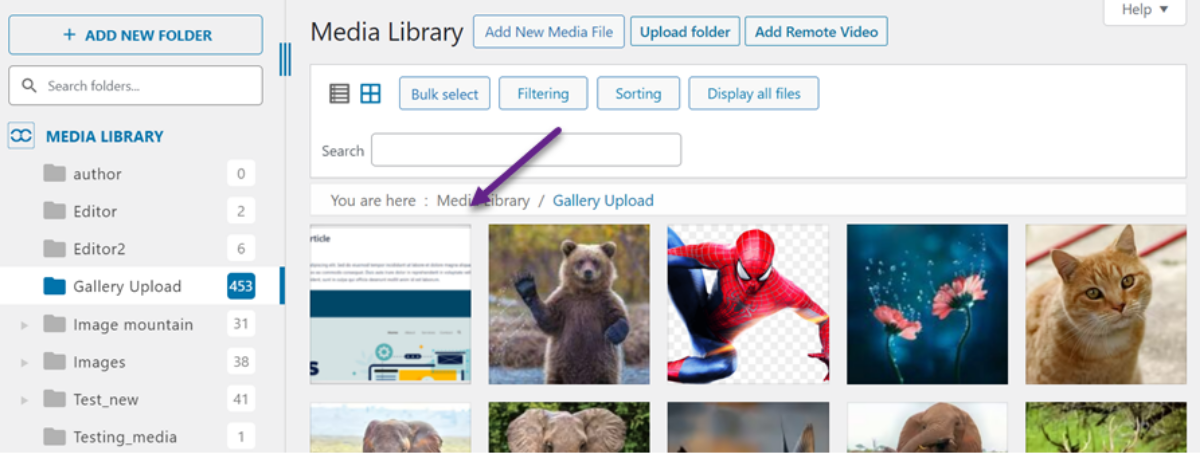
If successful, the image will be moved to the selected folder, as shown below.
The second option is to move the file manually. Right-click the image you want to move, then select Move to / Multi Folders.
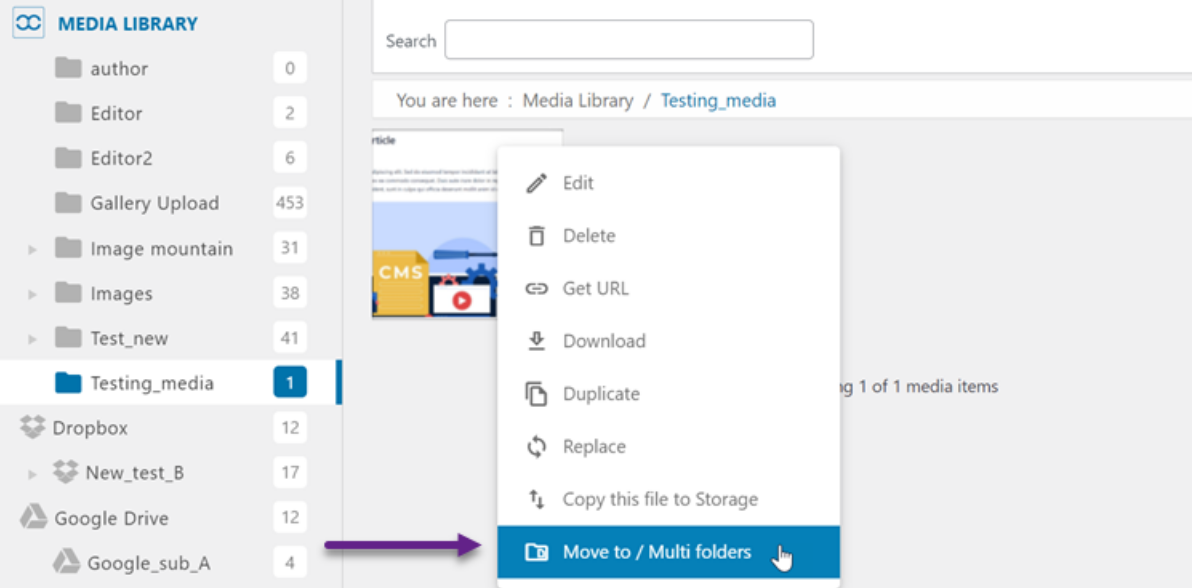
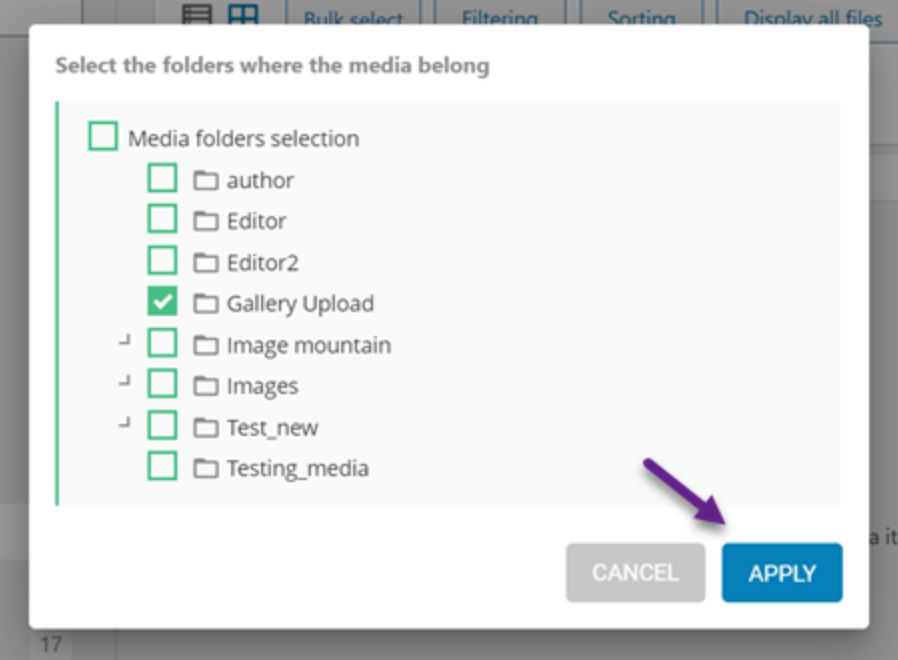
After that, you will see a list of available folders, such as Gallery Upload. Choose the desired folder, then click Apply.
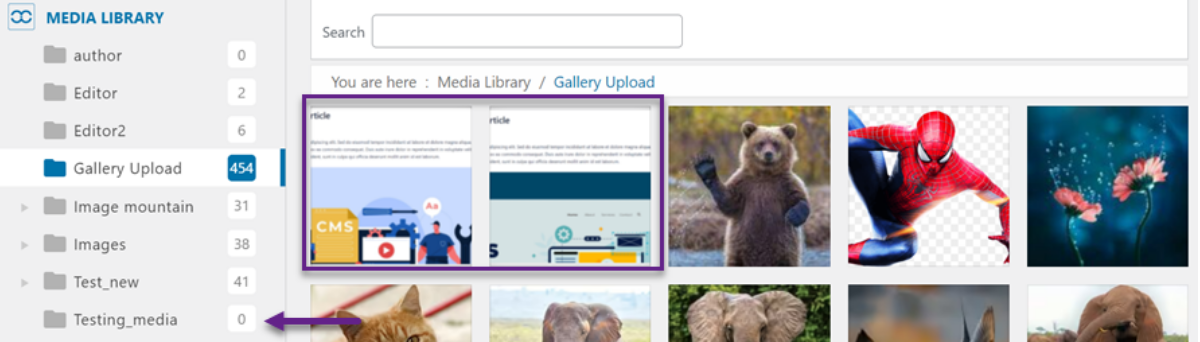
If the process is successful, open the Gallery Upload folder and you will see the moved files there. Meanwhile, the file count in the Testing_media folder will update to 0 files.
2. Copying File to a Folder in the Media Library
On the other hand, if you want to create a copy of a file and save it to the same folder, you can Right click on the file, then select "Copy this file to storage". Then, you will receive a notification confirming the file has been successfully copied.
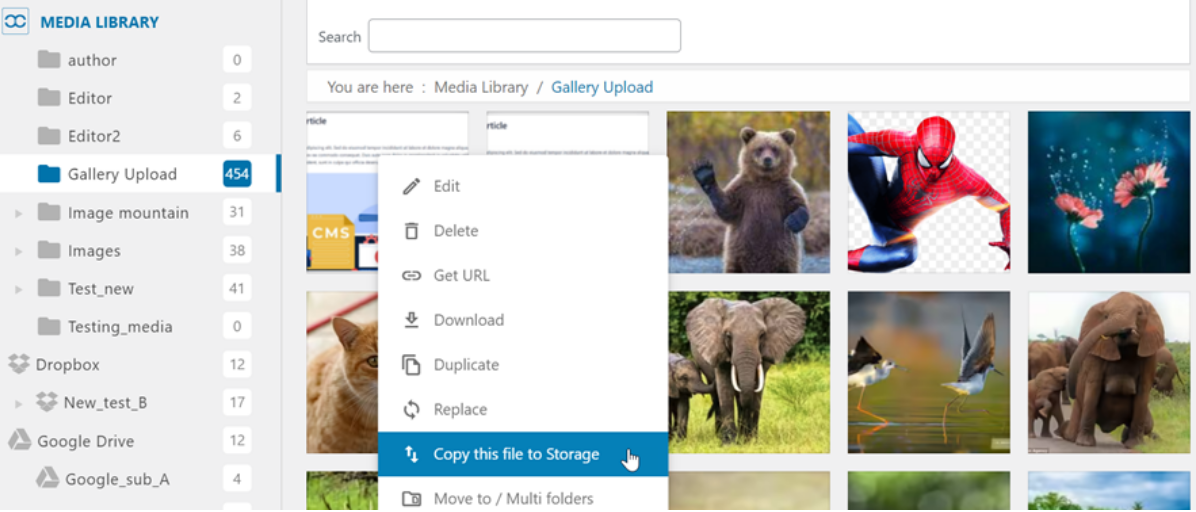
Please note that the copied file will appear in your connected cloud storage, such as Google Drive, not in the local Media Library folder itself.
How to Rename Files and Folders in the Media Library
Keeping your file and folder names consistent is just as important as organizing them into the right structure. WP Media Folder gives you full control over naming, both manually and automatically.
1. Rename Folder in Media Library Folders
Find the folder that you want to change and right-click on the folder you want to rename. Then, choose "Rename" menu and enter the new folder name that you desire.
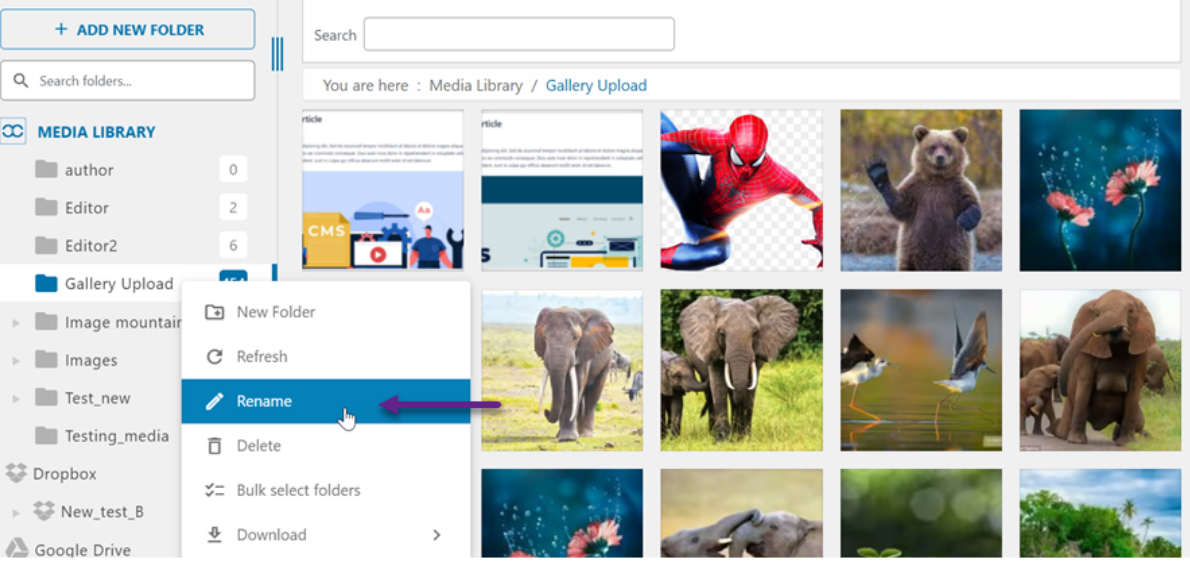
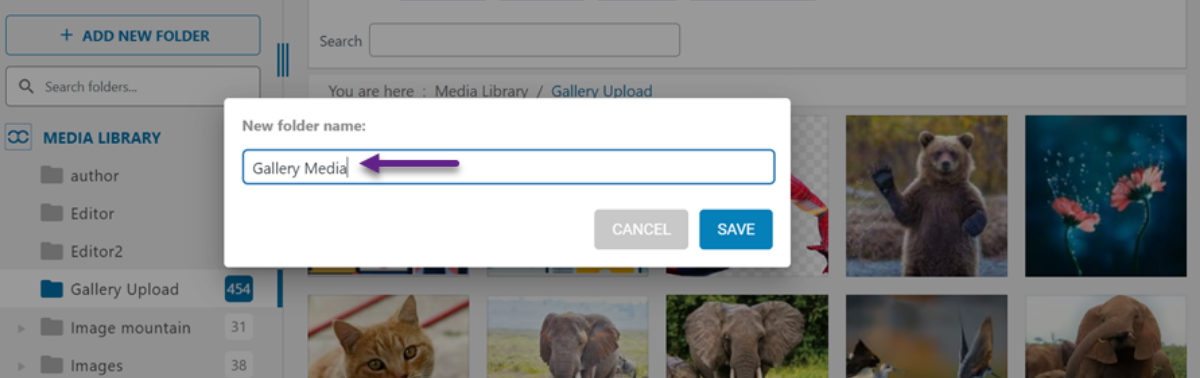
For example, enter the new folder name as shown below, then click Save.
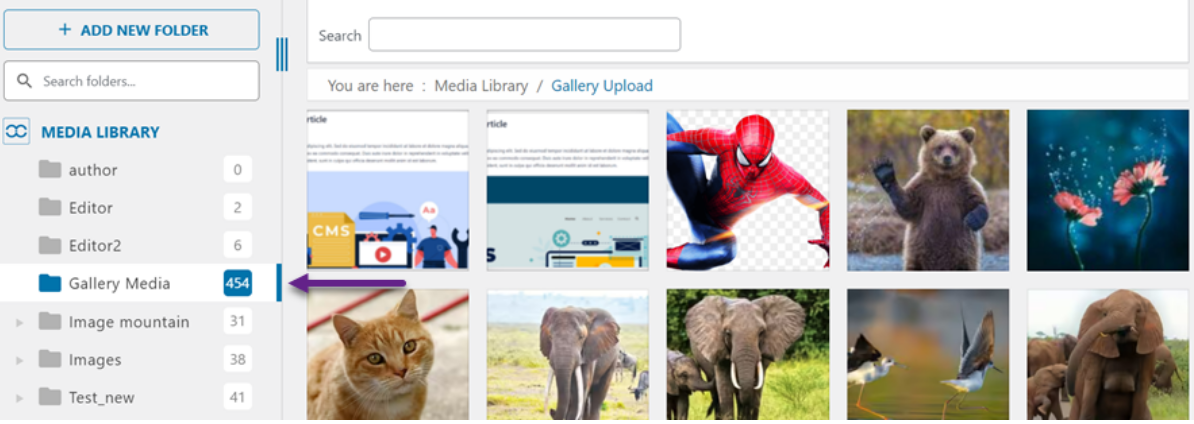
Afterward, you can see that the folder name was successfully changed.
2. Rename File in Media Library Folders
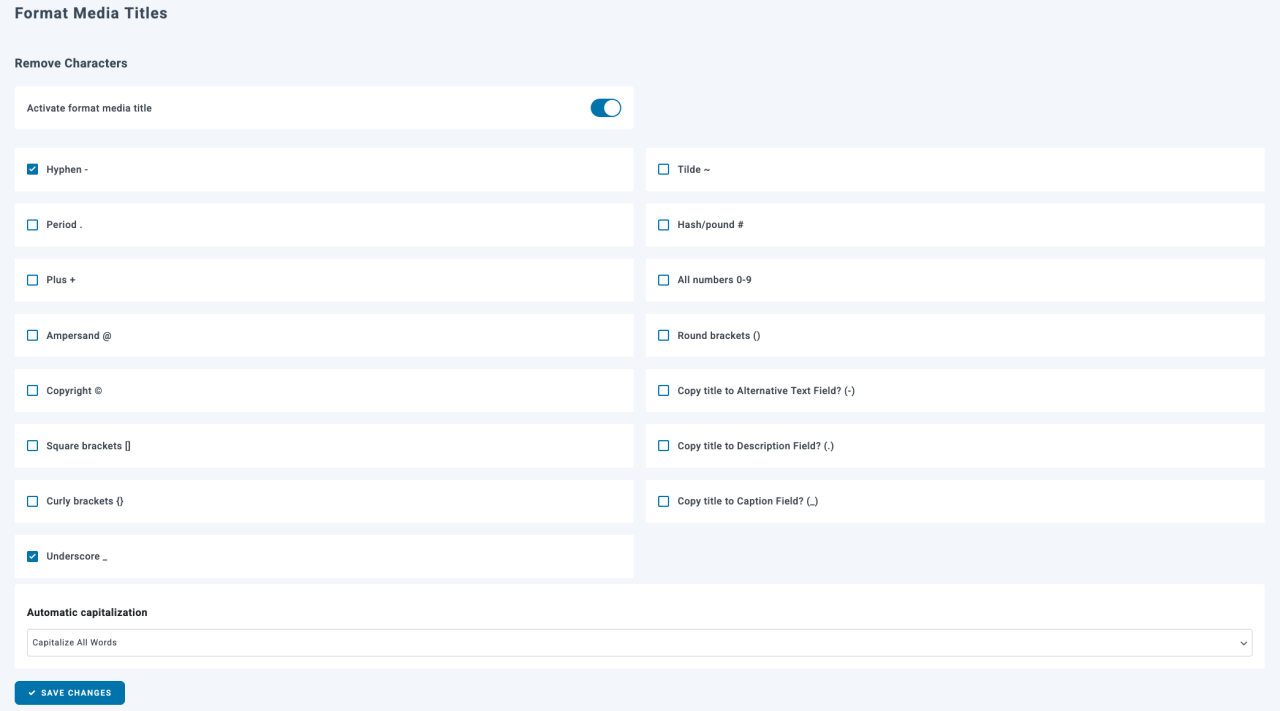
This plugin supports automatic file naming starting when the file is uploaded. This requires a specific configuration.
First, go to Settings > Rename & Watermark. You can click on Activate media rename on upload, then enter a Pattern, for example: {original name} - {foldername}.
Every file you upload will be automatically renamed following this pattern, helping you keep file names organized and consistent.
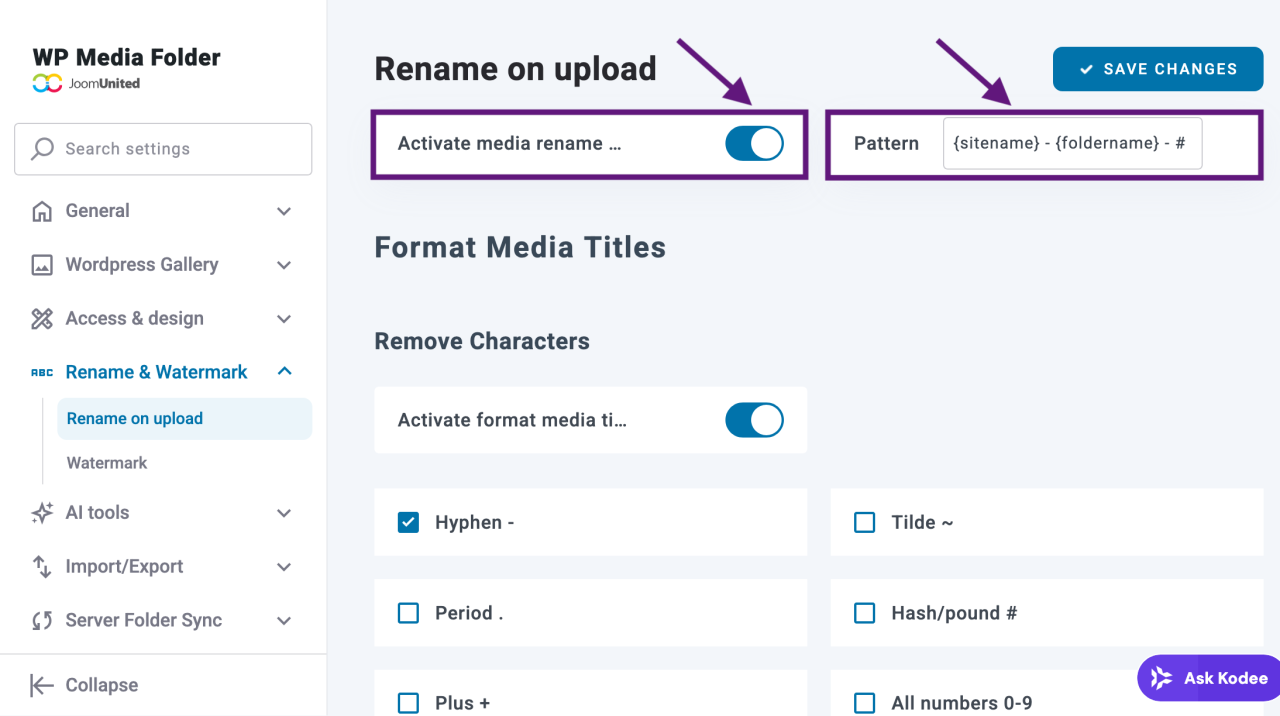
You can choose which characters you want to remove from the default file names. Once finished, click the Save Changes button.
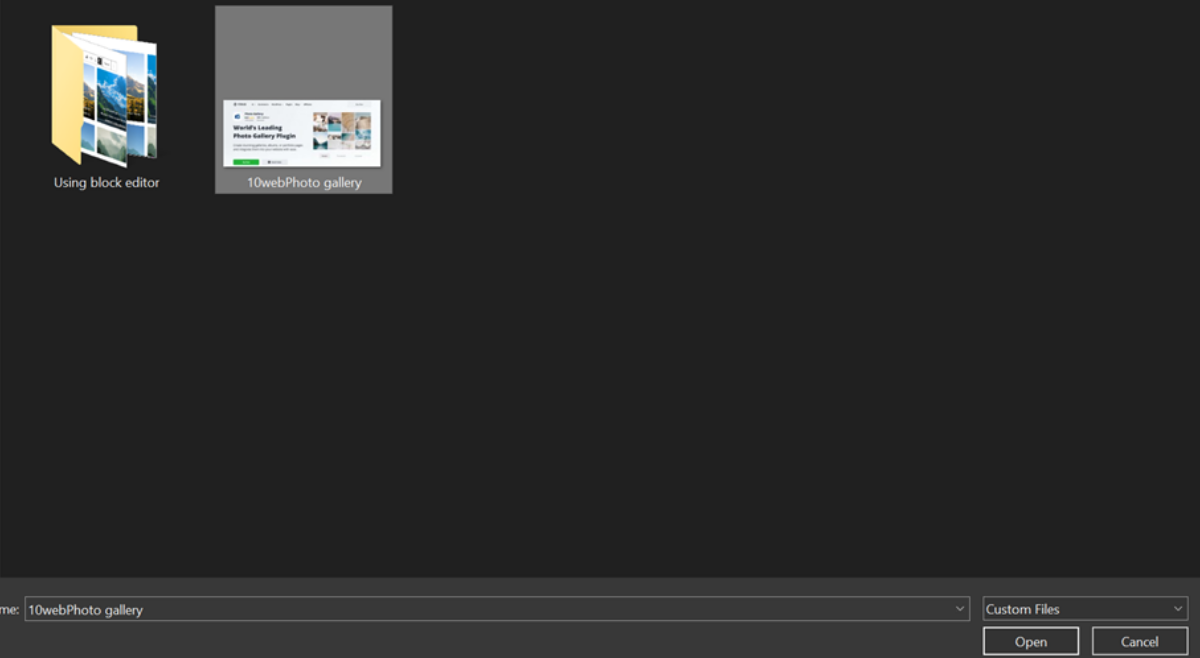
Now let's try uploading a file and see if automatic renaming works. First, select a file, such as "10webPhoto Gallery." After successfully uploading it to WordPress, the file name will change with an additional folder name based on the configured pattern.
After successfully uploading, the file name will automatically change without you needing to edit it manually.
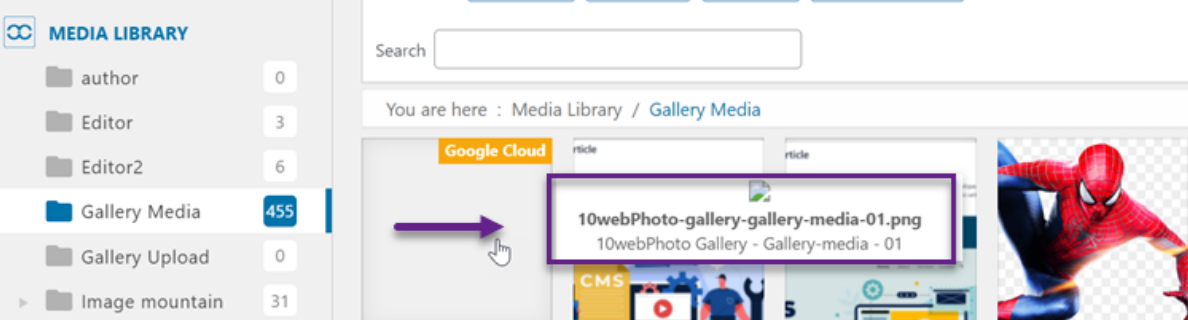
Also, we recommend you type in the SEO-friendly name, such as keywords, that can help optimize your images.
Why WP Media Folder by JoomUnited Stands Out
Throughout this guide, we have been using WP Media Folder by JoomUnited as our plugin of choice and for good reason. It is particularly suited for agencies, e-commerce sites, and content-heavy blogs that need a full-featured file manager with drag-and-drop, cloud sync, and bulk optimization.
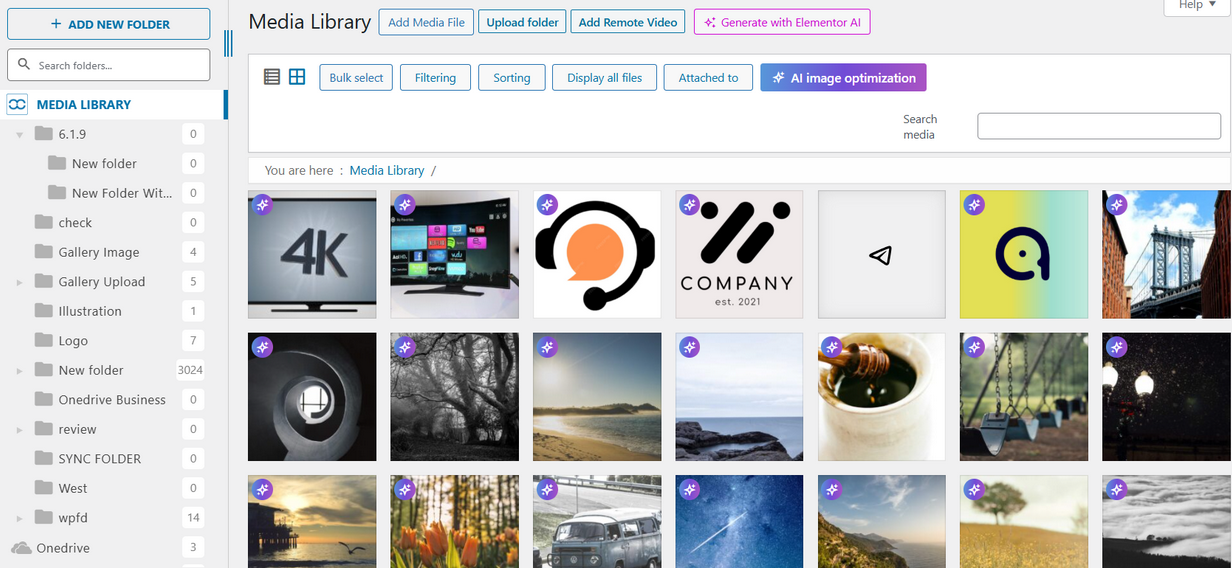
主要功能:
- One-click AI metadata generation (title, alt text, description)
- 无限文件夹和子文件夹
- Drag-and-drop management
- Cloud integrations (Google Drive, OneDrive, Dropbox, Amazon Web Services, DigitalOcean, Google Cloud, Wasabi, and more)
- Google Photos 集成
- Bulk image processing and optimization
- Media preview and search
- Replace media everywhere without breaking links
优点:
- Easy folder-based organization
- One-click AI metadata generation for faster SEO
- Drag-and-drop workflow
- SEO-friendly media management
- Extensive cloud integration options
- Advanced media access control by user or role
- Scales well for large websites
缺点:
- Premium plans required for cloud and gallery add-ons
- Advanced features may take time to explore for new users
价格:
- WP Media Folder (Plugin + 1 Year Support & Update) – $49/year
- Plugin + All Addons (Plugin + 1 Year Support & Update + Cloud & Gallery Addons) – $69/year
呼叫所有网站管理员!
使用 WP Media Folder节省时间并提高生产力。轻松组织客户媒体文件,创建自定义图库,并提供无缝的用户体验。
立即升级您的网站项目!
结论
Organizing your WordPress media library using folders is crucial in maintaining an efficient and well-structured website. Implementing a plugin like WP Media Folder by JoomUnited can significantly streamline your media management process, saving time and improving overall site performance.
This article has guided you through the essential steps of installing the plugin, creating folders, uploading files, and efficiently moving, copying, and renaming media within your WordPress environment. With flexible pricing options and no auto-renewal policy, you can choose the plan that best fits your needs and get started today.
当您订阅博客后,如果网站有新更新,我们会发送电子邮件通知您,以免您错过。.