Sản phẩm WordPress
 Sản phẩm Joomla
 Hỗ trợ
 Tin tức
 Đăng nhập
Hướng dẫn từng bước cách chuyển dữ liệu đa phương tiện WordPress lên Cloudflare R2 bằng WP Media Folder

Khi một website WordPress phát triển, hình ảnh, video, PDF và các tệp phương tiện khác có thể trở nên tốn kém và khó quản lý trên máy chủ lưu trữ thông thường. Thư viện phương tiện lớn làm tăng dung lượng lưu trữ, khiến việc sao lưu nặng hơn và tạo thêm áp lực lên cùng một máy chủ đang chạy WordPress, theme, plugin và cơ sở dữ liệu. Bằng cách chuyển các tệp phương tiện của WordPress sang Cloudflare R2 với WP Media Folder, bạn có thể di chuyển các tệp đó đến một hệ thống lưu trữ đám mây có khả năng mở rộng trong khi vẫn giữ cho việc quản lý phương tiện đơn giản ngay trong bảng điều khiển WordPress.
This setup is especially useful for high-traffic websites because Cloudflare R2 is designed around zero-egress-cost storage, meaning you are not charged traditional outgoing bandwidth fees when files are delivered from R2. WP Media Folder makes the process easier by connecting your WordPress media library to Cloudflare R2, helping you copy new uploads, synchronize existing files, rewrite media URLs, and reduce the load on your hosting server without needing complex development work.
In this guide, we will explain what makes Cloudflare R2 different, how WP Media Folder integrates with R2, how media delivery works through Cloudflare, and how to follow a practical step-by-step workflow for offloading WordPress media safely and efficiently.
Tạm biệt thư viện media lộn xộn.
WP Media Folder cho phép bạn phân loại tệp, đồng bộ hóa thư mục với lưu trữ đám mây, tạo thư viện ảnh tuyệt vời và thậm chí thay thế hình ảnh mà không làm hỏng liên kết.
Tối ưu hóa quy trình làm việc phương tiện của bạn ngay hôm nay
Nội dung bảng
- Why Offload WordPress Media to Cloudflare R2
- What Makes Cloudflare R2 Different
- Performance Benefits of Offloading Media
- Requirements Before Starting
- Step 1: Create Your Cloudflare R2 Credentials
- Step 2: Open the WP Media Folder Cloud Settings
- Step 3: Add Your Cloudflare R2 Credentials
- Step 4: Select or Create a Cloudflare R2 Bucket
- Step 5: Configure the R2.dev or Custom Subdomain
- Step 6: Enable Copy to Cloudflare R2
- Step 7: Synchronize Existing WordPress Media
- Step 8: Enable Remove After Upload for Full Media Offload
- Media Delivery Through Cloudflare CDN
- Scale WordPress Media with WP Media Folder and Cloudflare R2
Why Offload WordPress Media to Cloudflare R2

WordPress stores uploaded files in the media library by default. These files usually live inside the wp-content/uploads folder on your hosting server. This works well for small websites, but it can become limiting when the site starts receiving more traffic or when the media library grows with hundreds or thousands of files.
Every image loaded on a page uses hosting resources. Every PDF download, product image, gallery, or video file also increases bandwidth usage. If your website relies heavily on visual content, your hosting server may spend a lot of time serving files rather than focusing on WordPress itself.
Offloading media means moving those files away from your local WordPress server and storing them in a cloud storage service like Cloudflare R2. The files remain available on your website, but they are delivered from cloud storage instead of your hosting account.
The main benefits include:
- Lower pressure on your WordPress hosting server
- Better scalability for large media libraries
- Smaller and cleaner server backups
- More predictable storage management
- Reduced outgoing bandwidth cost compared with traditional cloud storage
- Better performance for high-traffic media pages
For websites with global audiences, media offloading can also help deliver content more efficiently because files are handled through Cloudflare's infrastructure rather than only from one hosting location.
What Makes Cloudflare R2 Different
Cloudflare R2 is an object storage service. In simple terms, object storage is a cloud-based place to store files such as images, videos, PDFs, audio files, and documents. Instead of saving everything on your web hosting server, you store those files in a separate storage system designed for scale.
The major difference with Cloudflare R2 is its zero-egress-cost model. Egress means outgoing data transfer. For a WordPress website, this usually happens when visitors load images, download PDFs, or view media files from your pages.
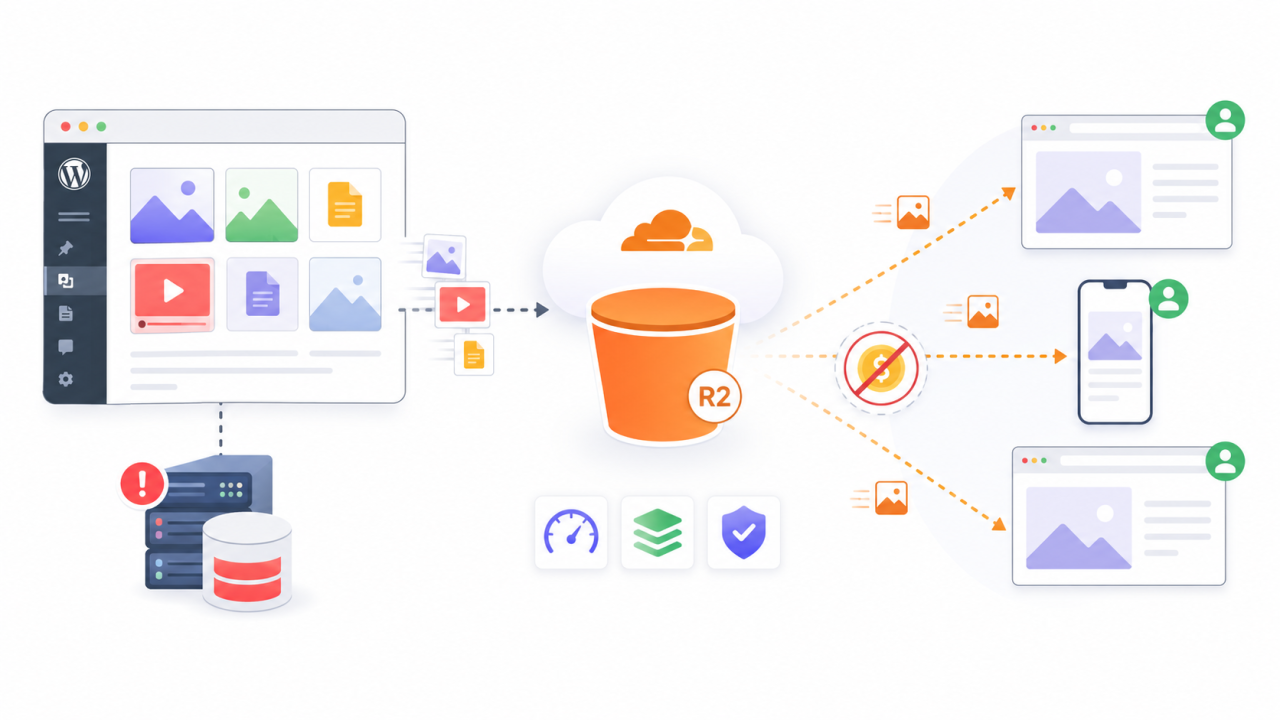
Many traditional cloud storage providers charge for storage and also charge when files are transferred out to visitors. On high-traffic websites, these transfer costs can become a major part of the bill. Cloudflare R2 removes this specific bandwidth charge, which makes it attractive for websites that serve a lot of media.
This does not mean every part of R2 is free. Storage usage and operations still matter. Uploads, file reads, and storage volume can still affect your monthly cost. However, removing egress bandwidth fees can make a significant difference for media-heavy WordPress websites.
Cloudflare R2 is especially useful for:
- Image-heavy blogs
- WooCommerce stores with many product photos
- Download websites
- Online course platforms
- Photography portfolios
- Magazines and publishers
- Membership websites with media files
- Global websites with traffic from many countries
Performance Benefits of Offloading Media

Performance is another important reason to offload WordPress media. When media files are served from your hosting server, each file request adds load to that server. This can affect the speed of your website, especially during traffic spikes.
By using WP Media Folder with Cloudflare R2, media delivery is moved away from your WordPress hosting environment. Your server can focus more on running WordPress, processing pages, and handling database requests.
This can lead to:
- Faster page delivery
- Lower hosting resource usage
- Better stability under traffic spikes
- Fewer storage-related hosting limitations
- More efficient backups
Performance also supports SEO. Search engines care about user experience, and faster pages usually create better engagement. While media offloading is not the only SEO factor, it supports a stronger technical foundation for your website.
Requirements Before Starting
Before connecting WordPress to Cloudflare R2 with WP Media Folder, make sure you have the necessary tools ready.
You will need:
- An active WordPress website
- WP Media Folder installed
- WP Media Folder Cloud Addon installed
- A Cloudflare account
- Access to Cloudflare R2
- Permission to create API credentials
- Permission to create or select an R2 bucket
The Cloudflare R2 integration is part of the WP Media Folder Addon, so the Cloud Addon is required in addition to the main WP Media Folder plugin. This is an important point because the base plugin handles media management, while the addon enables cloud storage integrations such as Cloudflare R2.
Step 1: Create Your Cloudflare R2 Credentials
The first step is to create the credentials that allow WP Media Folder to connect securely to Cloudflare R2.
Inside your Cloudflare dashboard, go to the API section and manage API tokens. From there, create a new token for R2 access. During this process, Cloudflare will generate the key information required for the connection.
You should keep the following details available:
- Mã định danh khóa truy cập
- Khóa truy cập bí mật
- ID tài khoản
These credentials are what WP Media Folder uses to authenticate the connection between WordPress and Cloudflare R2.
The Access Key ID identifies the connection. The Secret Access Key acts like a password. The Account ID tells WP Media Folder which Cloudflare account should be used. Keep these values secure and do not share them publicly.
Step 2: Open the WP Media Folder Cloud Settings
After preparing your Cloudflare R2 credentials, return to your WordPress dashboard.
Go to:
Settings > WP Media Folder > Cloud & Media offload > Media offload
From the media offload settings, select Cloudflare R2 as the cloud provider.
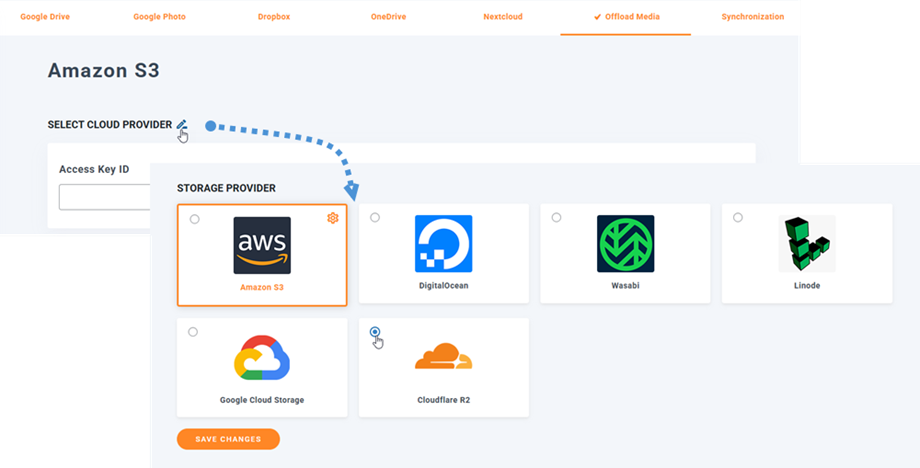
This is where WP Media Folder connects WordPress to your Cloudflare R2 storage. The interface is designed so you do not need to manually edit WordPress files or write code.
Step 3: Add Your Cloudflare R2 Credentials
Once Cloudflare R2 is selected in WP Media Folder, paste the required credentials into the connection fields.
You will need to enter:
- Mã định danh khóa truy cập
- Khóa truy cập bí mật
- ID tài khoản
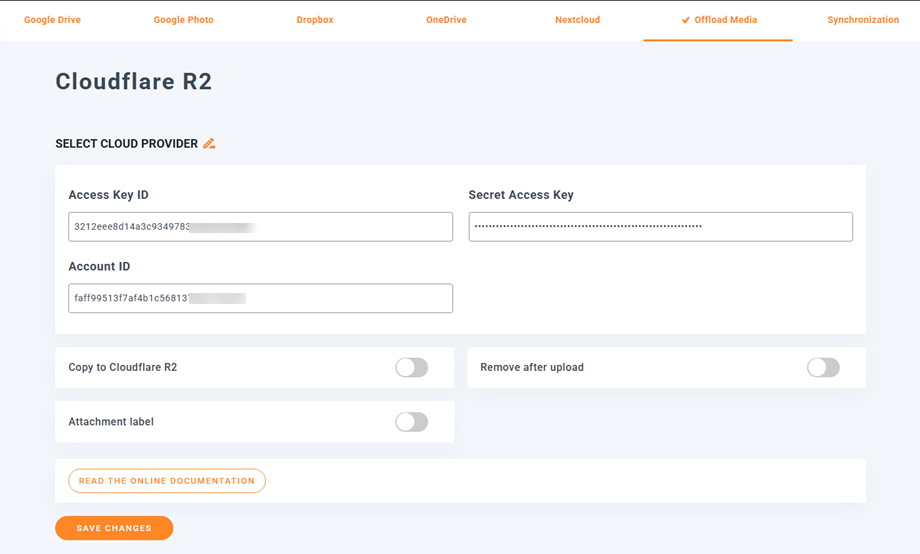
After adding the credentials, save the settings.
If the credentials are correct, WP Media Folder should be able to connect to Cloudflare R2 successfully. If the connection fails, check for common issues such as an incorrect copied key, missing permissions, or using credentials from the wrong Cloudflare account.
Step 4: Select or Create a Cloudflare R2 Bucket
A bucket is the storage container where your WordPress media files will be stored. Think of it as the cloud folder that holds your uploaded images, documents, videos, and other media assets.
After connecting WP Media Folder to Cloudflare R2, you can select an existing bucket or create a new one from the plugin settings.
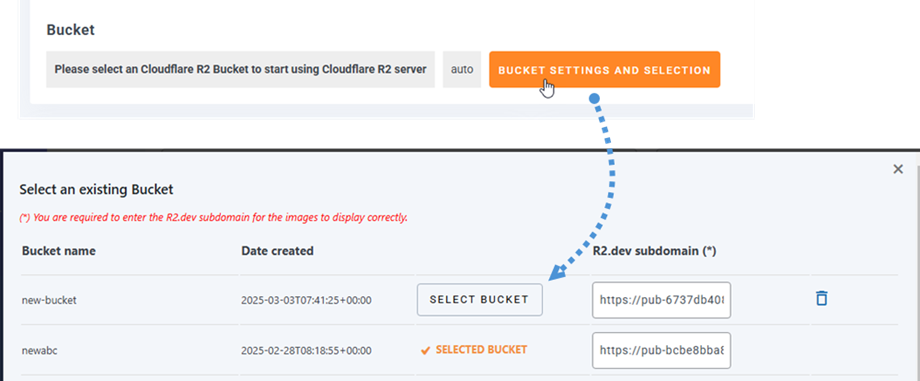
Using a dedicated bucket for your WordPress website is usually the best approach. This keeps your website files separate from other projects and makes management easier.
For example, you could create a bucket name related to your website, brand, or project. Keep the bucket name simple, clear, and easy to identify later.
Step 5: Configure the R2.dev or Custom Subdomain
To serve media files from Cloudflare R2, your bucket needs a public delivery URL. Cloudflare can provide an R2.dev subdomain, or you can use a custom domain depending on your setup.
The R2.dev subdomain gives your bucket a public address that can be used to load media files on your website. WP Media Folder can use this address when rewriting media URLs.
In Cloudflare, open the bucket settings and enable access for the R2.dev subdomain if needed. Then copy the URL and use it in the related field inside the WP Media Folder Cloudflare R2 settings.
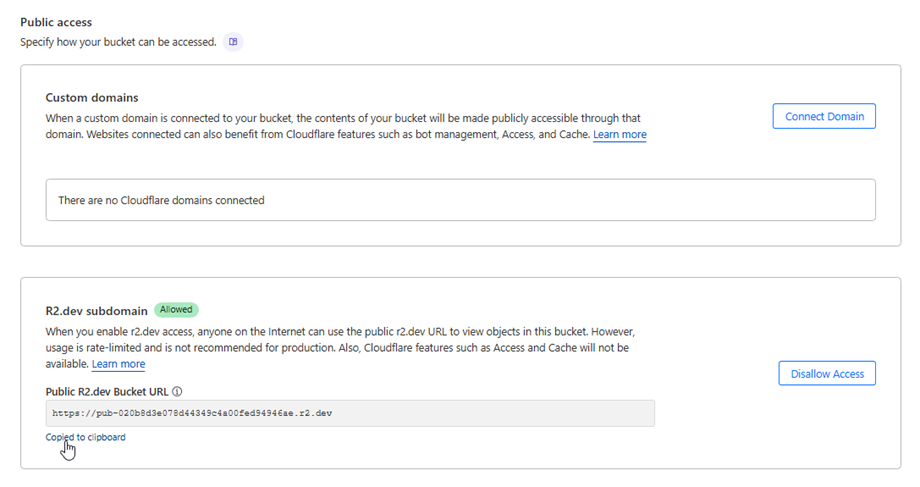
This step is important because WordPress needs to know where the offloaded files should be loaded from.
Step 6: Enable Copy to Cloudflare R2
After selecting the bucket, enable the Copy to Cloudflare R2 option inside WP Media Folder.
This tells the plugin to send new WordPress media uploads to your Cloudflare R2 bucket. Once enabled, future files uploaded through the WordPress media library can be copied to R2 automatically.
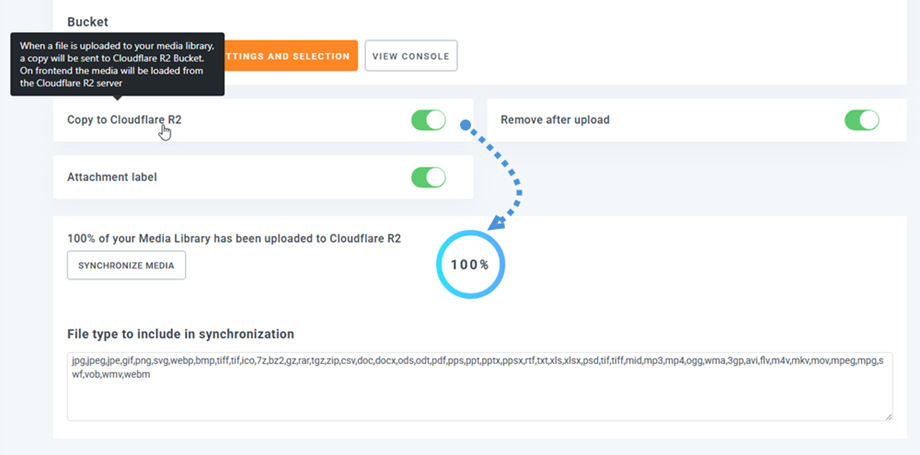
This is one of the most important parts of the workflow because it starts moving media delivery away from your local server and into cloud storage.
For new websites, this can be enabled early so the media library begins with a clean cloud-based structure. For existing websites, it is often better to test with new uploads first before synchronizing the full media library.
Step 7: Synchronize Existing WordPress Media
If your website already has media files, new uploads are only part of the solution. You may also want to move existing media from WordPress to Cloudflare R2.
WP Media Folder includes a Synchronize Media option for this purpose. When used, the plugin sends your existing WordPress media library to the selected Cloudflare R2 bucket.
This is useful for websites that already have many uploaded files and want to reduce local server storage usage.
Step 8: Enable Remove After Upload for Full Media Offload
Copying media to Cloudflare R2 is useful, but if you want to fully reduce local server storage, you should also enable the Remove after upload option.
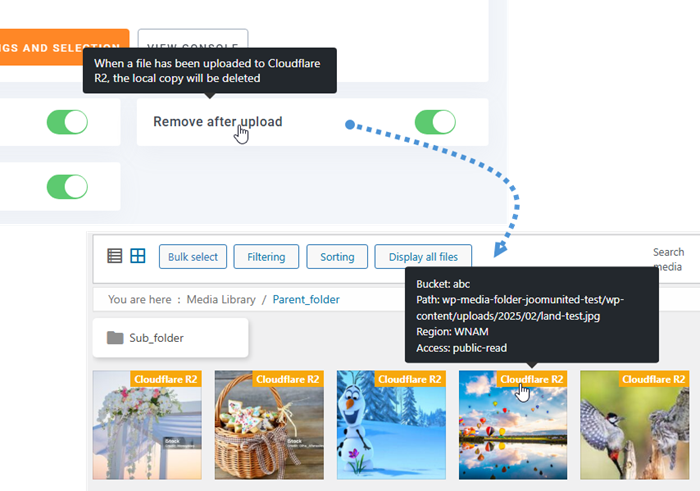
When enabled, WP Media Folder stores your media library on Cloudflare R2 instead of keeping all files on your WordPress server. This is the setting that creates a more complete media offload workflow.
This option is especially valuable for websites where local storage is becoming expensive or difficult to manage.
However, because this changes where your media files are stored, it should be used carefully. Always confirm that the R2 connection works, URLs are rewritten correctly, and media files are accessible from the frontend before relying on this option for a large production website.
Media Delivery Through Cloudflare CDN
One of the biggest advantages of using Cloudflare R2 is that it works naturally with Cloudflare's delivery network. A CDN, or content delivery network, is a group of servers that helps deliver files from locations closer to visitors.
For non-technical users, the concept is simple: instead of every visitor loading files from one hosting server, Cloudflare helps deliver those files through a faster global network.
This can improve performance for visitors in different countries or regions. If your WordPress site has global traffic, media delivery through Cloudflare can help reduce delays when loading images, videos, or downloadable files.
When combined with WP Media Folder, the workflow stays simple. You manage media in WordPress, WP Media Folder connects it to R2, and Cloudflare helps deliver those files efficiently.
Gọi tất cả quản trị web!
Tiết kiệm thời gian và tăng năng suất với WP Media Folder. Dễ dàng sắp xếp tệp phương tiện của khách hàng, tạo thư viện tùy chỉnh và cung cấp trải nghiệm người dùng liền mạch.
Nâng cấp website dự án ngay bây giờ!
Scale WordPress Media with WP Media Folder and Cloudflare R2
Offloading WordPress media to Cloudflare R2 with WP Media Folder is a smart way to reduce server load, improve scalability, and optimize media delivery costs. Cloudflare R2 provides a strong zero-egress-cost storage model, while WP Media Folder makes the integration manageable directly from WordPress.
By connecting WP Media Folder to Cloudflare R2, selecting a bucket, enabling copy and offload options, synchronizing existing media, and checking URL rewriting, you can build a more efficient media system without complicated manual work.
For high-traffic websites, global audiences, and large media libraries, this workflow offers a practical balance of performance, cost control, and ease of management. With the right configuration, WP Media Folder and Cloudflare R2 help WordPress websites grow without letting media storage become a hosting bottleneck.
Khi bạn đăng ký theo dõi blog, chúng tôi sẽ gửi cho bạn một email khi có bản cập nhật mới trên trang web để bạn không bỏ lỡ chúng.