WP Media Folder: Configuration
Global settings are available through the menu Settings > WP Media Folder > General > Main Settings tab.
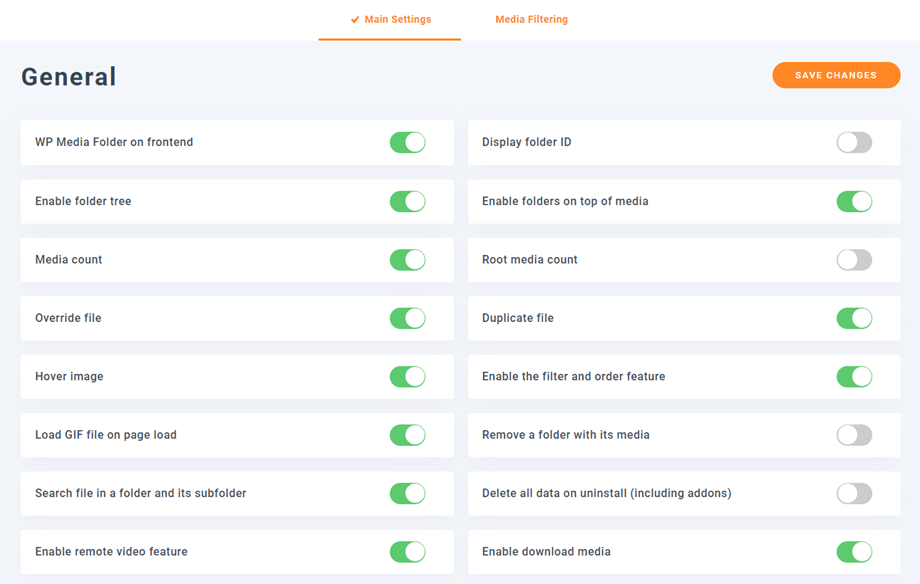
1. General settings
- WP Media Folder on frontend: If you're using a page builder that is available on the frontend, you can activate this option to use WP Media folder. If not, keep it disabled - you'll get better performance without it
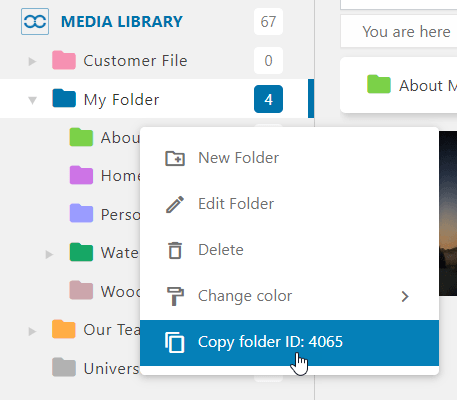
- Display folder ID: Display and copy the folder ID by making a right-click on the folder
- Enable folder tree: Load a left folder tree on the left part of the media manager for a faster folder navigation
- Enable folders on top of media: Enable or not the display of folders in the main view on top of the media
- Media count: Display the number of media available in each folder in the folder tree
- Root media count: Display the number of media available in root folder, in the folder tree. This option is applied for administrator role only.
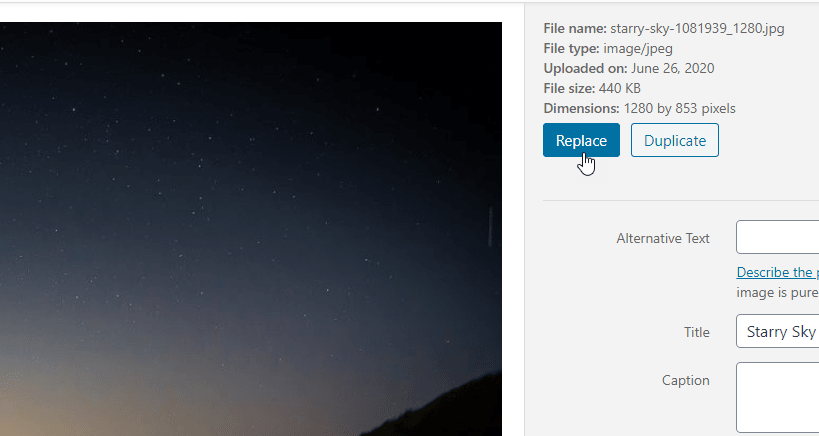
- Override file: Replace an existing file with another without generating broken links (same format allowed, for example from .jpg to .jpg)
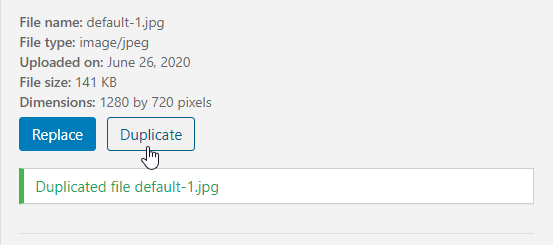
- Duplicate file: Add a button to duplicate a media from the media manager
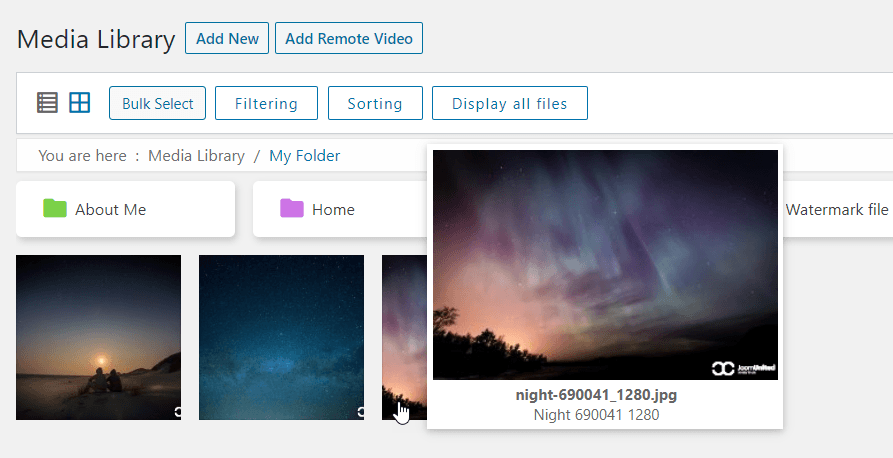
- Hover image: On mouse hover on an image, a large preview is displayed
- Enable the filter and order feature: Additional filters will be added in the media views
- Load GIF file on page load: Automatically play the GIF animation on page load. By default, it’s a static image in WordPress
- Remove a folder with its media: When you remove a folder all media inside will also be removed if this option is activated. Use with caution
- Search file in a folder and its subfolder: If enabled, when you search file in a folder, it will search in its subfolders too
- Delete all data on uninstall (including addons): all your media files will be removed when uninstalling our plugin.
- Enable remote video feature: Include and manage remote video from Youtube Vimeo or Dailymotion
- Enable download media: Right-click on media to download (Grid view)
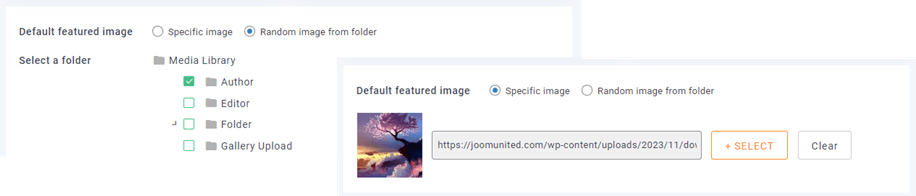
- Default featured image: Select a default image or a random image from a media folder to be loaded by default in any new post. The image can be replaced by editing it in the post of course
- Media count: Display the number of media available in each folder in the folder tree
- Override file: Replace an existing file with another without generating broken links. Click on Replace button and select an image from your PC.
- Duplicate file: Duplicate a media file by clicking on a Duplicate button only.
- Hover image: Display a hover effect that displays the image in a medium size on mouse hover in the administration panel
- Filter and order feature: Order and filter media activation
- Display folder ID: Display and copy the folder ID by making a right click on the folder
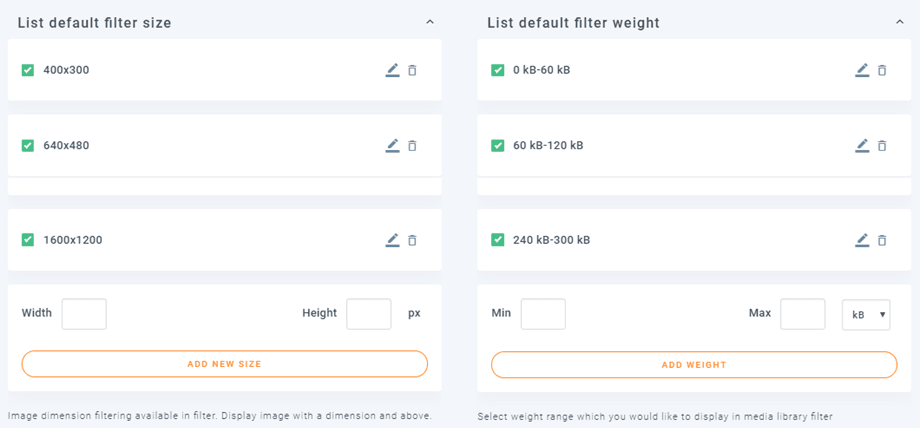
- Media size filter and weigh filters: Add, remove or define filtering range
2. Gallery settings
You can go to Settings > WP Media Folder > Wordpress Gallery > Gallery Features tab
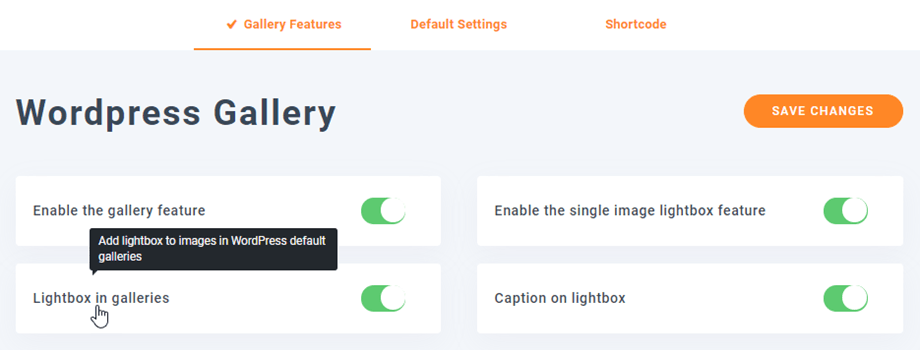
- Enable the gallery feature: Enable or disable gallery functions (create gallery by folder, gallery themes...)
- Lightbox in galleries: Add a lightbox to images in WordPress default galleries
- Enable the single image lightbox feature: Add a lightbox option on each image of your WordPress content
- Caption on lightbox: Use caption of images on lightbox instead of title
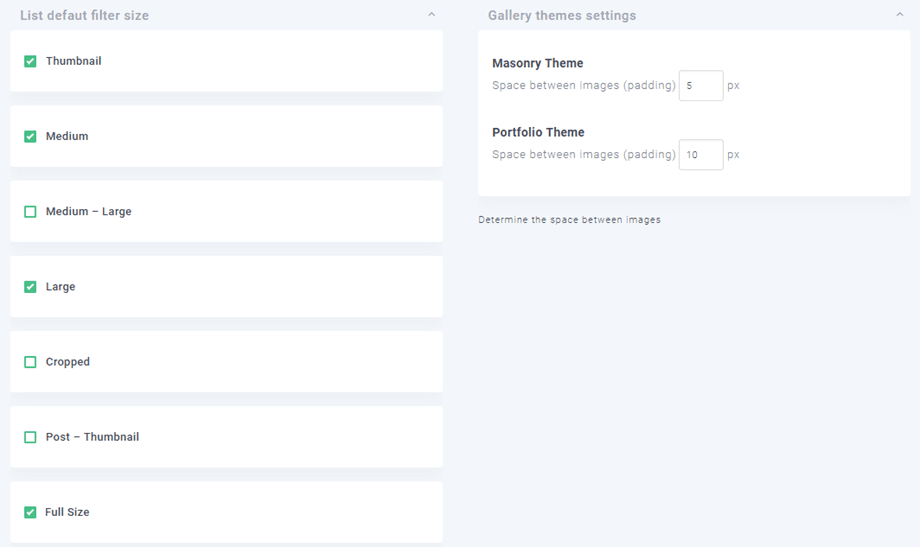
Gallery image size and settings: Choose which image sizes will be available to be chosen in galleries. WordPress has 6 sizes of images defined by default in the media settings. Once you install new plugins, a new size can be added. For example, WooCommerce is adding a custom size for its products. You can choose which size to load in the image galleries here.
Sync/import NextGEN galleries: Only displayed if the plugin is installed - import or make new sync of the NextGEN galleries available on the website
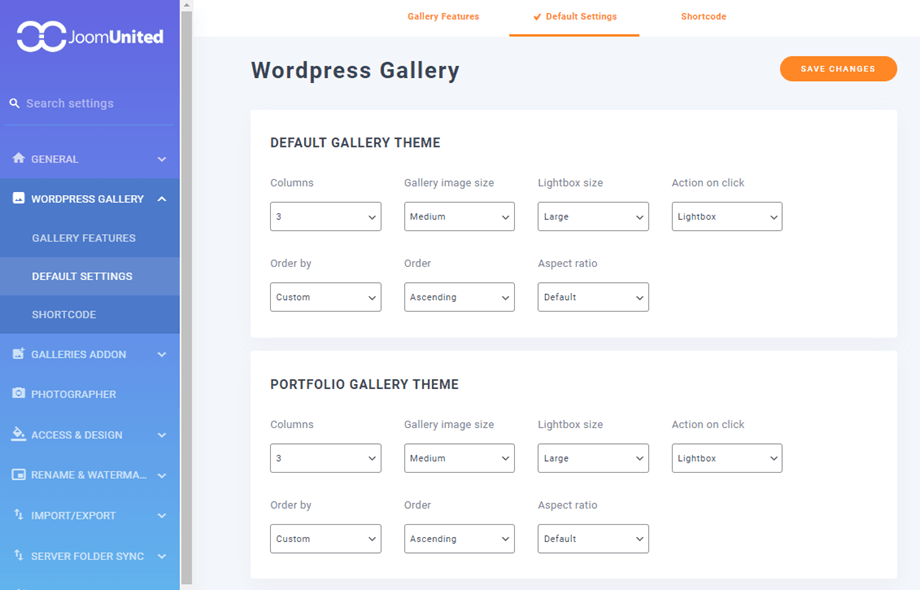
Default settings
There are four default themes available in the gallery. To adjust the options for these themes, navigate to Settings > WP Media Folder > Wordpress Gallery > Default Settings tab
The 2 first themes: Default and Portfolio Gallery Theme have the same settings:
- Columns
- Gallery image size
- Lightbox size
- Action on click
- Order by
- Order
- Aspect ratio
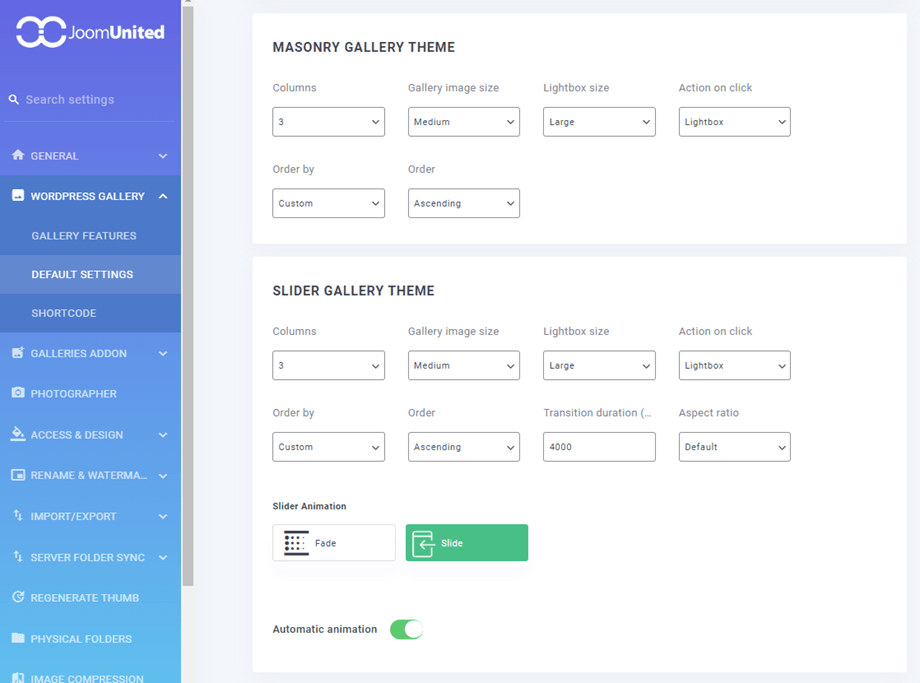
Masonry Gallery Theme:
- Columns
- Gallery image size
- Lightbox size
- Action on click
- Order by
- Order
Slider Gallery Theme:
- Columns
- Gallery image size
- Lightbox size
- Action on click
- Order by
- Order
- Transition duration
- Aspect ratio
- Slider Animation
- Automatic animation
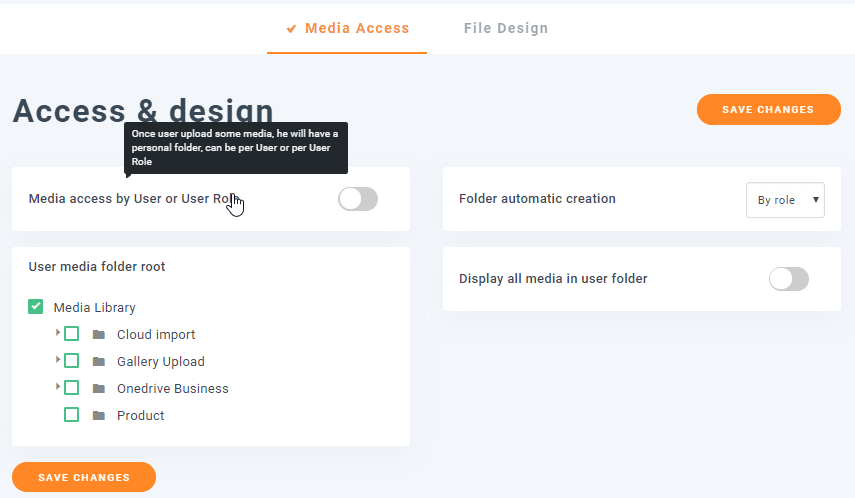
3. Media access
You can go to Settings > WP Media Folder > Access & Design > Media Access tab.
WP Media Folder has an option to limit media display and management to the user's own media only. When a new user is created, a root media folder is generated for them, with their name and all their media inside. They can create subfolders inside. As an administrator, you have an option to display or hide your own media right inside the media manager.
You can limit media access by:
- User (a folder per user)
- User role (a folder per user role)
- Define a root folder where all your user's media/folders will be created
- Display all media in user folder: If activated the user will also be able to see the media uploaded by others in his own folder (additionally to his own media). If not activated, he'll see only his own media
4. Import/Export
Library Import/Export
In order to backup or recover a database from Media library, you can go to Settings > WP Media Folder > Import/Export > WordPress tab.
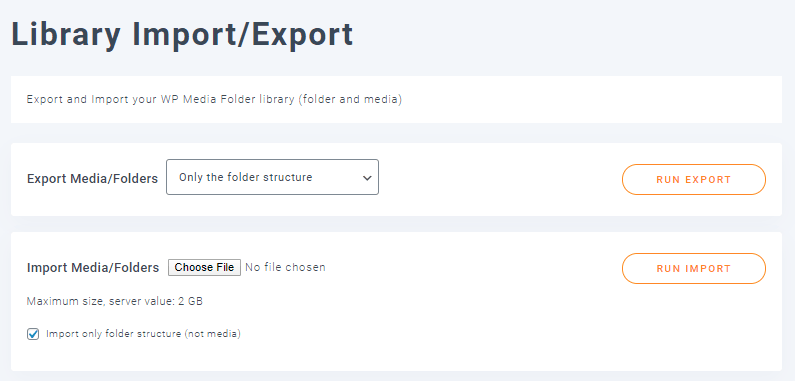
Firstly, Export Media/Folders feature, there are some options to choose before exporting data:
- All folders and media
- Only the folder structure
- A selection of folders and media
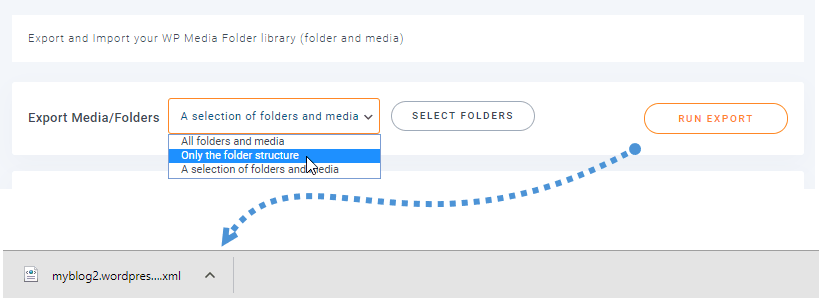
After selecting the right option, just click on Run Export button and finally, an export file will be downloaded automatically on your browser.
Secondly, Import Media/Folders, you select the backup file that you have from Exporting feature. After that, you can tick the option Import only folder structure to import folder structure without media. Then click on Run Import button.

Finally, all your data/structure folders will be restored. That's so cool, I know :)
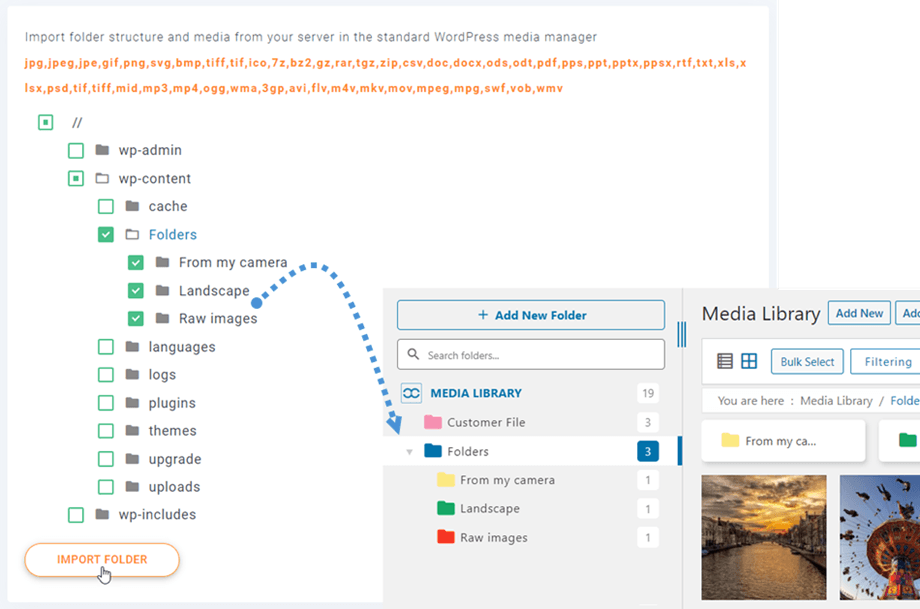
Import Server Folder
A tool is included also in this tab to import a massive amount of media from a server folder in the native WordPress media manager from the plugin. Please select a folder and/or subfolder, click on Import folder button, and it’s done! All the folder structure and media are now available in your native WordPress media manager.
It imports the folder structure and all media inside.
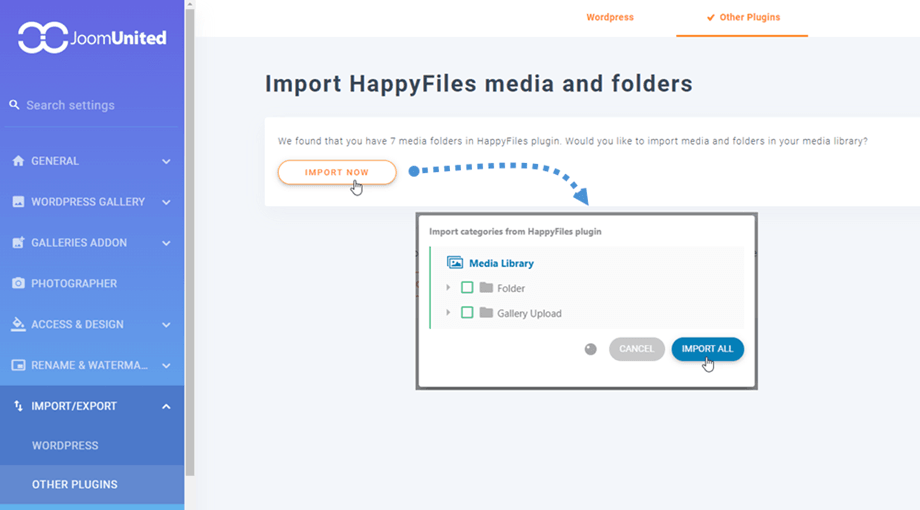
Import from 3rd party plugins
If you ever used one of five plugins: Real Media Library, FileBird, Folders, Media Library Plus, and HappyFiles, you can now easily import them into WP Media Folder. To do this:
- Navigate to the plugin's configuration section.
- Select 'Import/Export' followed by the 'Other plugin' tab.
- Click on the 'Import now' button.
- A popup will appear allowing you to 'Import all' or select specific folders for import.
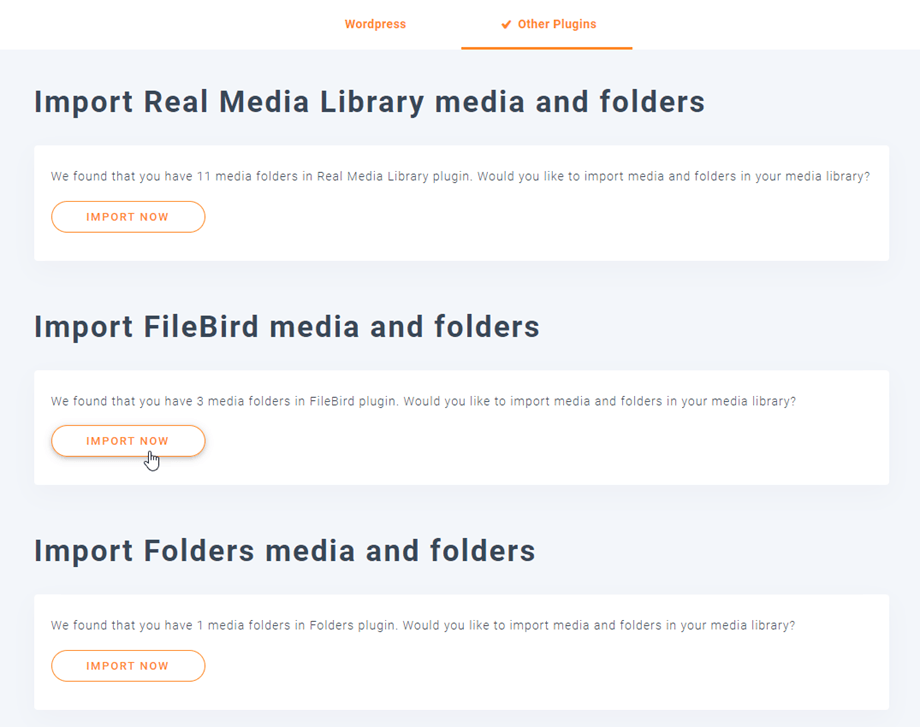
Please note that the import duration may vary based on the number of files and folders you have.
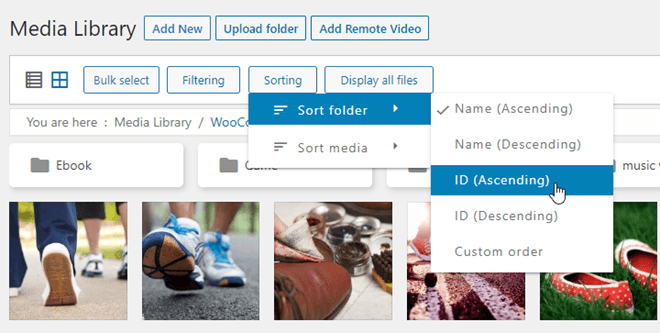
5. Server Folder Sync
A sync tool is also available from the plugin Settings > Server Folder Sync > Folder Sync tab. From there you can sync a folder from the server where your WordPress website is currently installed with a WP Media folder. 3 main settings are available:
- Synchronization methods: from server to WP Media Folder and vice versa
- The folder source and the destination: local server folder to WP Media Folder directory
- The sync delay: delay to run sync between those folders
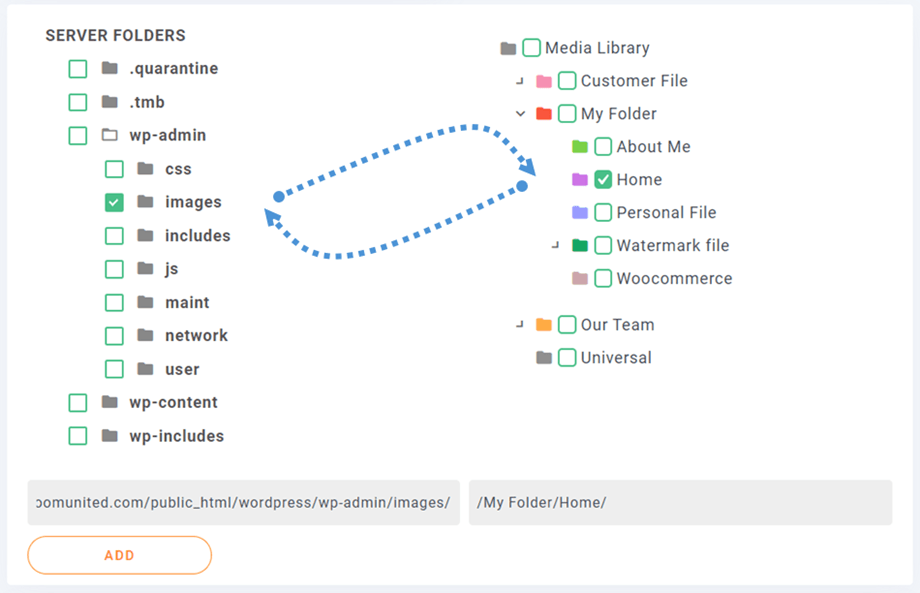
First, you select the folder synchronization options:
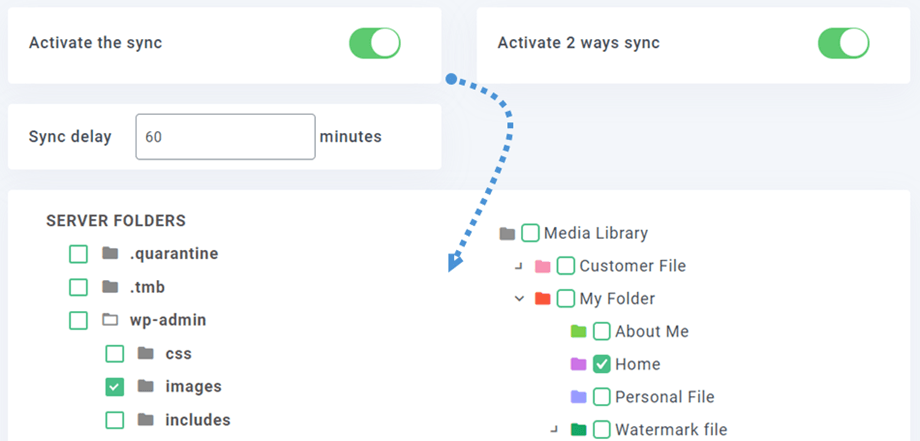
And it’s very flexible, select the server folder (the source) and the WP Media folder (the destination), the synchronization delay and you’re done! Of course, you can do that with several folders (folder list is at the bottom).
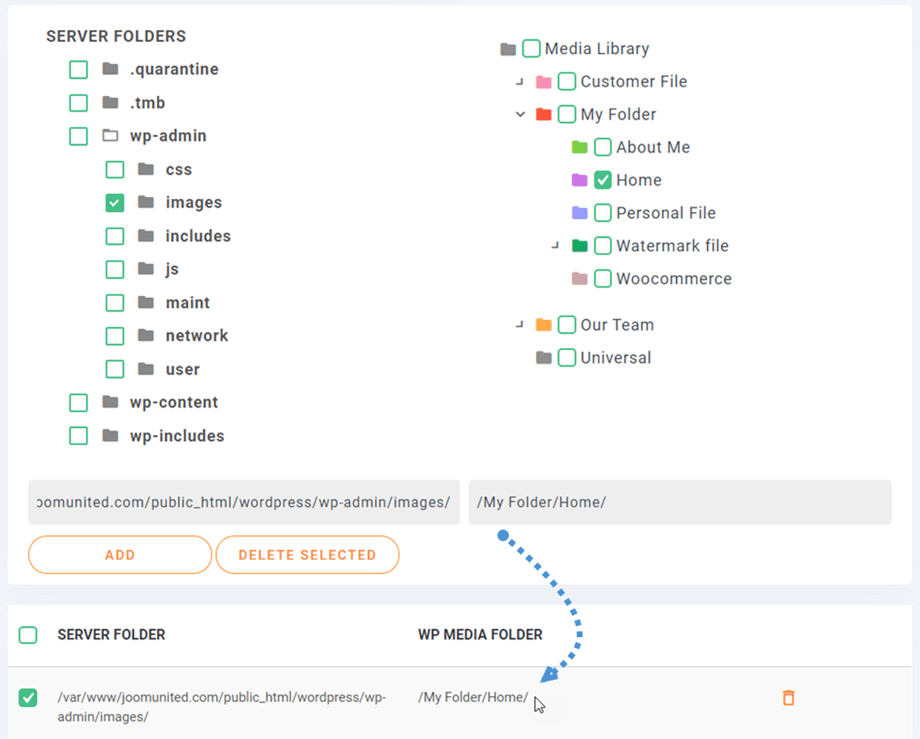
Then just click Add and Save Changes button and wait for the next sync.
That's 2 way synchronization: the media synchronization can also be done in the other way, from WordPress media manager to an external folder. This is pretty useful to share media with another plugin or CMS that is using a folder outside the default WordPress one: “/uploads”.
You can find some options for this feature at Server Folder Sync > Filters tab.
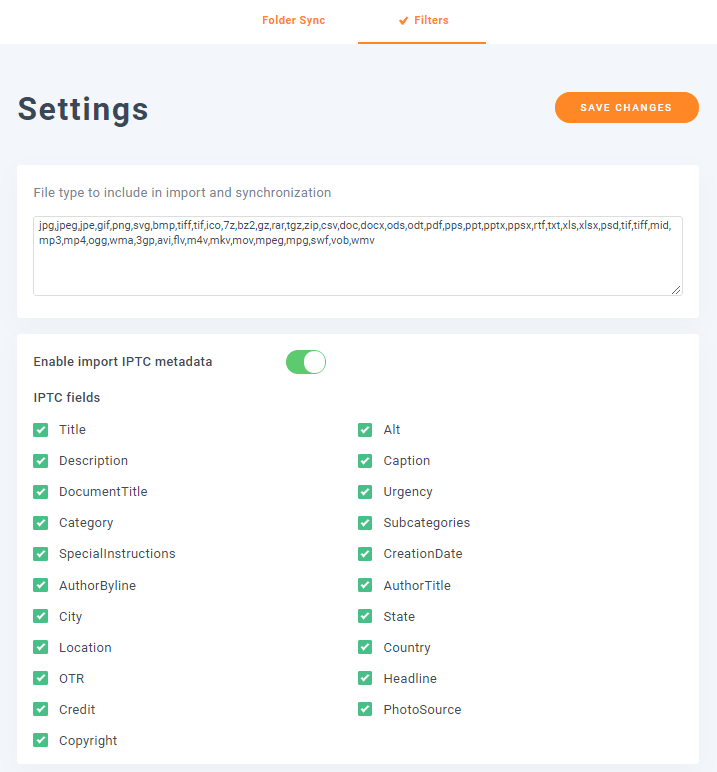
- File type to include in import and synchronization: you can add or remove the file type that you want to import.
- Enable import IPTC metadata: when an image is imported, synchronized or uploaded to the WordPress media library, keep the IPTC metadata attached to the image file.
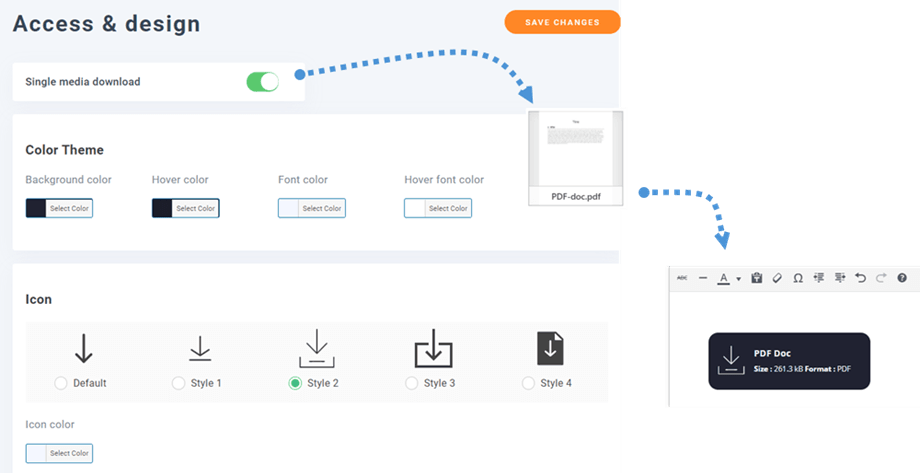
6. Single file design
The WordPress media manager handles not only images but also documents and other file formats (like PDF, zip files). We’ve included a function to add your design to files. You can define a button and font colors, and instead of a basic link to a PDF file, for example, you'll get a real download button. You should go to the plugin Settings > Access & design > File Design tab. There are several options to customize:
- Color theme: background, hover, font and hover font.
- Icon: style and color.
- Border: radius, width, type and color.
- Margin: top, right, bottom and left.
- Padding: top, right, bottom and left.
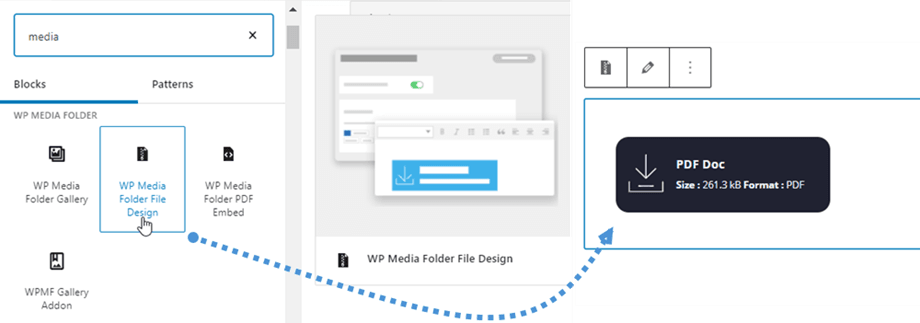
In Classic Editor:
In Gutenberg Editor:
7. Media Rename
You have an option to automatically rename your media on upload, respecting a pattern you’ve defined, which is useful for SEO.
You can find at WP Media Folder configuration > Rename & Watermark > Rename On Upload tab
Tag avaiable: {sitename} - {foldername} - {date} - {original name}
Note: # will be replaced by increasing numbers
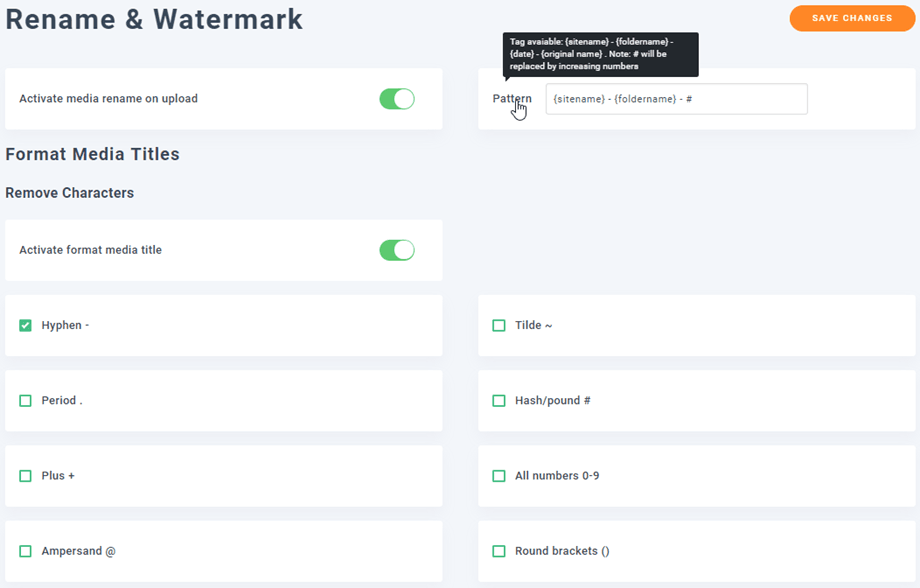
Remove characters:
- Hyphen (-)
- Tilde (~)
- Period (.)
- Hash/pound (#)
- Plus (+)
- All numbers (0-9)
- Ampersand (@)
- Round brackets (())
- Copyright (©)
- Square brackets ([])
- Curly brackets ({})
- Underscore (_)
- Copy title to 'Alternative Text' Field? (-)
- Copy title to 'Description' Field? (.)
- Copy title to 'Caption' Field? (_)
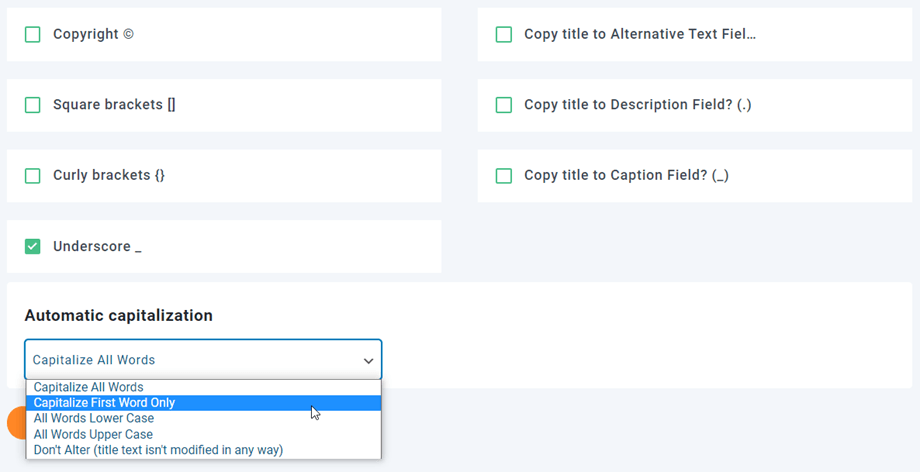
Automatic capitalization:
- Capitalize All Words
- Capitalize First Word Only
- All Words Lower Case
- All Words Upper Case
- Don't Alter (title text isn't modified in any way)
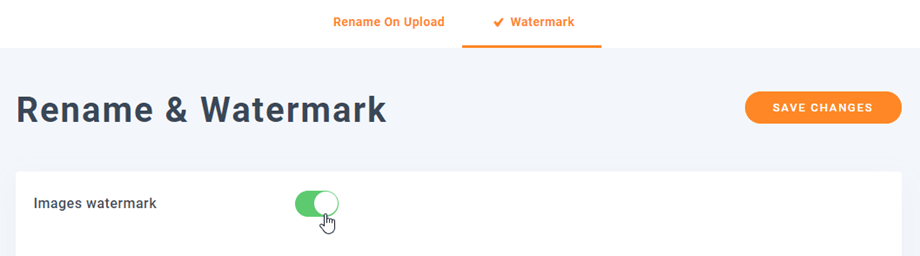
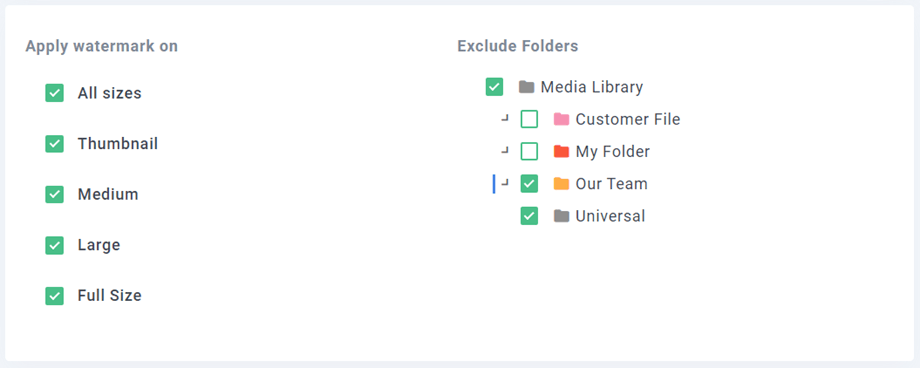
8. Image watermark
You can apply image watermarks to your media - a non-removable watermark visible by your end-users.
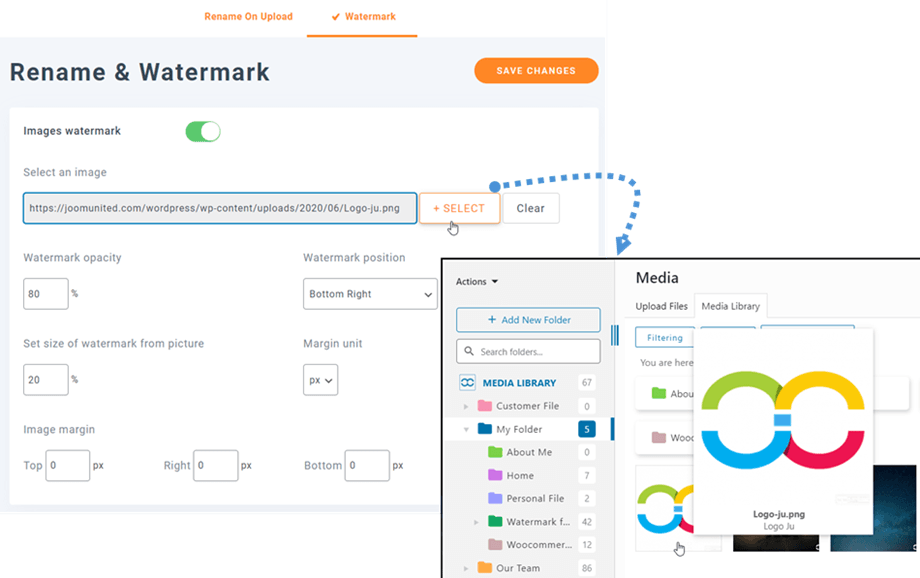
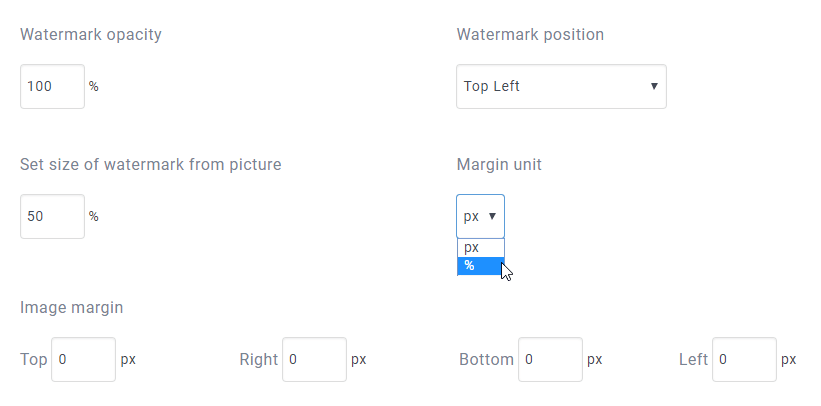
- Watermark opacity: Set the watermark opacity (0-100)
- Watermark position: Select the watermark image position
- Set size of watermark from picture: Make a watermark fit each photo size, resize the width of the watermark
- Margin unit: Select the watermark margin unit (px/%)
- Image margin: Watermark image margin (top, right, bottom and left)

9. Image Compression
ImageRecycle is a 3rd party image compression service: https://www.imagerecycle.com/
We've added the service in the left menu Settings > WP Media Folder > Image Compression because we consider it's a big performance improvement but it's not mandatory to use it. Our members can get a 20% OFF coupon on all membership from the configuration page.
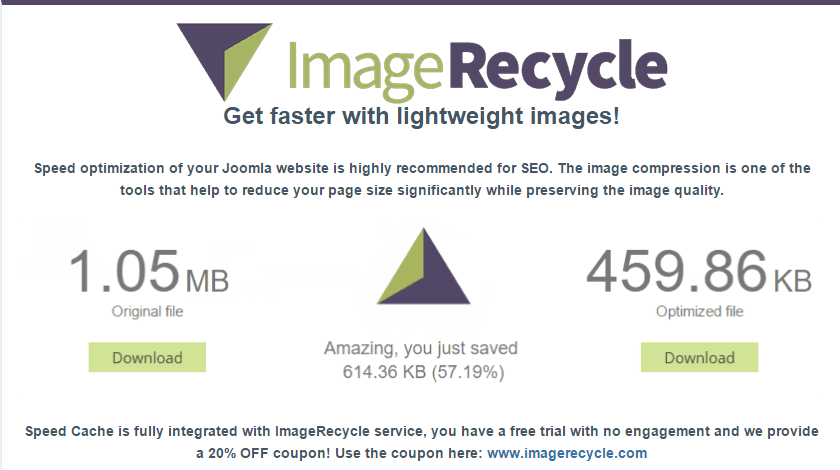
After installing, you can compress the image and pdf files at the left menu Media > ImageRecycle.
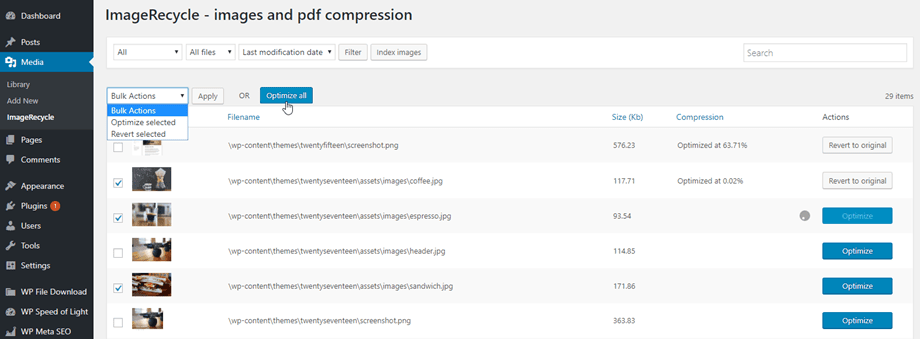
For more information you can go here: https://www.imagerecycle.com/cms/wordpress
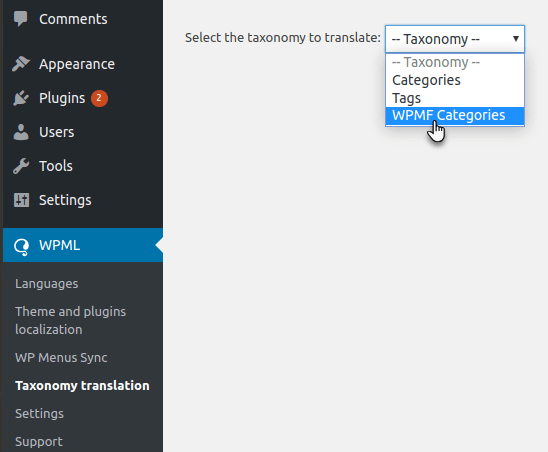
10. WPML settings
If you are using WPML and want all your files and folders are translated into all languages, please navigate to WPML > Settings > Taxonomies Translation and then tick the buttons on Not translatable column of both WPMF Categories and WPMF Gallery Categories; or just WPMF Categories if you do not use Gallery Addon.