


Instant Google Drive File Synchronization with Dropfiles for Joomla

Few cloud services are as common as Google Drive. The massive service is often used by individuals, but one lesser-known feature of the cloud behemoth is that it can also be used to share files with your Joomla blog. How? Dropfiles!
For some time now, Dropfiles has supported using Google Drive to store files on the cloud. That part is not novel, but what is new is instant file synchronization, even when files are big. This new synchronization method depends on a verified domain, which Dropfiles now handles.
Webmasters, simplify file collaboration for client websites with Dropfiles.
Empower clients to securely share and collaborate on files, boosting productivity and streamlining project workflows.
Get the competitive edge now!
Connecting Google Drive with Joomla
The journey to set up Google Drive with Joomla starts in the Google API Console. Create a project by entering its name and submitting. Then, wait for the notification that signals that the project has been created successfully.
If this is your first venture with using Google Drive in this way, you will need to enable using this API. Head to the library from the navigation menu, scroll down until you find the Google Drive icon and click it. You should be shown a button to enable the Google Drive API - click it to continue.

Back in the dashboard, which can also be accessed from the navigation menu, you will find your next destination in the sidebar on the left - the Credentials page. Navigate to the credentials page and create new OAuth Client ID credentials.
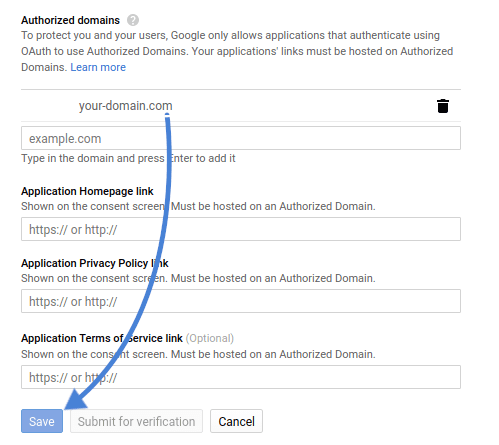
You might be prompted to choose a product name, in which case follow instructions to do so - click on the configure consent screen and set a product name. While you are here, add your domain name to the list of authorized domains. Finally, save and go back to where you left off.
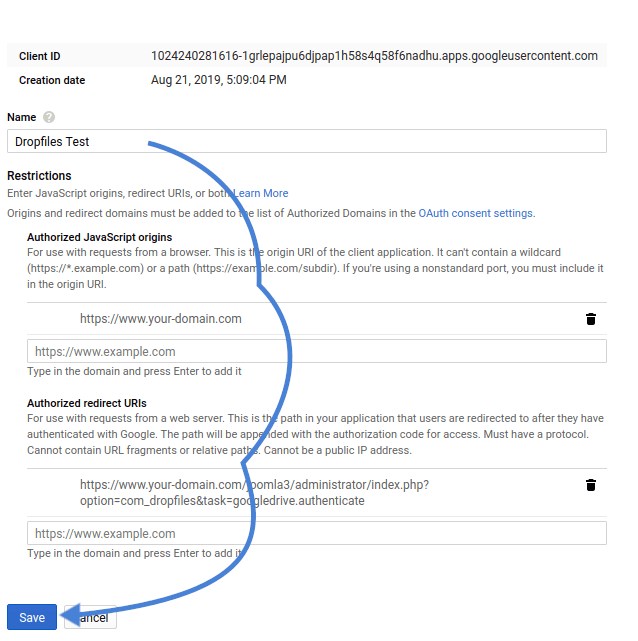
Now that you have set a product name and authorized your domain name, you can create your credentials. The application type is web application since Google Drive will synchronize with your Joomla blog. Choose a name for the client, or your blog.
Fill the Authorized JavaScript Origins with https://www.your-domain.com, replacing your-domain.com with your domain name. In the Authorized redirect URIs field, input https://www.your-domain.com/joomla3/administrator/index.php?option=com_dropfiles&task=googledrive.authenticate, again replacing your-domain.com with your domain name.
When you are ready, press on create to get your client ID and secret. Back on your blog, head to the Dropfiles settings page and copy-paste the client ID and secret into their respective fields under the cloud connection tab. Save changes and then click on connect, approving as need be.
Verifying your domain on the Google APi Console
By performing this set-up, you can now synchronize your Joomla blog with Google Drive. However, if you stop at this point, synchronization is not instantaneous, especially with big files. To do that, you need to verify your domain, which brings us back to the Google API Console.
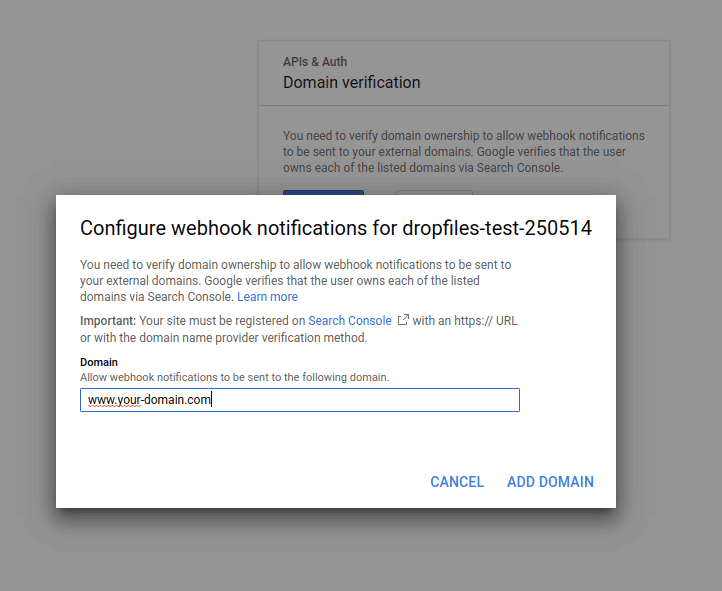
One other, as yet unexplored area in the dashboard is the domain verification tab. Navigate to this page and click on add domain. Input your domain name and submit. You will be prompted to follow a simple process - click take me there to get started.
From this page, you will first need to choose your domain name provider, or other if you cannot find them in the list. If you choose other, you will be given a TXT record, which you need to add to your DNS configuration. Once you have done so, click on verify, which should be successful. An alternative to a TXT record - CNAME - also exists.
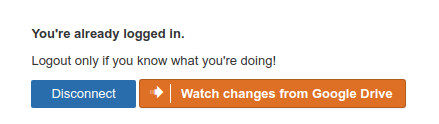
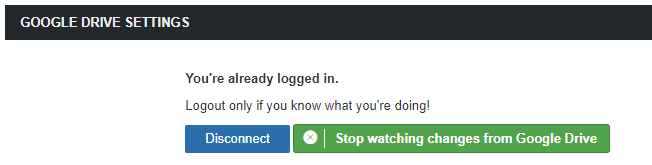
Once you have verified your domain, head back to your Joomla blog and Dropfiles’ settings. If you have not connected with Google Drive, connect now. Once you do, click on the new button next to the disconnect button - watch changes from Google Drive. If it is already enabled, you will instead see a green button that reads stop watching changes from Google Drive.
Using Google Drive to manage files with Joomla
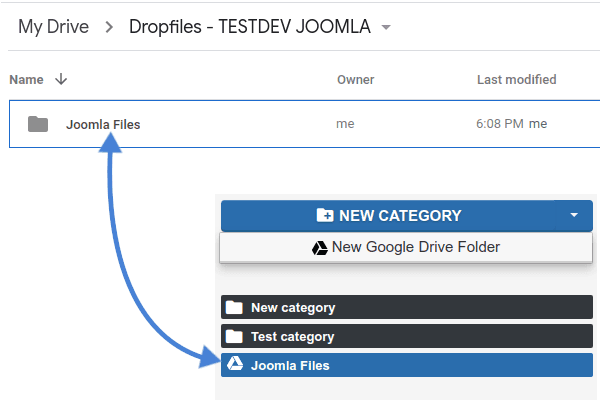
Now that the lengthy setup is complete, you can start using Dropfiles’ File Manager. By activating the Google Drive-Joomla link, Dropfiles creates a new directory in the root folder of your Google Drive space.
In your Dropfiles File Manager, apart from creating normal categories, you can also click on the dropdown to create a new Google Drive Folder. When you do that, a new folder will be created in Google Drive’s newly-created Dropfiles directory. One nagging question remains - why did you have to verify the domain?
By verifying the domain and watching Google Drive you have successfully enabled notification pushing. When you upload, change or delete a file in Dropfiles or Google Drive, the two will communicate together to mirror the changes. The synchronization is two way - from Joomla to Google Drive, and from Google Drive to Joomla - and it all happens instantaneously, including for big files!
Calling all webmasters!
Enhance your client websites with Dropfiles. Easily upload, categorize, and share files, offering clients a user-friendly and efficient way to manage their documents.
Upgrade your web design services today!
The cloud as a service is there to serve you, not create problems. With Dropfiles, you can transition between Google Drive and Joomla seamlessly. Thanks to the latest update, neither do you have to wait for the two to communicate together, or force synchronization - it happens instantaneously, and can be easily managed with the new design!
When you subscribe to the blog, we will send you an e-mail when there are new updates on the site so you wouldn't miss them.


Comments